XP-142E System Reference-SYS-XP142-2.0E.pdf.pdf - 第45页
2.1.2 Operation Mode The machine has three modes of operation, “Sequence”, “Step” and “Pause”. These modes of operation have different purposes as is explained below. Sequence: Use Sequence for assembly. In this mode the…
2.1.1 Production Mode
There are four modes of production: “Product”, “Idle 1”, “Idle 2”, and “Pass”. Details of
each mode are explained below.
Product: This mode is used during assembly. Parts are picked up, inspected, and
placed on the panel.
Idle 1: This mode is selected primarily for machine adjustment and test run
operations. The nozzle moves to the part pickup position, and actually feed
the part. The feeder should be removed from the MFU to prevent parts
from being scattered.
Idle 2: This mode is selected primarily for machine adjustment and test run
operations. In this mode, the nozzle moves to the part pickup position, but
does not feed the part. It is not necessary to remove the feeders from the
MFU.
Pass: Pass mode is used when the machine is not used in current production. In
pass mode the machine simply acts as a conveyor, moving the panel on to
the next machine in the line.
Procedure
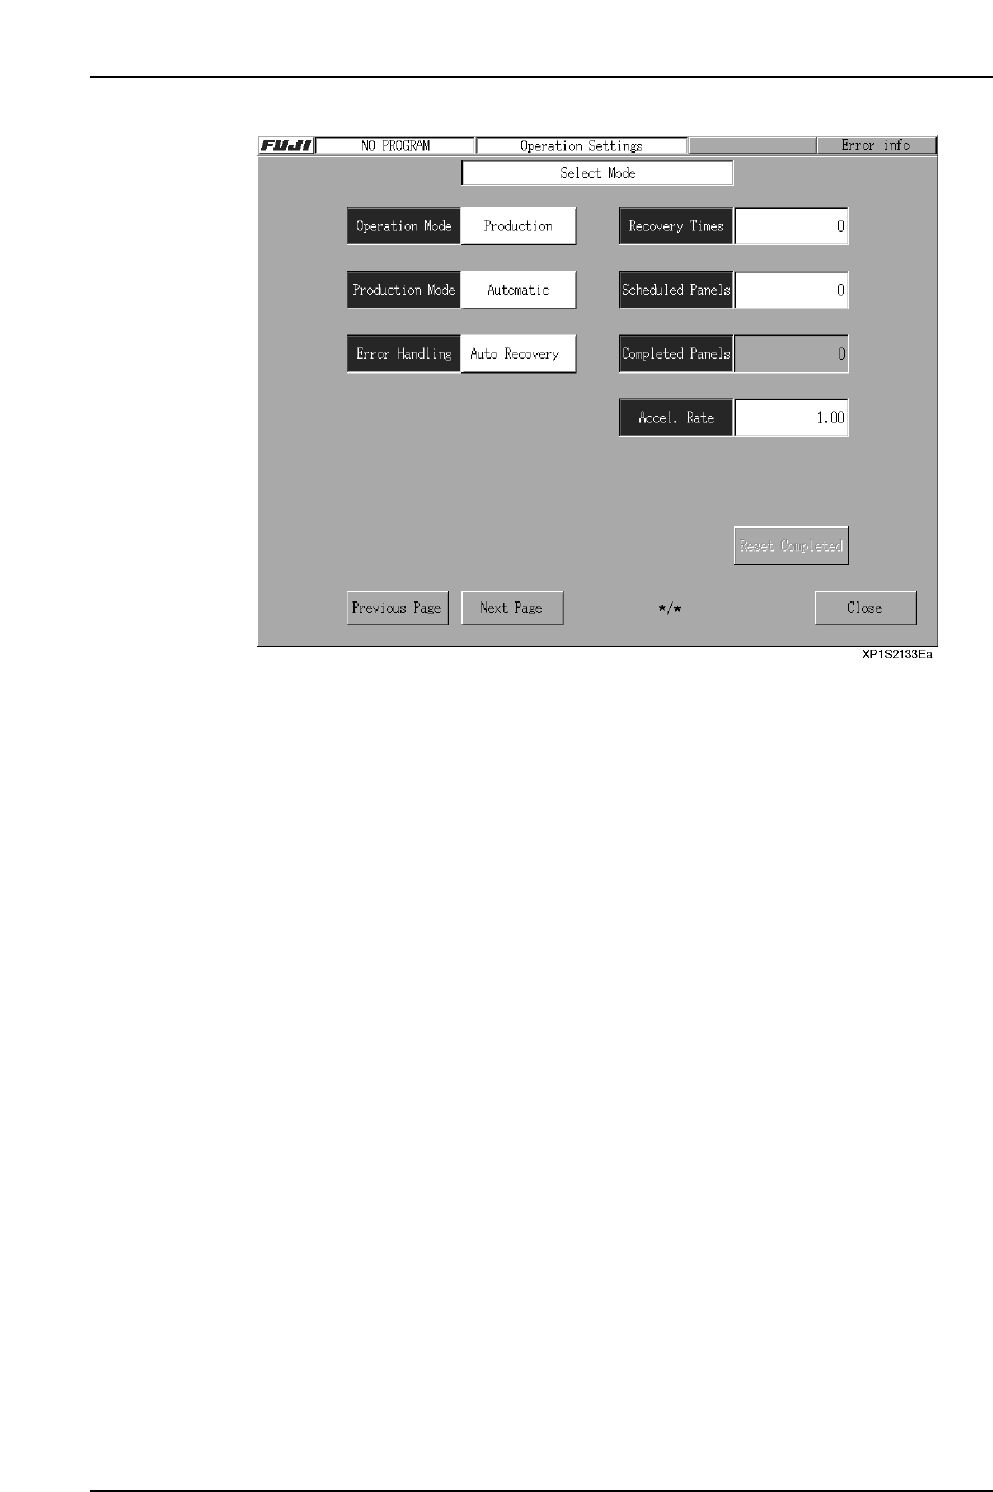
1. At the [Main] screen, press [Maintenance A] then [Operation Settings] to display
the [Operation Settings] screen.
2. Select the desired mode from the “Product”, “Idle 1”, “Idle 2”, “Pass” candidates
at the upper left of the screen.
3. Press [Close] to return to the [Main] screen.
Part 2 Chapter 2 Settings Prior to Start Production
Edition 2.0 2-2-2 XP-142E System Reference

2.1.2 Operation Mode
The machine has three modes of operation, “Sequence”, “Step” and “Pause”. These
modes of operation have different purposes as is explained below.
Sequence: Use Sequence for assembly. In this mode the machine operates
continuously, performing each of the sequences defined in the program.
Step: Use Step to test the operation of the machine. In this mode the machine
performs one sequence at a time, and the START button must be pressed to
perform the next sequence.
Pause: The “Pause” mode is used to perform machine test runs. In this mode,
machine operation is divided into several cycles. Press the [CYCLE STOP]
button to pause, then press [Start] to resume operation beginning from the
next sequence. Operation proceeds to the next cycle each time the START
button is pressed.
Procedure
1. At the [Main] screen, press [Maintenance A] then [Operation Settings] to display
the [Operation Settings] screen.
2. Select the desired mode from the “Sequence”, “Step”, “Pause” candidates at the
upper left of the screen.
3. Press [Close] to return to the [Main] screen.
2.1.3 Error Handling
The machine can be set to react differently to a parts error. Parts error refers to parts
pick-up and parts inspection errors. There are three modes of operation triggered by a
parts error, “Auto Recovery”, “Error Stop” and “Error Pass” which can be changed by
the operator.
Auto Recovery: The machine will repeat a sequence it failed to carry out (due to a
pick-up miss or part inspection error) up to the specified number of
times (this is referred to as the ”Recovery Limit”).
Error Stop: The machine stops if a pick-up miss or part inspection error occurs.
Error Pass: The machine ignores pick-up miss or part inspection errors, and
continues operation.
Procedure
1. At the [Main] screen, press [Maintenance A] then [Operation Settings] to display
the [Operation Settings] screen.
2. Select the desired mode by pressing the recovery mode button.
3. Press [Close] to return to the [Main] screen.
Part 2 Chapter 2 Settings Prior to Start Production
Edition 2.0 2-2-3 XP-142E System Reference

2.1.4 Recovery Limit
The recovery count limit setting can be specified in part data or on the machine. The part
data setting has priority, however, when set to other than “0”.
This setting determines the number of recovery attempts which occur in response to part
pick-up or vision processing errors. The procedure for specifying the recovery count
limit setting on the machine is shown below.
Procedure
1. At the [Main] screen, press [Maintenance A] then [Operation Settings] to display
the [Operation Settings] screen.
2. At the [Recovery times] item (upper right of screen), press the numeric value to
display a numeric keypad, then enter the desired recovery count value and press
[CR]. Input range is 0 ~ 9.
3. Press [Close] to return to the [Main] screen.
2.1.5 Production Quantity
Specify the number of panels that are scheduled to be produced using the production
program currently selected for use.
If the program’s production quantity is already set, however, this “production quantity”
setting item is disabled. If the production quantity setting and the production quantity
indicated in the program are both “0”, production will continue until interrupted.
Procedure
1. At the [Main] screen, press [Maintenance A] then [Operation Settings] to display
the [Operation Settings] screen.
2. Press the numeric value at the screen’s “Scheduled Panels” item to display the
numeric keypad. Enter the desired “Scheduled Panels” value, then press [CR].
Input range is 0 ~ 9999.
3. Press [Close] to return to the [Main] screen.
2.1.6 Number of Completed Panels
Reset the number of completed panels to 0. Use this command when the counter needs
to be returned to 0.
Procedure
1. At the [Main] screen, press [Maintenance A], then [Operation Settings] to display
the [Select Mode] screen.
2. Select [Reset Completed Panels] and a message box is displayed. To reset the
number of completed panels to 0 press [Yes], otherwise press [No].
3. Press [Close] to return to the [Main] screen.
Part 2 Chapter 2 Settings Prior to Start Production
Edition 2.0 2-2-4 XP-142E System Reference