KE2010.Instruction Manual.Ver.2.01,Rev.08.pdf - 第632页
8 − 43 2) Side lig ht This contr ol item t urns on and/or off t he side light. - W hen the control item " Side light" is checked, click the <ON>, <OFF> or <ON/OFF> but ton or press t he F3 , F…
8 − 42
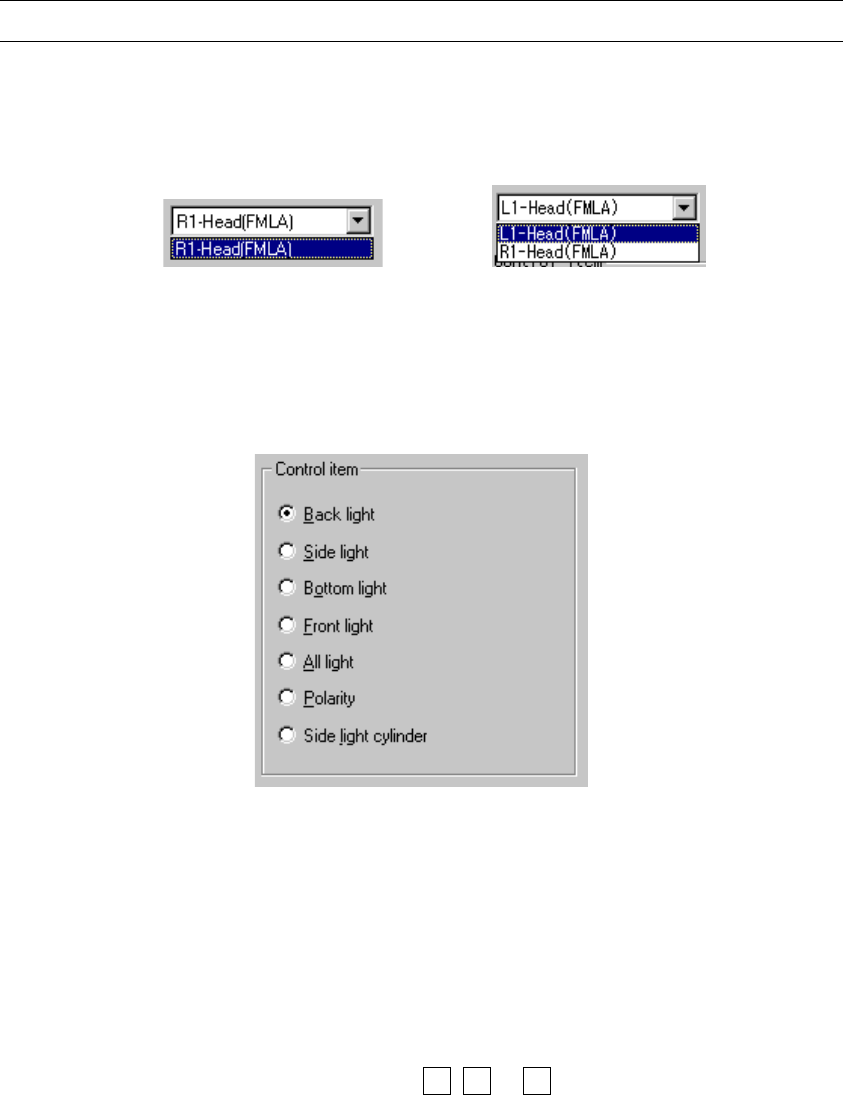
(2) Control head
Select a head to be controlled from the combo box.
This selection will not affect the setting of the "Device enable" dialog box invoked
from the Machine setup menu (you can select a unit not checked (that is, not
enabled)).
Note: You can select the FMLA head only.
* When you press the down arrow key while holding down the Alt key, the
following list appears on the screen.
(KE-2020) (KE-2040)
(3) Control item
Select a control item with the corresponding radio button.
(4) Control button
With the control button, execute the control item you selected.
The displayed control buttons vary depending on the control item you selected.
1) Back light
This control item turns on and/or off the back light.
- When the control item "Back light" is checked, click the <ON>, <OFF> or
<ON/OFF> button or press the F3, F4 or F5 key to control the back light.
- If you click the <Setting> button or press the F6 key when the control item
"Back light" is checked, the "Light setting" dialog box appears on the
screen.
The state of the back light is updated when the back light is controlled
completely.

8 − 43
2) Side light
This control item turns on and/or off the side light.
- When the control item "Side light" is checked, click the <ON>, <OFF> or
<ON/OFF> button or press the F3, F4, or F5 key to control the side
light.
- If you click the <Setting> button or press the F6 key when the control item
"Side light" is checked, the "Light setting" dialog box appears on the
screen.
The state of the side light is updated when the side light is controlled
completely.
3) Bottom light
This control item turns on and/or off the bottom light.
- When the control item "Bottom light" is checked, click the <ON>, <OFF>
or <ON/OFF> button or press the F3, F4, or F5 key to control the bottom
light.
- If you click the <Setting> button or press the F6 key when the control item
"Bottom light" is checked, the "Light setting" dialog box appears on the
screen.
The state of the bottom light is updated when the bottom light is controlled
completely.
4) Front light
This control item turns on and/or off the front light.
- When the control item "Front light" is checked, click the <ON>, <OFF> or
<ON/OFF> button or press the F3, F4, or F5 key to control the front light.
- If you click the <Setting> button or press the F6 key when the control item
"Front light" is checked, the "Light setting" dialog box appears on the
screen.
The state of the front light is updated when the front light is controlled
completely.
5) All light
This control item turns on and/or off the all lights.
- When the control item "All light" is checked, click the <ON>, <OFF> or
<ON/OFF> button or press the F3, F4 or F5 key to control the all lights.
- If you click the <Setting> button or press the F6 key when the control item
"All light" is checked, the "Light setting" dialog box appears on the screen.
The state of the all lights is updated when the all lights are controlled
completely.
8 − 44
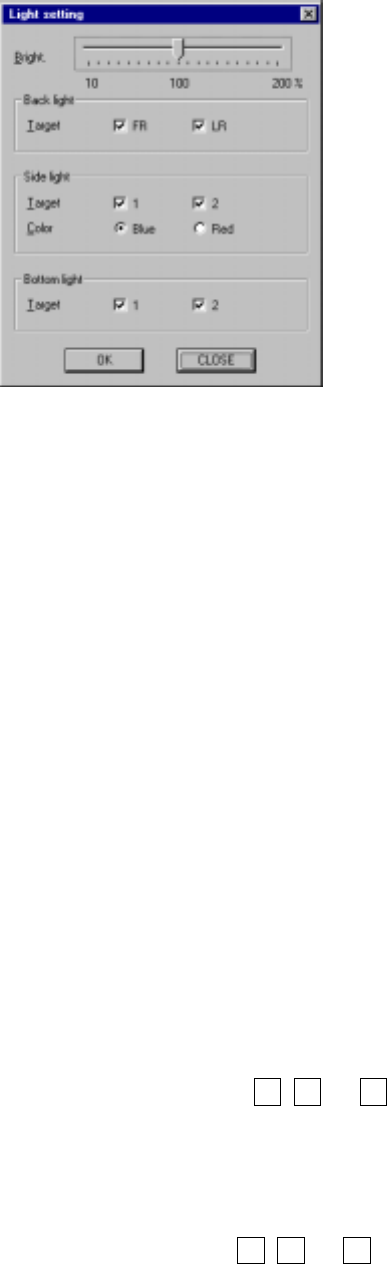
Figure 8.4.2 Light setting dialog box
- Bright
Move the slide bar to set the brightness.
To move the slide bar, press any of arrow keys, PgUp key or PgDn key.
- Back light
Select which light is to be controlled with checking the corresponding
check box.
- Side light
Select which light is to be controlled with checking the corresponding
check box.
Select the color with the corresponding radio button.
- Bottom light
Select which light is to be controlled with checking the corresponding
check box.
−
When you click the <OK> button, the lights are turned on under the
conditions you set here.
−
When you click the <CANCEL> button, your settings are canceled.
6) Polarity
This control item controls the polarity: negative or positive.
When the control item "Polarity" is checked, click the <Positive>, <Negative>
or <Positive/Negative> button, or press the F3, F4, or F5 key.
7) Side light cylinder
This control item turns on and/or off the side light cylinder.
When the control item "Side light cylinder" is checked, click the <ON>,
<OFF> or <ON/OFF> button or press the F3, F4, or F5 key to control the
side light cylinder.
The state of the side light cylinder is displayed when it is controlled
completely.
(5) State display