KE2010.Instruction Manual.Ver.2.01,Rev.08.pdf - 第717页
11 − 8 − W hen this option is not check ed, the number of boards produced is cleared to "0" when the <START > key is pressed. ④ Change to the pr oduction screen when start select ed (HLC only) − Using the…
11 − 7
11.4.2 Setting the Production (Display) option
When you select the [Options] command on the menu bar, then [Option Setting]
command on the Options menu, the Operation option setting dialog box appears on
the screen.
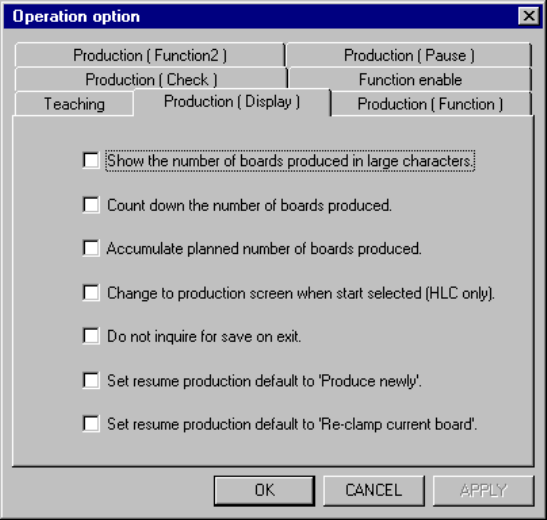
When you select the <Production (Display)> tag, the <Production (Display) > option
setting dialog box appears on the screen as shown in Figure 11.4.2.
Figure 11.4.2 <Production (Display)> option setting dialog box
(1) How to set the item
① Show the number of boards produced in large characters.
− Using the check box, set the display mode of the number of boards
produced.
− When this option is checked, the number of boards produced during a
production run is shown in the upper case.
② Count down the number of boards produced.
− Using the check box, display the number of boards produced or to be
produced.
− When this option is checked, the number of remaining boards to be
produced is shown.
− When it is not checked, the number of boards already produced is shown.
③ Accumulate planned number of boards produced.
− Using the check box, set how to update the number of boards produced.
− When this option is checked, the number of boards adds up and is
accumulated until the production management information is cleared (the
total number is shown).

11 − 8
− When this option is not checked, the number of boards produced is cleared
to "0" when the <START> key is pressed.
④ Change to the production screen when start selected (HLC only)
− Using the check box, execute the automatic change of the screen to the
production start screen with HLC.
− When this option is checked, and you use the HLC to start PWB production
in the initial (Main menu) state, the screen automatically changes to the
production condition (PWB production) screen after the production
program data is downloaded from HLC has been completed.
Notes:
−
This option is effective only when "HLC connection" of the
multistation line setting on the Machine setup is set to "Connect".
−
The screen will not change if there is something wrong in the
production program data which has been downloaded from the
HLC.
⑤ Do not inquire for save on.
− Using the check box, display the message which asks whether to save the
production program when quitting the production condition screen.
− When this option is turned ON, the Exit dialog box does not appear when
quitting the production condition screen.
⑥ Set resume production default to 'Produce newly'.
− Using this check box, specify which radio button is checked by default,
“Continue the production” or “Produce newly” on the “Processing before
production begins” dialog box (if there is a continuous production file) that
appears when you press the <START> switch.
− When you check this check box, the radio button “Produce newly” is
checked by default on the “Processing before production begins” dialog
box (if there is a continuous production file).
− When you do not check this check box, the radio button “Continue the
production” is checked by default on the “Processing before production
begins” dialog box.
⑦ Set resume production default to 'Re-clamp current board'.
− Set the default for production operation if there is a continuous production
file when the “Before start production” dialog box appears on the screen
and you can select the initial production (by checking the radio button
“Produce after PWB enter.” or “Produce after PWB re-clamp.”).
− When you check this check box, the radio button “Produce after PWB
re-clamp.” is selected.
− When you do not check this check box, the radio button “Produce after
PWB re-clamp.” is selected.
When you validate the selected item(s), click the <OK> button. If you do not want to
set any option, click the <CANCEL> button.

11 − 9
11.4.3 Setting the Production (Function) options
When you select the [Options] command on the menu bar, then [Option Setting]
command on the Options menu, the Operation option setting dialog box appears on
the screen.
When you select the <Production (Function)> tag, the <Production (Function)> option
setting screen appears as shown in Figure 11.4.3.
Figure 11.4.3 Production (Function) option setting screen
(Screen example when a KE-2030 is used)
(1) How to set the item
① Auto-correct pick position.
− Using the check box, perform the pick up position correction.
− When this option is checked, the pick point is corrected based on the
centered position.
− When this option is not checked, the "pick up position correction" setting of
the "Component Data" is ignored, then the correction is not performed.
② Check release of component after placing completion.
− Using the check box, check to see if a component is apart from the nozzle
when it is placed.
− When this option is checked, using the laser, the system checks if there is
no component on the nozzle when the Z axis moves up after a component
is placed.
− When this option is not checked, the setting "Component release check" of
"Component Data" is ignored, then the system does not check whether a
component is released.