MR8740、MR8741_user_manual_eng_20191016H.pdf - 第100页
4.2 Saving Data 88 Measurement data are acquired for the recording length and th en saved automatically each time. Save location and data typ e are selected before the measuremen t. Waveform data can be saved. 4.2.2 Auto…
4.2 Saving Data
87
4
Chapter 4 Saving/Loading Data & Managing Files
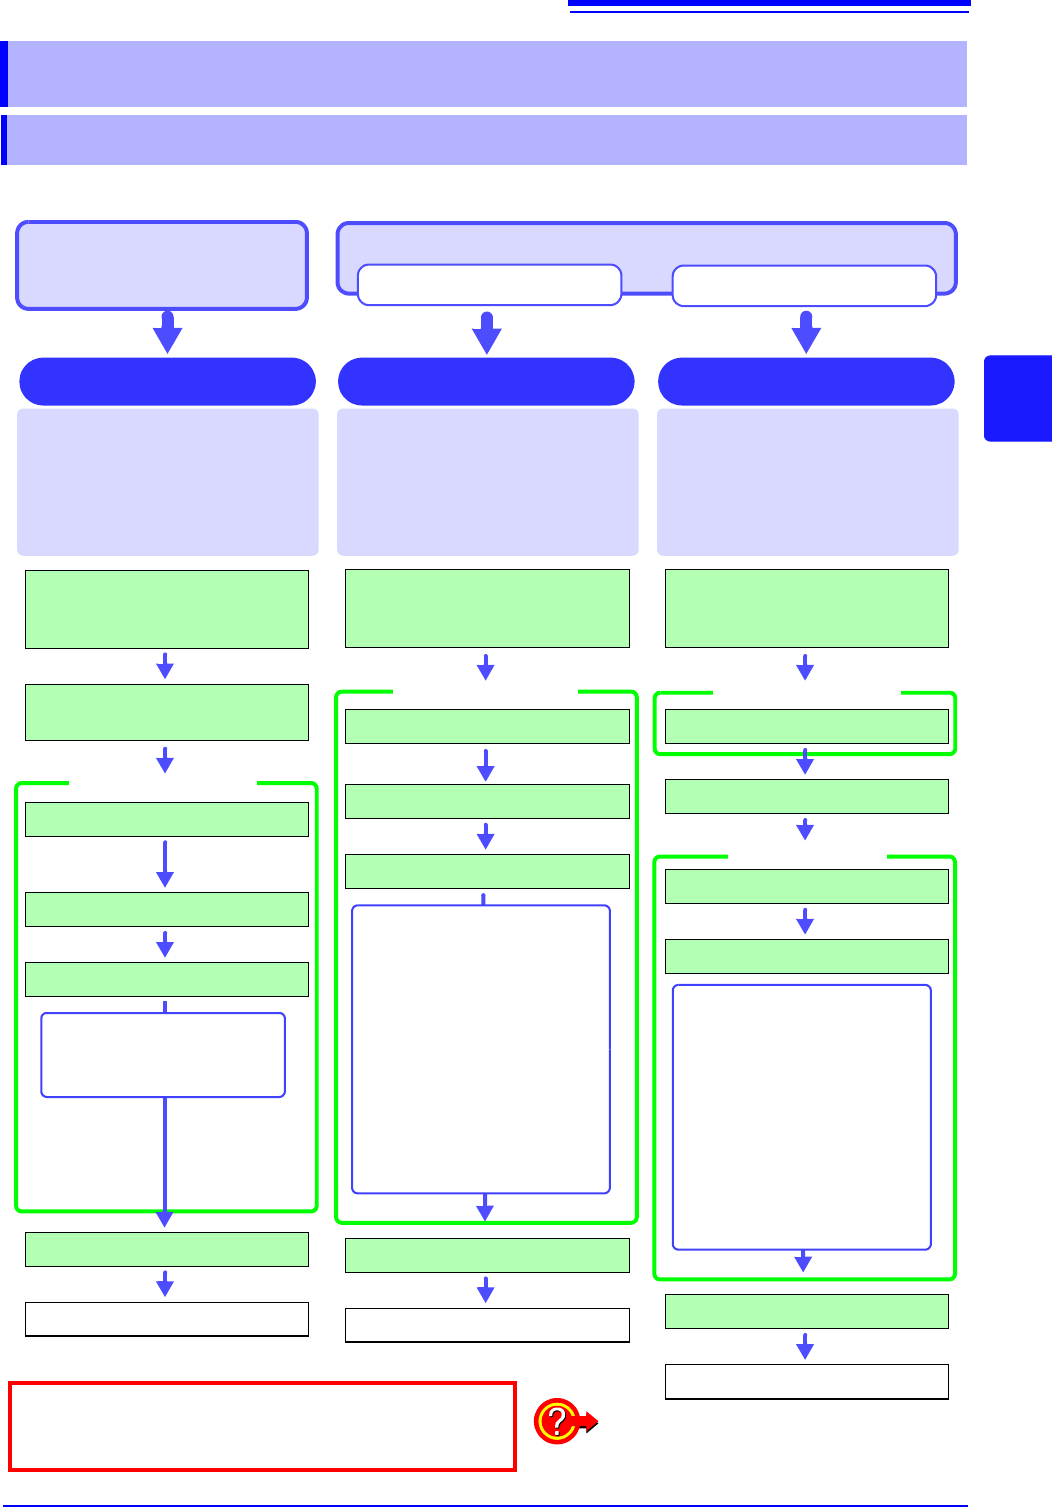
There are basically three types of save operations.
4.2 Saving Data
4.2.1 Save Types and Workflow
To save data automatically
during measurement
(p.88)
To save data manually with [SAVE] (p.93)
Auto Save
This is convenient for saving multi-
ple times and for quick saving of
data during monitoring. Before click-
ing [SAVE], the data content is
specified. (p.93)
(default setting)
Click [SAVE] and then specify the
data content for saving. Because no
settings on the [File Save] sheet are
necessary, save settings can be
made from any screen. (p.93)
Quick Save Selection Save
Measurement data are acquired for
the recording length and then saved
automatically each time. Save loca-
tion and data type are selected be-
fore the measurement. (p.88) Data
are saved on USB memory stick.
Save data straight away
Select data and save
After installation and connection,
turn the power on.
Insert the storage media.
Set the measurement configura-
tion.
Set [Auto Save] to [On].
Select the save destination.
Select the data to save.
Measure
Auto Save
[File Save] sheet
• Waveform data
• Numerical calculation
results*
After installation and connection,
turn the power on.
Insert the storage media.
Set [Select at save] to [No].
Select the save destination.
Select the data to save.
Click [SAVE]
Save
[File Save] sheet
Any of the following can be
saved:
• Setting data
• Waveform data
• Display screen
• Waveform screen
• Numerical calculation results
• Waveform evaluation
setting data
• Waveform evaluation area
• Pulse pattern data
• Arbitrary waveform data
• Program data
After installation and connection,
turn the power on.
Insert the storage media.
Set [Select at save] to [Yes].
Click [SAVE]
Select the save destination.
Select the data to save.
Select [Exec]
Save
[File Save] sheet
Dialogue
Any of the following can be saved:
• Setting data
• Waveform data
• Display screen
• Waveform screen
• Numerical calculation results
• Waveform evaluation
setting data
• Waveform evaluation area area
• Pulse pattern data
• Arbitrary waveform data
• Program data
Check points before saving:
• Media inserted and initialized? (p.53), (p.54)
• Save target specified correctly?
• Auto Save set to [On]? (For auto-saving)
*: To save numerical calculation results
See: "9.4 Saving Numerical Calculation
Results" (p.221)
4.2 Saving Data
88
Measurement data are acquired for the recording length and then saved automatically each time.
Save location and data type are selected before the measurement.
Waveform data can be saved.
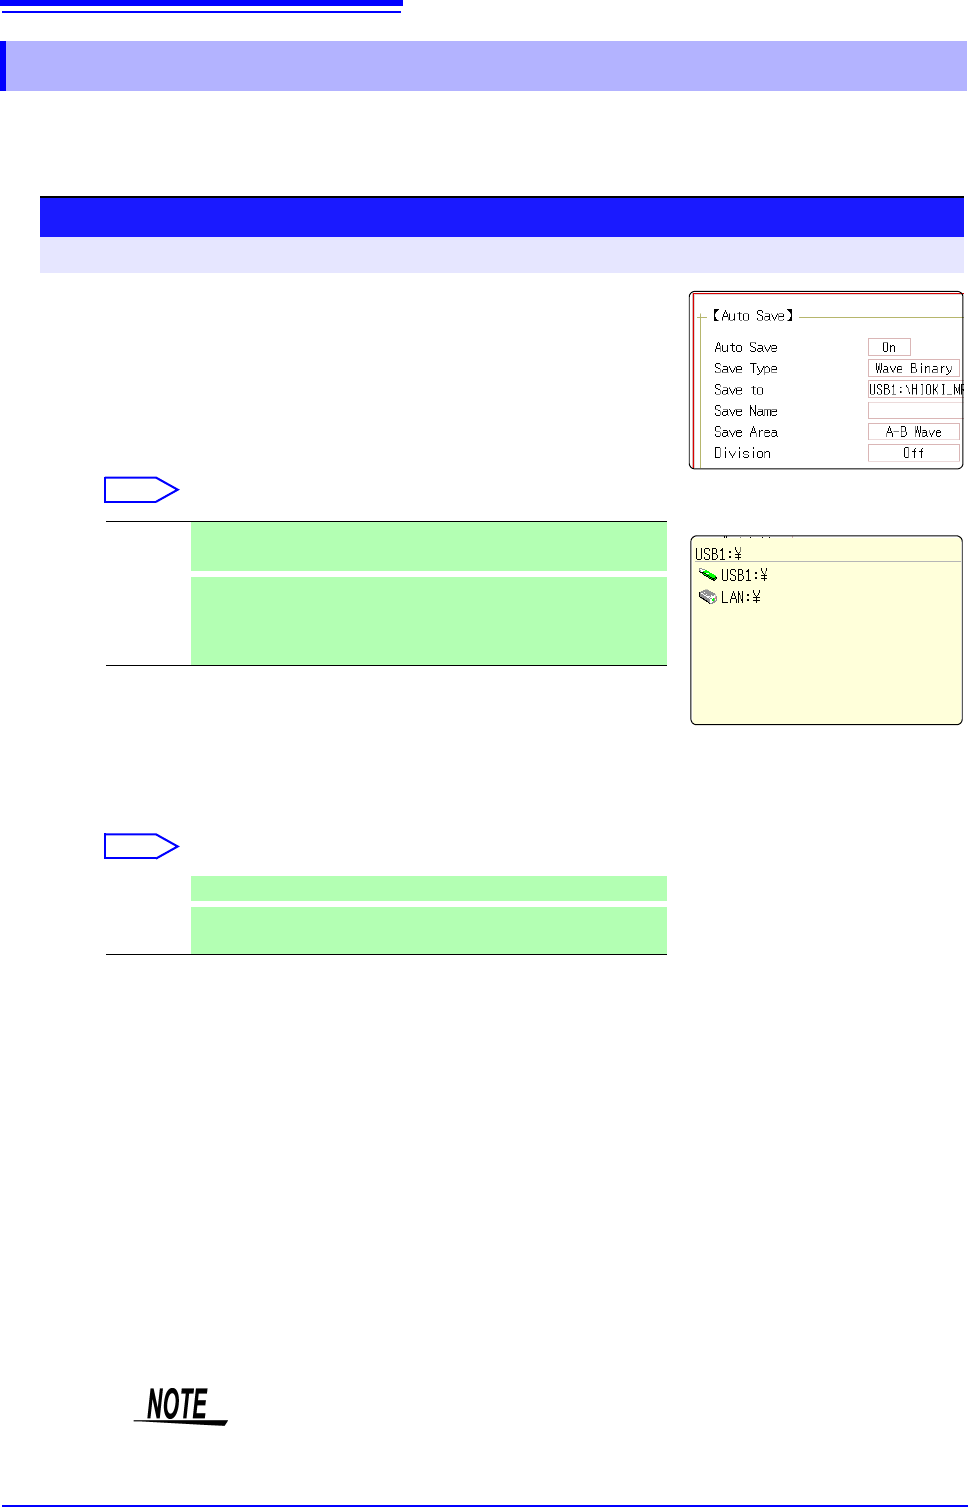
4.2.2 Automatically Saving Waveforms
Procedure
To open the screen: Right-click and select [SYSTEM] [File Save] sheet
1
Enable auto save.
Move the flashing cursor to the [Auto Save] item, and select [On].
Default setting: Off (automatic saving is not performed)
2
Set the save type.
Move the flashing cursor to the [Save Type] item.
Select
3
Set the save destination.
Move the flashing cursor to the [Save To], and select [Edit].
The Browse folders dialog box appears (at bottom right).
Move the flashing cursor to the save target media
*
and confirm
the setting with [Confirm].
Select
When the root directory (topmost folder on media) was selected, a folder named
"HIOKI_MR8740" or "HIOKI_MR8741" is created automatically. (If the media was
initialized in the instrument, the folder will already have been created.) This folder
is then used as save target.
To create a new folder, select [New Folder]. When [LAN] is set
as the save destination, [New Folder] setting is ignored and the
folder named with the current date is created.
4
Set the file name.
Move the flashing cursor to the
[Save Name]
, and enter the save
name.
See: "7.1.3 Alphanumeric Input" (p.141)
When [LAN] is set as the save destination, [Save Name] setting is
ignored and the files to be saved are named in the previously-
determined format.
See:
"Save Operations (When setting the save destination to [LAN])"(p.92)
Wave
Binary
Save the waveform data in binary format.
(Data saved in binary format can only be loaded to this instrument.)
Wave
Text
Save the waveform data in text format.
The data can be thinned out and then saved.
(This data can be opened by a computer editor or spreadsheet
software, but it cannot be loaded to this unit.)
USB1 Automatically save the waveform data on the USB memory stick.
LAN
Automatically save the waveform data on the PC connected via
LAN. Model 9333 LAN Communicator is required to be installed.
1
2
3
4
File name
The maximum number of characters for the [Save Name] string is 123. The
maximum path length including file name is 255 characters.
4.2 Saving Data
89
4
Chapter 4 Saving/Loading Data & Managing Files
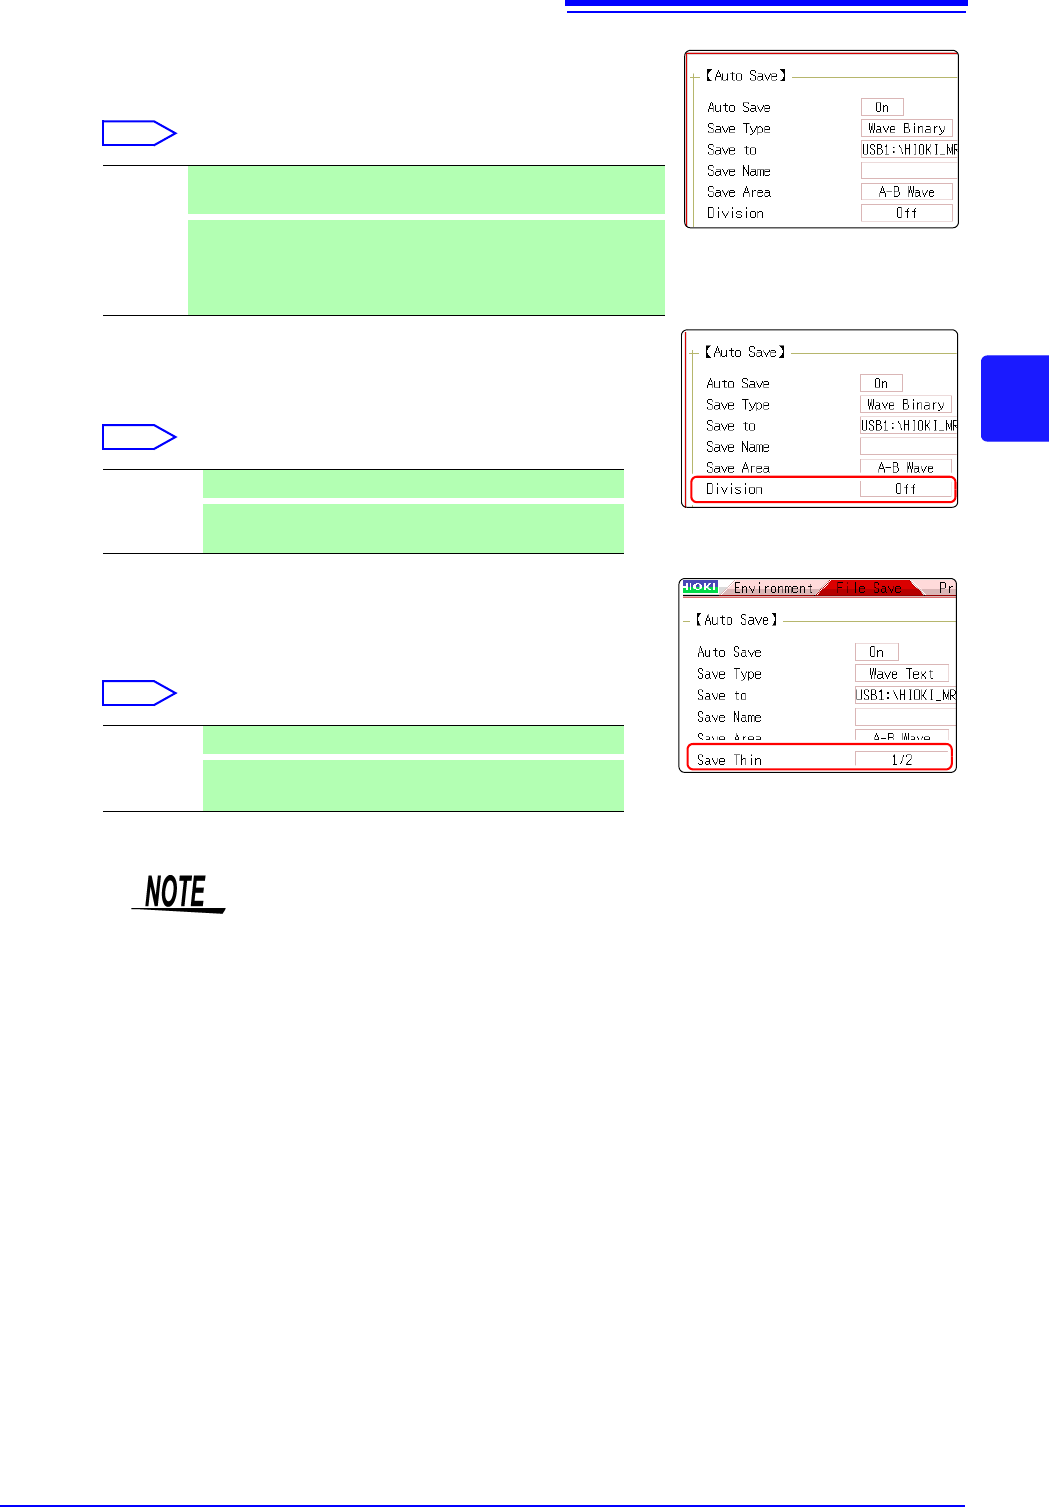
5
Select the save area.
Move the flashing cursor to the [Save Area] item.
Select
6
(When [Wave Binary] is the selected save type)
Select whether to save divided files
Move the flashing cursor to the [Division] item.
Select
(When [Wave Text] is selected as the save type)
Set the data thinning number.
Move the flashing cursor to the [Save Thin] item.
Select
Whole
Wave
Save all recorded data. (default setting)
A-B
Wave
Save the data between the A and B cursors. If only the A cursor is
used, the range from the A cursor position to the end of the data is
saved.
A/B cursor Specification Method (p.120)
Off Files are not divided when saved.
16M, 32M
64M
Select the size for divided save.
Off Data thinning (sub-sampling) is not carried out.
1/2 to
1/1000
Set the thinning number (out of how many data items to
leave one data item remaining).
5
About the save area
• If the MR8990 is installed, one data item more than the number of data items
specified with the A and B cursors may be saved.
• The data that is measured and saved with the MR8990 will be the same data
twice in a row.
About divided saving
• Large quantities of waveform data can be divided and saved as multiple files.
• Saving divided data makes a folder automatically, and creates one or more
waveform files and an index (IDX) file in the folder.
• Then by loading the IDX file, the data in the waveform file(s) is loaded as a
batch.
• When divided saving is selected, delete save is not available.
• When using the memory division function, divided saving cannot be performed
automatically.
See: "Batch load of waveform data"(p.101)
"Memory Division Function"(p.241)
Thinning
A large amount of space is required for saving files in text format. Data thinning
enables a reduction in file size.
Example: When [1/2] is set, every second data item is saved. The number of
data items is reduced to a 1/2.