MR8740、MR8741_user_manual_eng_20191016H.pdf - 第328页
15.1 LAN Settings and Connection (Before Usin g FTP/Internet Browser/Command Communications) 316 MR8740/MR8741 is not equipped with a DHCP fu nction. There are tw o methods to install the instrument (MR8740/ MR8741) to a…

15.1 LAN Settings and Connection (Before Using FTP/Internet Browser/Command Communications)
315
12
Chapter 15 Connection to a Computer
14
15
Setting Items
Authorization User
Name and Password
These are used when you login to the instrument by FTP, or use a PC browser
(with the authorization setting set to on).
When authorization is enabled, login is not possible unless a correct user name
and password are entered. This setting is recommended if you wish to restrict
the users who can access the instrument.
The "Password" item is displayed as "************".
Valid characters: Alphabetic characters and symbols (however, ":" (colon) can-
not be used)
If you want to allow anyone to access, or you wish to login as "anonymous" with
a FTP client, leave the user name and password fields blank.
Interface LAN
Host Name This is a name that identifies the instrument on the network. Assign a host name that
is different from the names of all other devices. This instrument does not support dy-
namic DNS, the name that you set is not registered with a DNS server.
IP Address This is an address that identifies an individual device on a network.
Assign an address that is different from the addresses of all other devices.
Subnet Mask This is a setting used to divide an IP address shown to the network into a network
address and a host address. Use the same subnet mask for all devices in the same
network.
Gateway
IP Address
For network connections:
When your PC (or the communicating device) is on another network than this instru-
ment, set this to [On] and specify the gateway device. When the PC is on the same
network, this is usually set to the same address as the default gateway in the PC
communications settings.
15.1 LAN Settings and Connection (Before Using FTP/Internet Browser/Command Communications)
316
MR8740/MR8741 is
not equipped with a
DHCP function.
There are two methods to install the instrument (MR8740/MR8741) to a network
using a DHCP server to assign IP addresses.
(1) Ask your network system administrator to provide an available IP address,
which is out of the range of the IP addresses the DHCP server leases, and
assign it as the static IP address to the instrument.
(2) Forward incoming traffic addressed to the IP address assigned by the
DHCP server via a router.
It is recommended to employ the former method (1) to assign the static IP
address to the instrument because the latter method (2) will make the setting
configuration complicated and require additional work to verify the IP address
assigned by the DHCP server.
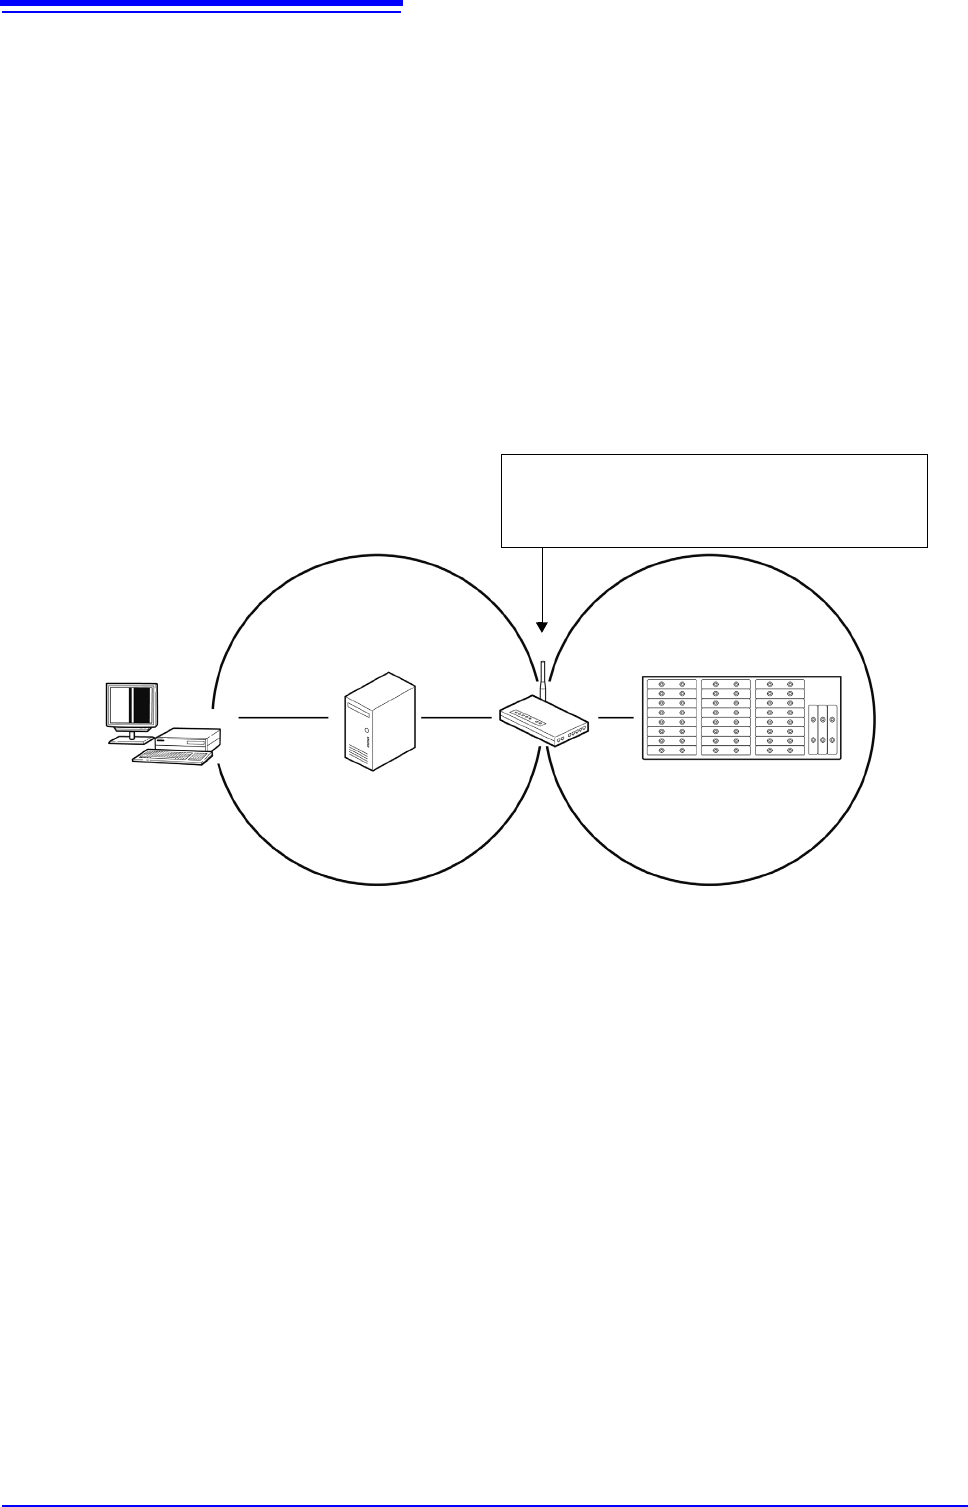
As the figure below indicates, install the router between the DHCP server and
the instrument. Contact your dealer or Hioki representative for more information.
Router installation
WAN port: IP address is automatically assigned by a DHCP server.
LAN port : Static IP address needs to be manually assigned.
Set up port forwarding to forward incoming traffic to this instrument
when the router receives it from PC.
Model MR8740
Model MR8741
Router
DHCP Server
PC
IP adress range assigned by DHCP server. Use static IP address.
15.1 LAN Settings and Connection (Before Using FTP/Internet Browser/Command Communications)
317
12
Chapter 15 Connection to a Computer
14
15
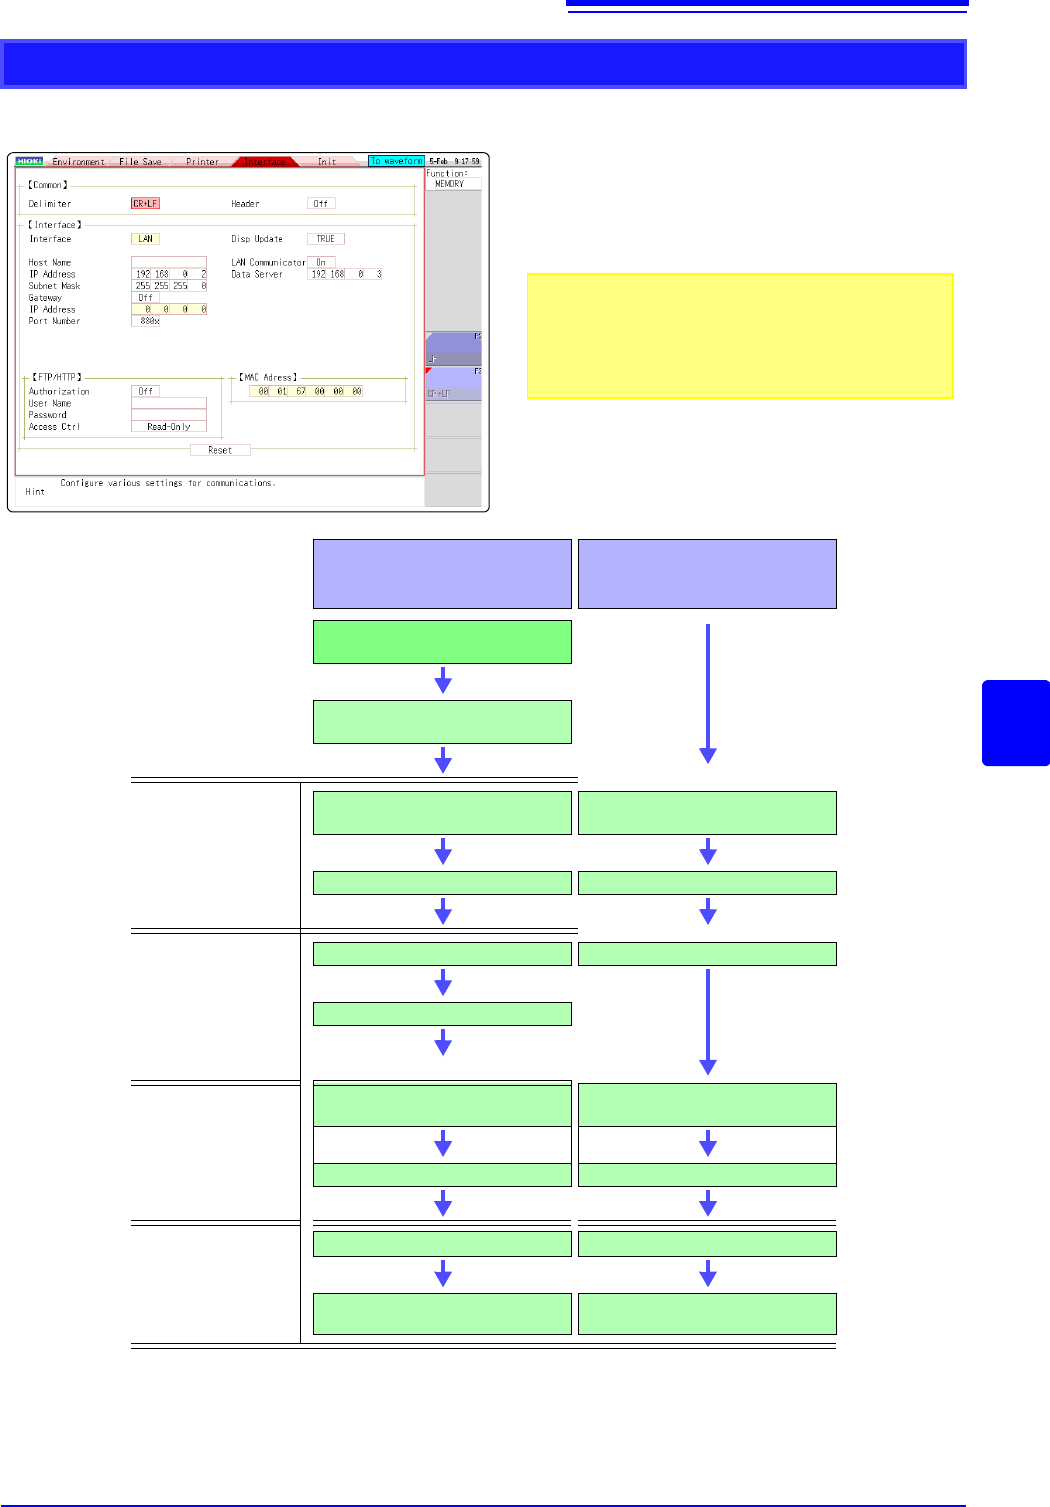
Click [SYSTEM] in the right-click menu to display the Communications sheet. According to the intended use,
make settings as outlined below.
LAN Setup Workflow
Use the mouse to move the flashing cursor
and select a setting item.
See: "7.1.3 Alphanumeric Input" (p.141)
For details on each setting, see "Setting Items" (p.315).
About the network
For IP address information and other details about the net-
work you are using, contact your network administrator.
(8)
(1)
(2)
(3)
(4)
(5)
(6)
(7)
Purpose
When Connecting to an
Existing Network
When Configuring a New
Network with a PC and
This Instrument
Use specified IP address and
connect to network
To assign a name to the instrument,
make a setting for (1) [Host Name]
Settings within same
network
(2) Set [IP Address] for this
instrument
(2) Set [IP Address] for this
instrument
(3) Set [Subnet Mask] (3) Set [Subnet Mask]
Settings for connecting
to other network
(Using gateway)
(4) [Gateway]: On
(4) Set [Gateway]: Off
(5) Set gateway [IP Address]
Settings for remote
operation and data
acquisition by using
Model 9333 LAN
Communicator
(6) Set [LAN Communicator]
to ON.
(6) Set [LAN Communicator]
to ON.
(7) Set IP address for [Data srvr] (7) Set IP address for [Data srvr]
Connect
(8) Execute [Reset] (8) Execute [Reset]
Connect with straight-through cable
See: "15.1.2"(p.318)
Connect with crossover cable
See:"15.1.2"(p.318)