MR8740、MR8741_user_manual_eng_20191016H.pdf - 第219页
8.10 Setting Trigger Timing 207 7 Chapter 8 T rigger Settings 8 This applies to the Memory functio n only. Set waveform recording operation when a trigger event o ccurs. Description About trigger timing The selected trig…
8.9 Pre-Trigger Settings
206
This applies to the Memory function only.
You can set whether a trigger is recognized (accepted) if trigger criteria are met during this period.
• When pre-triggering is enabled, trigger events are normally ignored for a cer-
tain period after measurement starts (while recording the specified pre-trigger
period).
• This period is indicated on the Status bar as [Pre-Trigger wait].
Description When trigger criteria are met during [Pre-Trigger wait]
Example: When the pre-trigger period is set to 50%
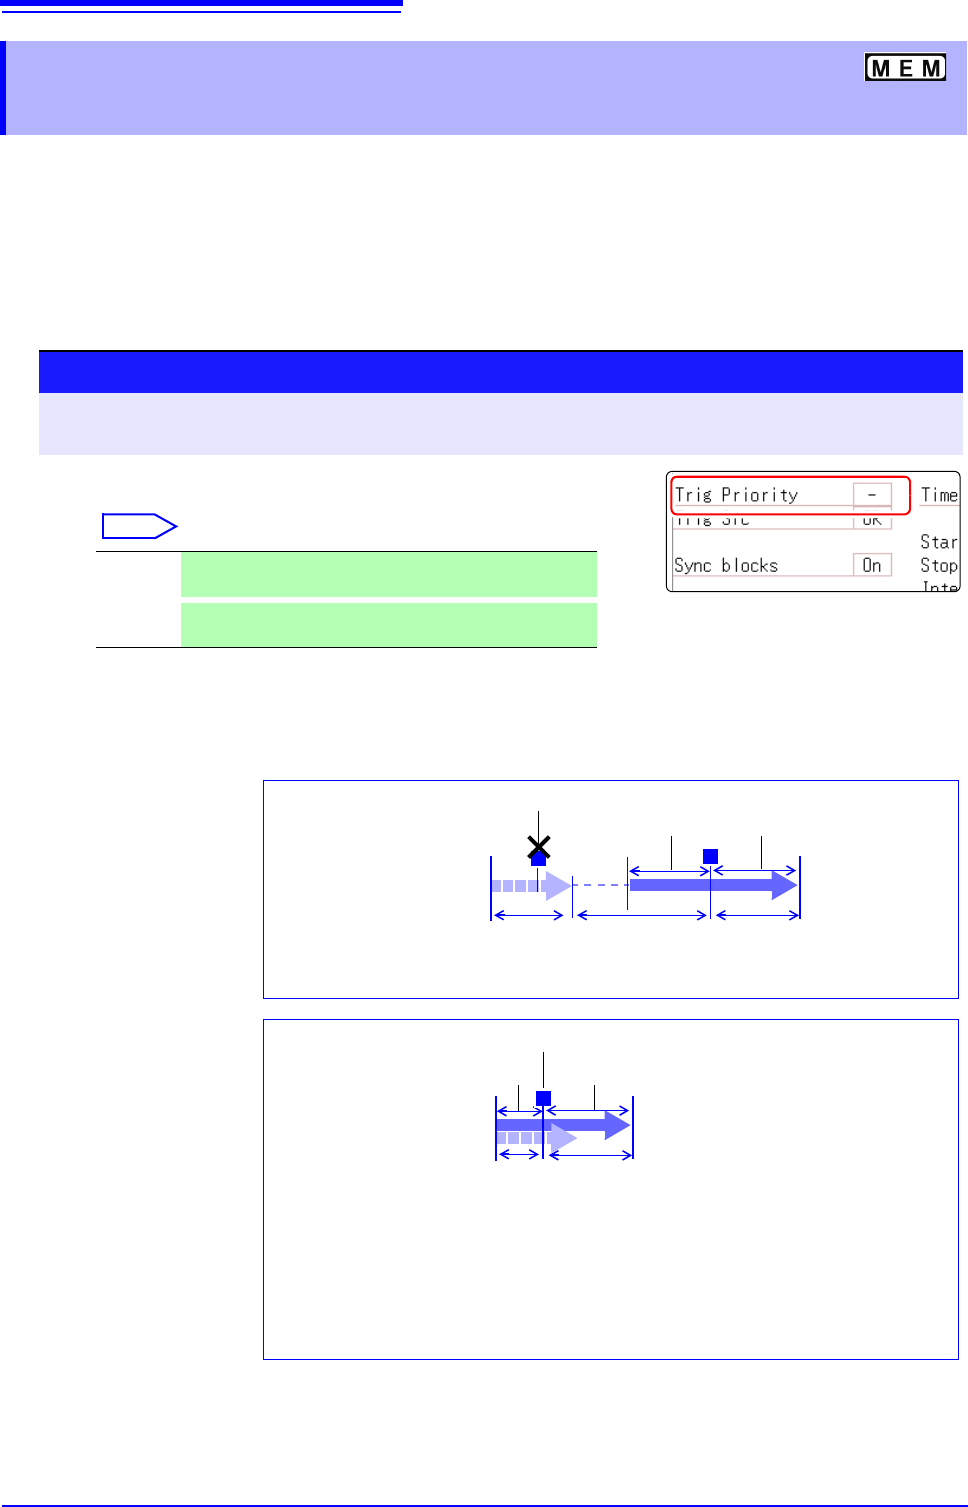
8.9.2 Setting Trigger Acceptance
(Trigger Priority)
Procedure
To open the screen: Right-click and select [DISP] Waveform screen Right-click and select [TRIG.SET] Trig-
ger settings window
Move the flashing cursor to the [Trig Prio] item.
Select
Off Trigger events are ignored during [Pre-Trigger wait]
(default setting)
On
Trigger events are recognized (accepted) during [Pre-
Trigger wait].
50% of Recording Length
before trigger
Trigger Priority: [Off]
T
(After 50% of the Recording Length is recorded internally, the [Trigger
wait] state begins)
[Trigger wait][Pre-Trigger wait]
50% of Recording Length
after trigger
T
Trigger ignored
[Now Storing]
Start
Measurement
Recording Length before trigger
Trigger Priority: [On]
[Pre-Trigger wait]
50% of Recording Length after trigger
T
Trigger accepted
[Now Storing]
(A trigger event occurs while 50% of the Recording Length is being
recorded internally)
When a trigger event occurs during pre-trigger recording, the data actually recorded
may be shorter than the specified recording length. (In this case, the pre-trigger re-
cording length is shortened. The recording length after the trigger event is the speci-
fied recording length minus the specified pre-trigger period.)
Start
Measurement
8.10 Setting Trigger Timing
207
7
Chapter 8 Trigger Settings
8
This applies to the Memory function only.
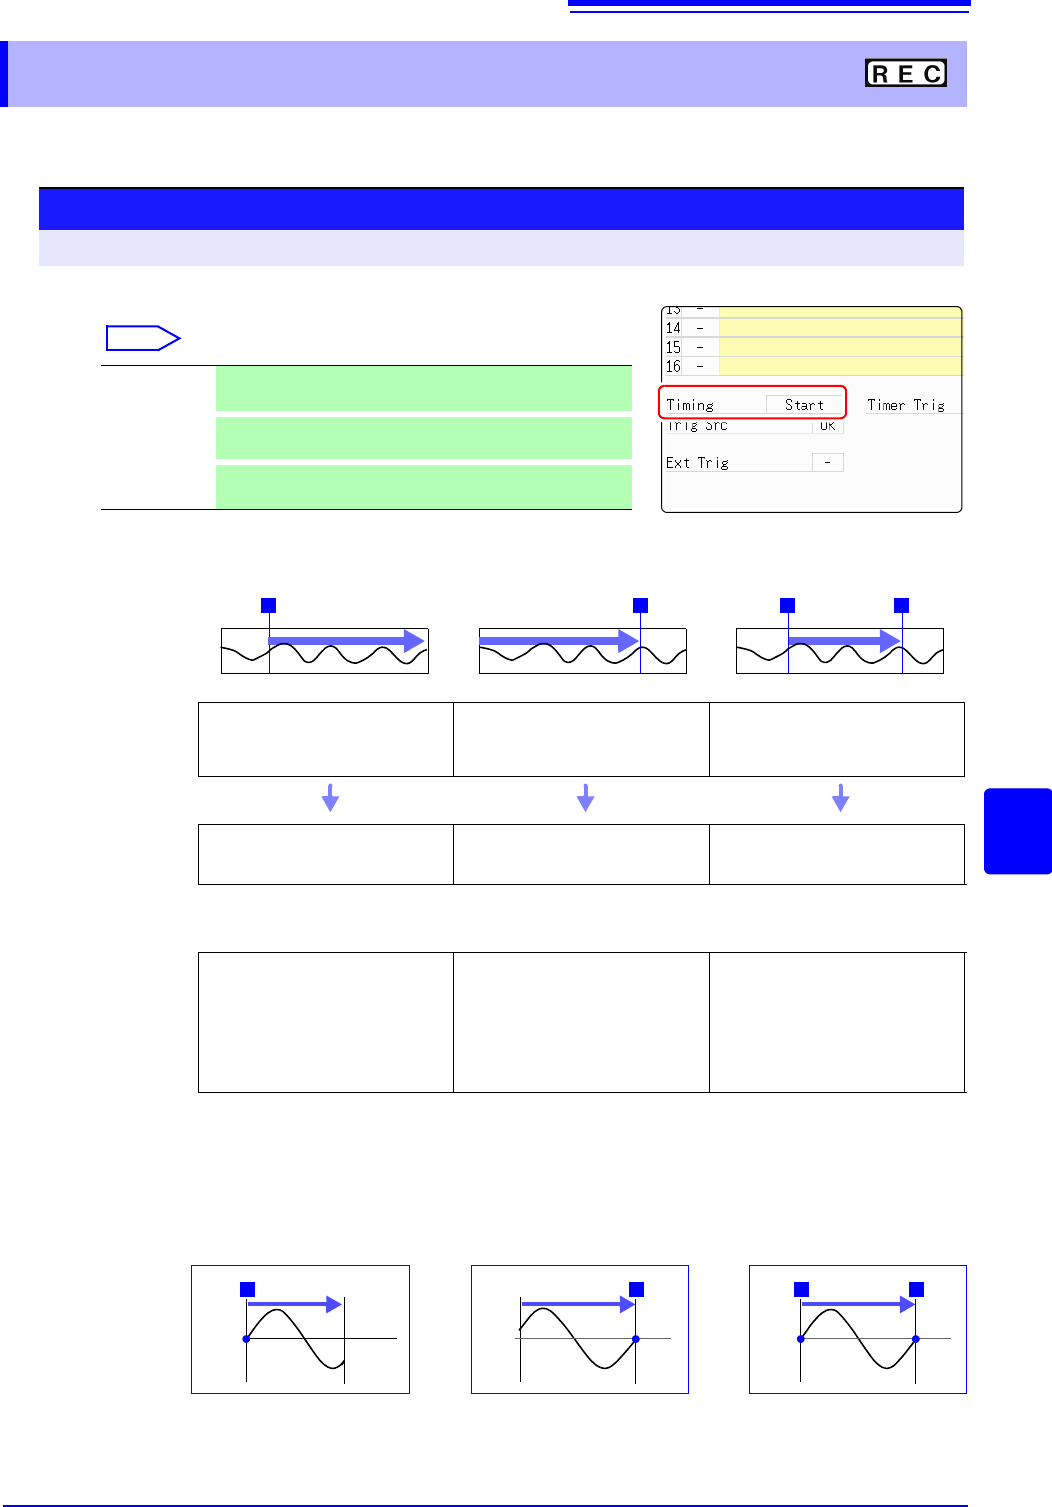
Set waveform recording operation when a trigger event occurs.
Description About trigger timing
The selected trigger mode determines how recording stops.
Example: When the trigger type is Level Trigger, Level = 0.000 V, and Slope = (rising)
8.10 Setting Trigger Timing
Procedure
To open the screen: Press the DISP key Waveform screen Press the TRIG.SET key Trigger settings window
Move the flashing cursor to the [Timing] item.
Select
Start
Start recording when a trigger event occurs, and stop after
the specified recording length.(default setting)
Stop
Start recording when the START key is pressed, and stop
when a trigger event occurs.
Start & Stop
Record the interval from one trigger event until the next
trigger event.
[Start] [Stop] [Start & Stop]
T
RecordingSTART key
T
Recording
T T
Recording
Recording
Starts
Recording starts when a trigger
event occurs
Recording starts when you press
the START key
Recording starts when a Start trig-
ger event occurs
Recording
Stops
With [Single]
trigger mode
Recording stops after data has
been acquired for the specified
recording length
Recording stops when a trigger
event occurs
Recording stops when a Stop trig-
ger event occurs
If no trigger event occurs before the specified recording length elapses:
[Stop] or [Start & Stop]: Recording stops after data has been acquired for the specified recording length
With [Repeat]
trigger mode
The Trigger Wait state begins af-
ter data has been acquired for the
specified recording length
When another trigger event oc-
curs, data is again acquired for the
specified recording length, then
Trigger Wait resumes (repeats)
When a trigger event occurs, re-
cording stops and then starts
again (repeats)
When a trigger event occurs, re-
cording stops and the Trigger Wait
state resumes. When another trig-
ger event occurs, recording con-
tinues until the next trigger occurs
(repeats)
If no trigger event occurs before the specified recording length elapses:
[Stop] : After data is acquired for the specified recording length, recording restarts. This repeats until
a trigger event occurs.
[Start & Stop]: The Trigger Wait state begins after data has been acquired for the specified recording length
(Start Trigger)
[Start]
[Stop] [Start & Stop]
Records for specified record-
ing length
Press START key to record
Records until a trigger occurs
TT
START key
Recording starts when a Start
trigger event occurs Records
until a Stop trigger occurs
TT
The above sequences repeat when the trigger mode is [Repeat].
0 V0 V0 V
Setting of [Timing]
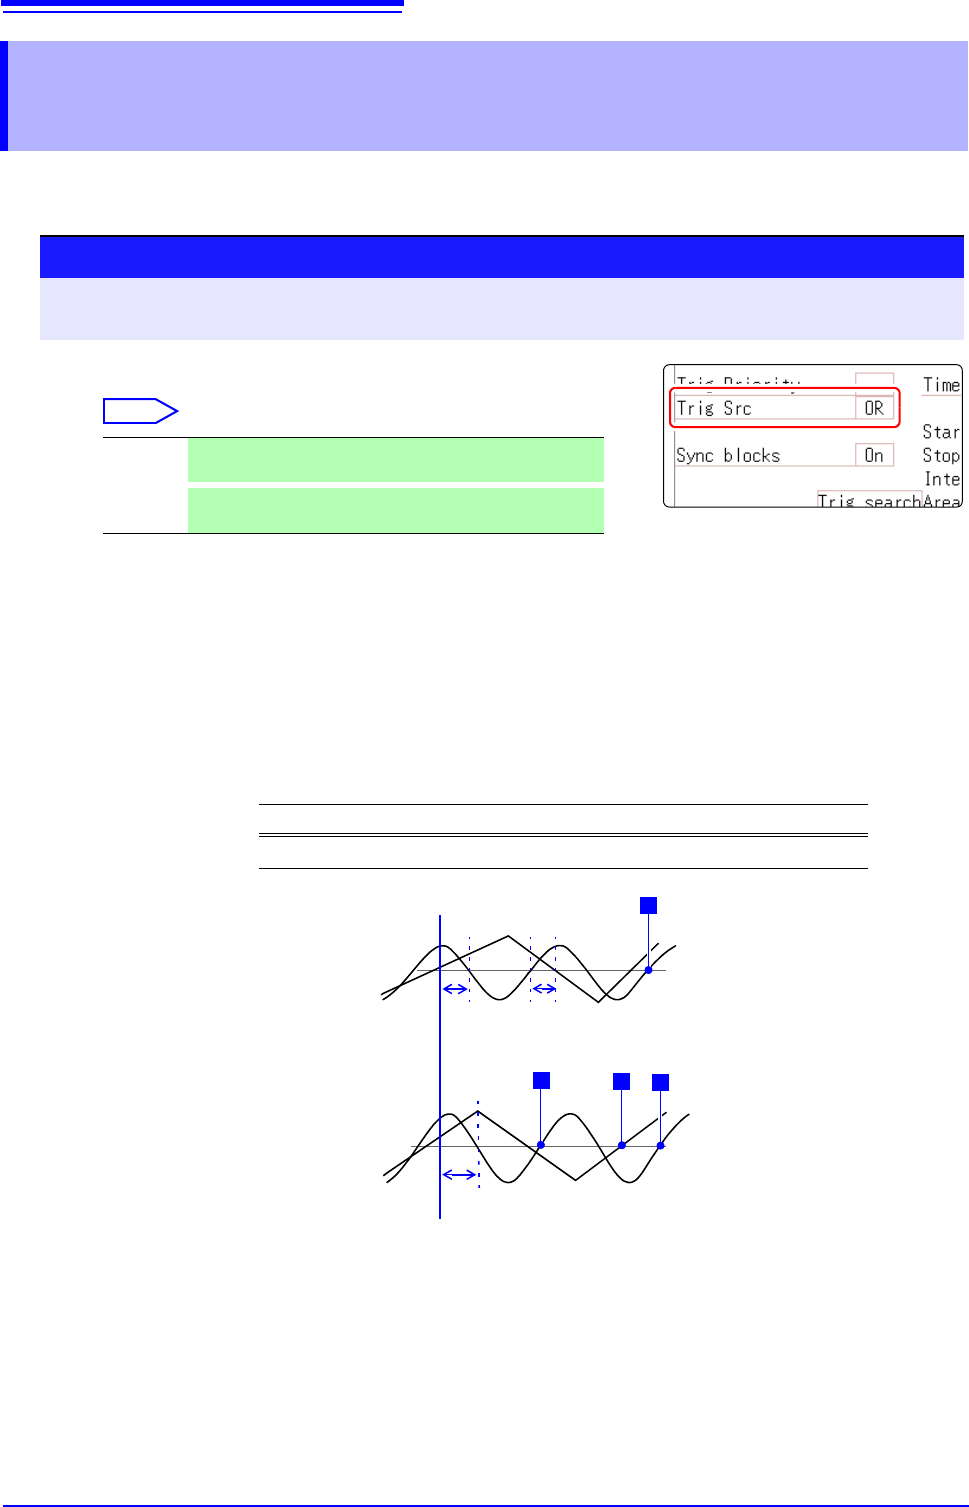
8.11 Setting Combining Logic (AND/OR) for Multiple Trigger Sources
208
Analog, logic, external and timer trigger criteria can be combined by AND/OR logic to define com-
plex trigger criteria.
Description When the trigger combining logic (Source (AND/OR)) is set to [AND]
If trigger criteria are already met when measurement is started, no triggering
occurs. Triggering occurs only after all trigger sources have ceased to meet the
criteria at once, and are subsequently met again.
Setting Example:
To apply a trigger when the upslope (
) of the waveform crosses zero volts
Triggering occurs as follows in the AND and OR cases.
8.11 Setting Combining Logic (AND/OR) for
Multiple Trigger Sources
Procedure
To open the screen: Right-click and select [DISP] Waveform screen Right-click and select [TRIG.SET]
Trigger settings window
(Memory Function case)
Move the flashing cursor to the [Trig Src] item.
Select
OR
Triggering occurs when any one of the specified trigger
source criteria is met. (default setting)
AND
Triggering occurs only when all of the specified trigger
source criteria are met.
Channel Trigger Trigger Level Slope Filter
Ch1, Ch2 Level 0.00 V Off
[AND]
Ch2
Ch1
One waveform has crossed
above 0V as the other
crosses on the upslope
[OR]
Either waveform crosses 0V
on the upslope
0 V
0 V
T
T
T
T
Ch2
Ch1
Start Measurement
Trigger criteria have been met,
but no trigger occurs.
Trigger criteria have been met,
but no trigger occurs.