KJ-01.02.Instruction Manual.REV.02.pdf - 第130页
5 − 34 2) Delete This com mand deletes a line of Placement data. Y ou can specify to delete a block of lines of data also. T o do so, move the cursor t o the f irst line of the block t o be deleted, and select the [2/Del…
5 − 33
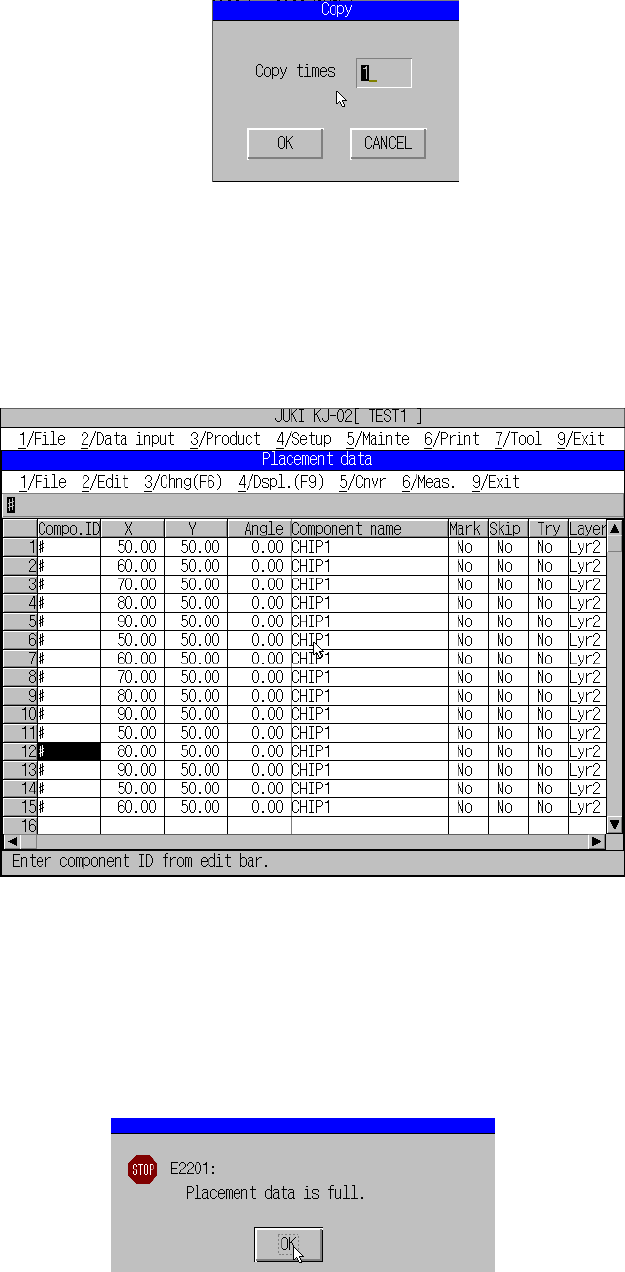
– Specifying the number of copies
After you enter the copy destination, specify how many times the machine
should perform a copy operation. The following dialog box appears on the
screen, and “1” is specified by default.
Figure 5.4.3.4 Figure of copy times specifying dialog box
When you click the <OK> button, the machine copies data of the specified line(s).
When you click the <CANCEL> button, the machine cancels the coy operation,
and returns to the conditions the machine entered before you invoked the copy
command. The specified data is inserted above the line entered as the copy
destination. Figure 5.3.3.5 shows the example of the copied data.
Figure 5.4.3.5 Result of copy operation
* If you copy Placement data with setting “Mark” to “Yes”, this “Mark” setting is
disabled, and set to “No” at the copied data. To use a mark, be sure to select
“Yes” on the pop-up menu.
If the number of records exceeds the maximum number of Placement data
records as the result of your copy operation, the following message appears on
the screen.
Figure 5.4.3.6 Placement data over error dialog box

5 − 34
2) Delete
This command deletes a line of Placement data. You can specify to delete
a block of lines of data also. To do so, move the cursor to the first line of
the block to be deleted, and select the [2/Delete] command on the menu, or
press the F4 key. The machine enters Delete block selection mode. The
machine regards the line on which the cursor is located as the first line of the
block to be deleted. Press the field selection key, Page UP or Page Down
key to highlight the block of lines to be deleted, and press the ENTER key to
confirm the block. To cancel the block specified, press the ESC key.
Figure 5.4.3.7 Delete confirmation dialog box
3) Move
This command moves a line of Placement data. You can specify to move a
block of lines of data also. To do so, move the cursor to the first line of the
block to be moved, and select the [2/Move] command on the menu, or press
the F5 key. The machine enters Move block selection mode. The
machine regards the line on which the cursor is located as the first line of the
block to be moved. Press the field selection key, Page UP or Page Down
key to highlight the block of lines to be moved, and press the ENTER key to
confirm the block. To cancel the block specified, press the ESC key.
The machine inserts the moved lines immediately above the specified
destination line.
4) Insert
This command inserts a blank line to the position on which the cursor is
located. The machine sets “#” as the component ID of the inserted line.
5) Duplicate
This command copies data of the line immediately above the line on which
the cursor is located, and then inserts the copied data immediately above the
line on which the cursor was located before this Duplicate operation. The
machine sets “#” as the component ID of this copied and inserted line.
6) Jump
This command allows the cursor to jump to the specified number of line.
When you select the [6/Jump] command from the menu, the dialog box
shown in Figure 5.3.3.8 appears on the screen.
Figure 5.4.3.8 Jump destination specify dialog box
5 − 35
Specify the line number you want to jump to, and click the <OK> button.
The cursor moves to the line you specified. If you click the <CANCEL>
button here, the machine returns to the condition you invoked this Jump
command. If the specified number of line is larger than the total number of
lines entered, the cursor moves to the last line of data.
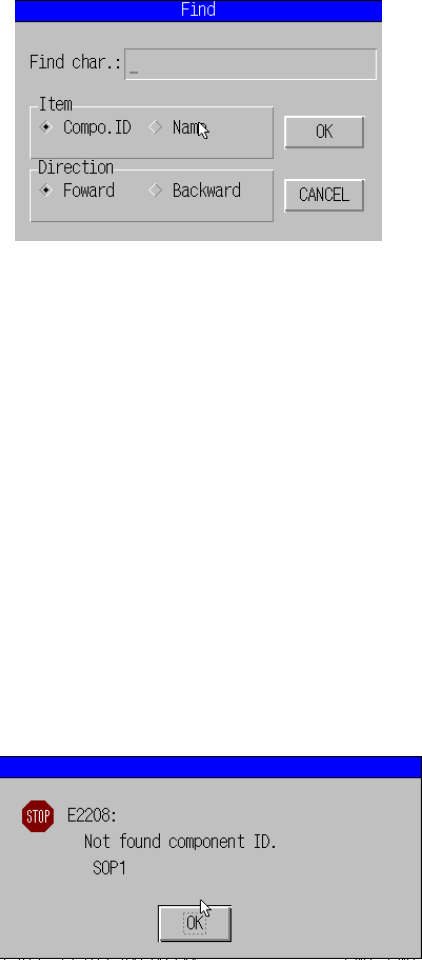
7) Find
This command allows you to search the data with using a component ID or
component name as a key. When you select the [7/Find] command on the
menu, the dialog box shown in Figure 5.3.3.9 appears on the screen.
Figure 5.4.3.9 “Find” dialog box
Enter the character string you want to search, and specify which item you
want to use to search data as a key, “Component ID” (Compo. ID) or
“Component name” (Name).
You can specify which direction the machine should search data also.
When you click the <OK> button, the machine starts finding the specified
character string. When you click the <CANCEL> key, the machine returns
to the condition before you select the [7/Find] command. If the machine
finds data of the specified component ID or component data, the cursor
moves to the data. Otherwise, the error dialog box shown in Figure
5.3.3.10 appears on the screen.
If you want to perform the find operation under the same condition, press the
F7 key (for searching forwards) or F8 key (for searching backwards). Note
that the machine does not distinguish a upper case letter from a lower case
letter for searching data.
Figure 5.4.3.10 Find error dialog