KJ-01.02.Instruction Manual.REV.02.pdf - 第335页
10 − 10 W hen y ou select the [ 4/A given Z coordinate m ove] command, t he dialog box appears, which asks you to enter the coordinate of the posit ion the nozzle is supposed to move to as shown in Figure 10.4. 1.2.2. W …
10 − 9
10.4.1.2 Moving the Z-axis
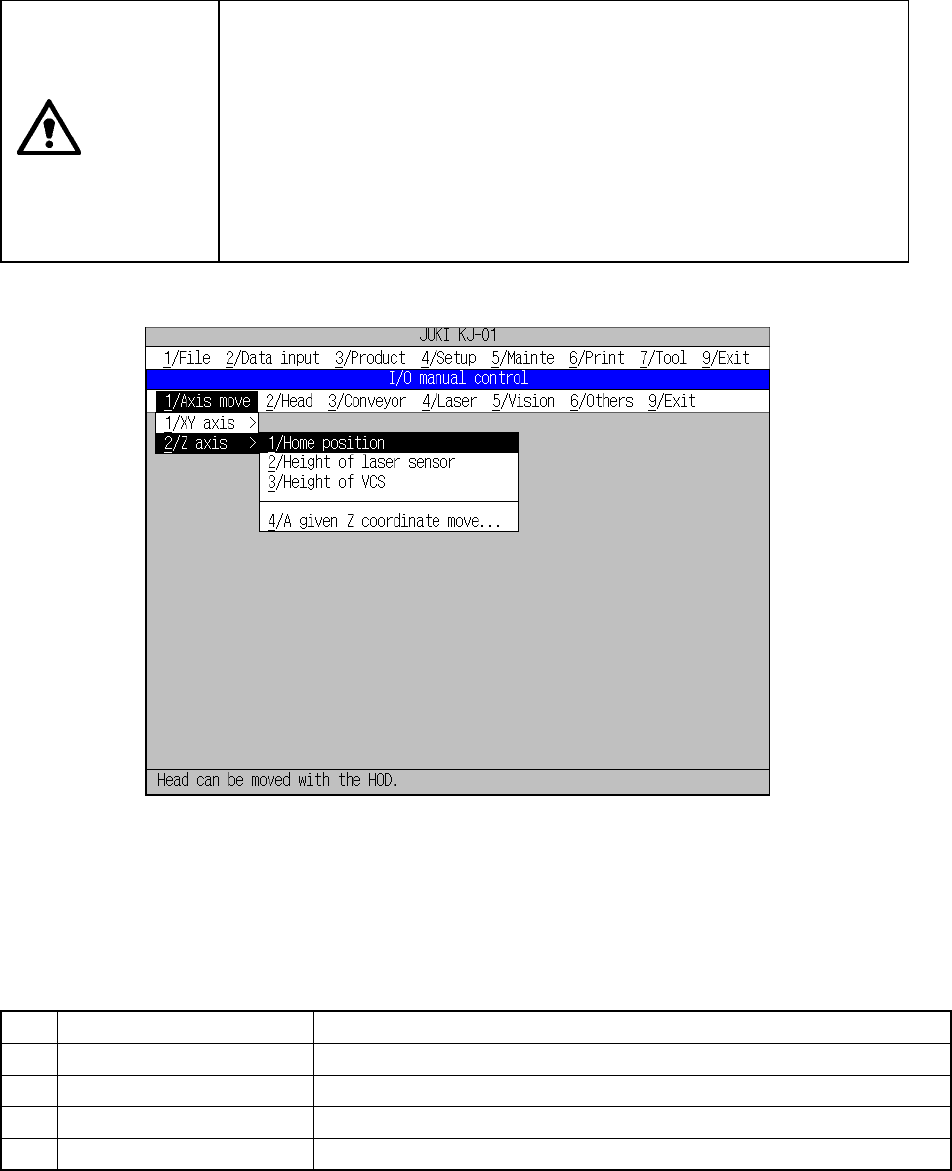
When you select the [1/Axis move] command on the menu bar, and then the [2/Z
axis] command on the displayed menu, the command menu appears on the screen
as shown in Figure 10.4.1.2.1.
When you select a command from this command menu, the machine starts
controlling the Z-axis operation.
CAUTION
The Z-axis starts moving immediately after you select a command.
To avoid risk of injury, do not place your hand in the machine, nor
move your face or head close to the machine during operation.
Before selecting a command, check to see if there is no one who is
working the internal parts of the machine.
Before selecting a command, check to see if there is no one who is
near the machine and can be injured when the machine warms up.
Before selecting a command, check to see there is no obstacle (tools
and jigs) attached or left in the machine that may prevent any part
inside the machine from operating.
Figure 10.4.1.2.1 Axis control (Z-axis) menu
Each command is described on Table 10.4.1.2.1.
Table 10.4.1.2.1 Description of each command
No. Sub menu name Description
1 Home position Moves the nozzle to the Z-axis home position.
2 Height of laser sensor Moves the nozzle to the height of the laser sensor.
3 Height of VCS Moves the nozzle to the height of the VCS.
4 A given Z coordinate move Moves the nozzle to the position whose coordinates are specified.
10 − 10
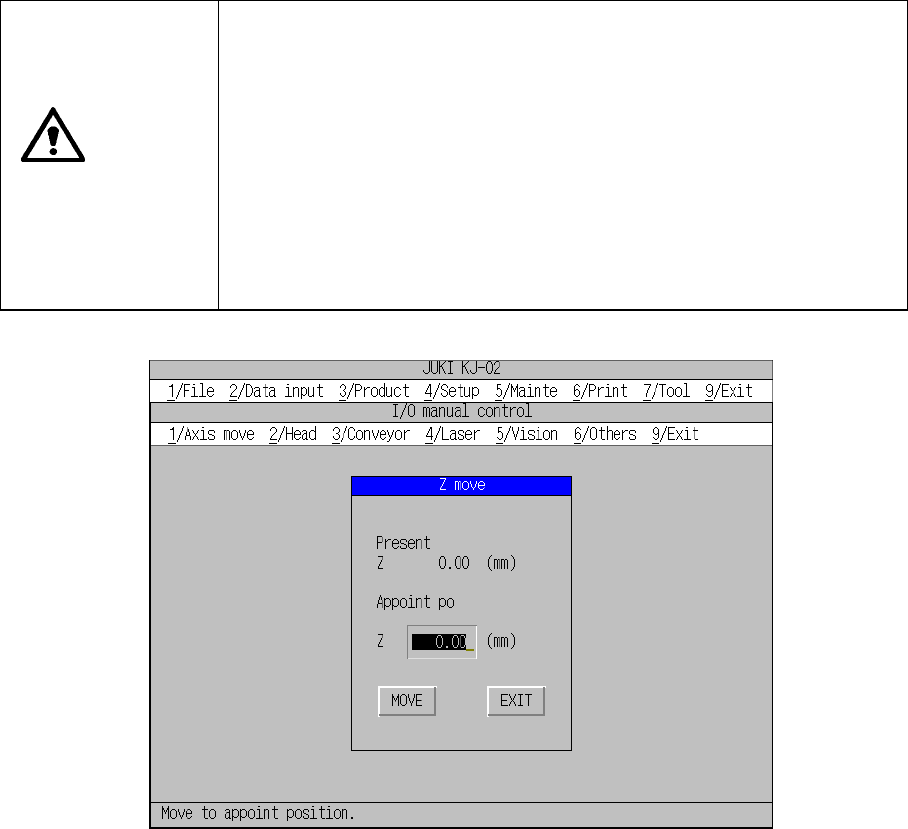
When you select the [4/A given Z coordinate move] command, the dialog box
appears, which asks you to enter the coordinate of the position the nozzle is
supposed to move to as shown in Figure 10.4.1.2.2. When you enter the Z
coordinate in the same manner as the XY coordinates and click the <MOVE> button,
the nozzle moves as instructed. Enter the Z coordinate with regarding the height a
board is located as “0”, the upper position as a positive value and the lower position
as a negative value.
CAUTION
The Z-axis starts moving immediately after you press the <MOVE>
button.
To avoid risk of injury, do not place your hand in the machine, nor move
your face or head close to the machine during operation.
Before pressing the <MOVE> button, check to see if there is no one
who is working the internal parts of the machine.
Before pressing the <MOVE> button, check to see if there is no one
who is near the machine and can be injured when the machine warms
up.
Before pressing the <MOVE> button, check to see there is no obstacle
(tools and jigs) attached or left in the machine that may prevent any part
inside the machine from operating.
Figure 10.4.1.2.2 “Z move” dialog box
10 − 11
10.4.2 Head control
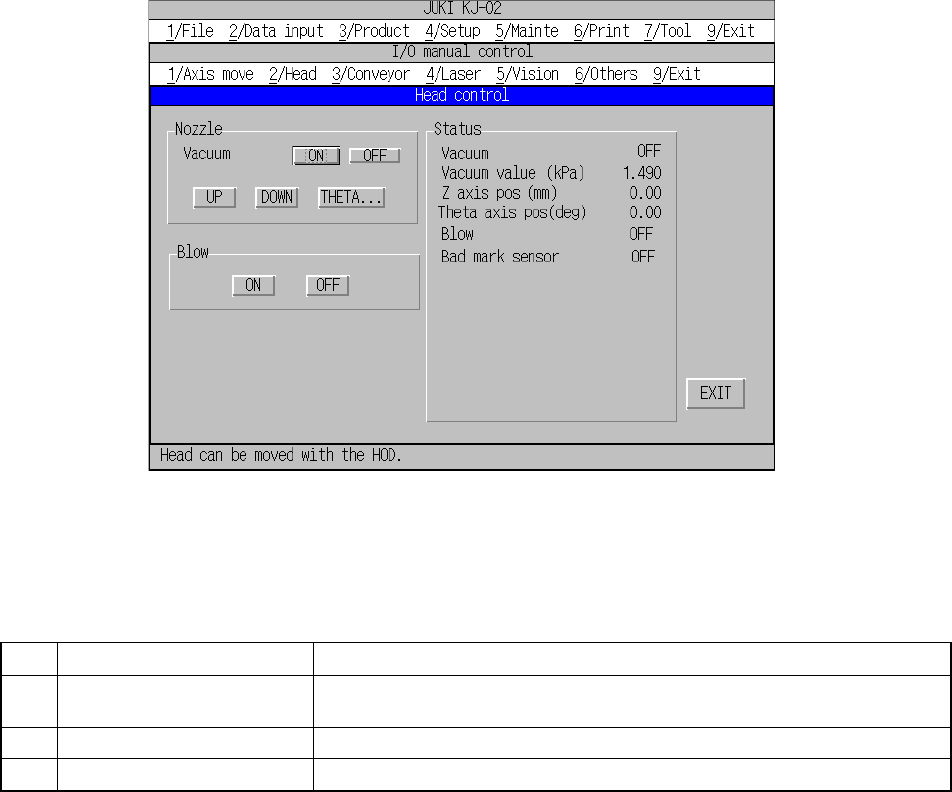
When you select the [2/Head] command on the menu bar, and then the [1/Head
control] command, the dialog box for controlling the head appears as shown in Figure
10.4.2.1.
Each command is described on Table 10.4.2.1.
Figure 10.4.2.1 “Head control” dialog box
Table 10.4.2.1 Description of each command
No. Command Description
1 Nozzle Turns on/off the vacuum condition (ON/OFF), moves the Z-axis
(UP/DOWN) and rotates a nozzle (by the specified angle).
2 Blow Enables a nozzle to blow or not (ON/OFF).
3 Status Displays the each operation control condition and sensor condition.
When you select a button displayed on the dialog box above, the machine controls its
corresponding operation. When you use a keyboard only, press the ENTER key.
When you use a trackball, click the desired button. The control condition is
displayed in real time.
When you click the <THETA> button, the dialog box for rotating a nozzle appears on
the screen as shown in Figure 10.4.2.2. Enter the angle, and then click the
<ROTATE> button. The machine starts rotating the nozzle by the angle you
specified.