KJ-01.02.Instruction Manual.REV.02.pdf - 第351页
11 − 5 1 1.2.1.3 Product ion programs ① W hen you select the [6/ Pirnt] command f rom t he main menu, and t hen the [2/Product ion data] command on t he displayed menu, the “Pr oduction prog ram list” dialog box appears …
11 − 4
11.2.1.1 Production program file list
① When you select the [6/Print] command from the main menu, and then the
[1/Data file list] command on the displayed menu, the “Production program file
list” that shows production programs located under the current directory of the
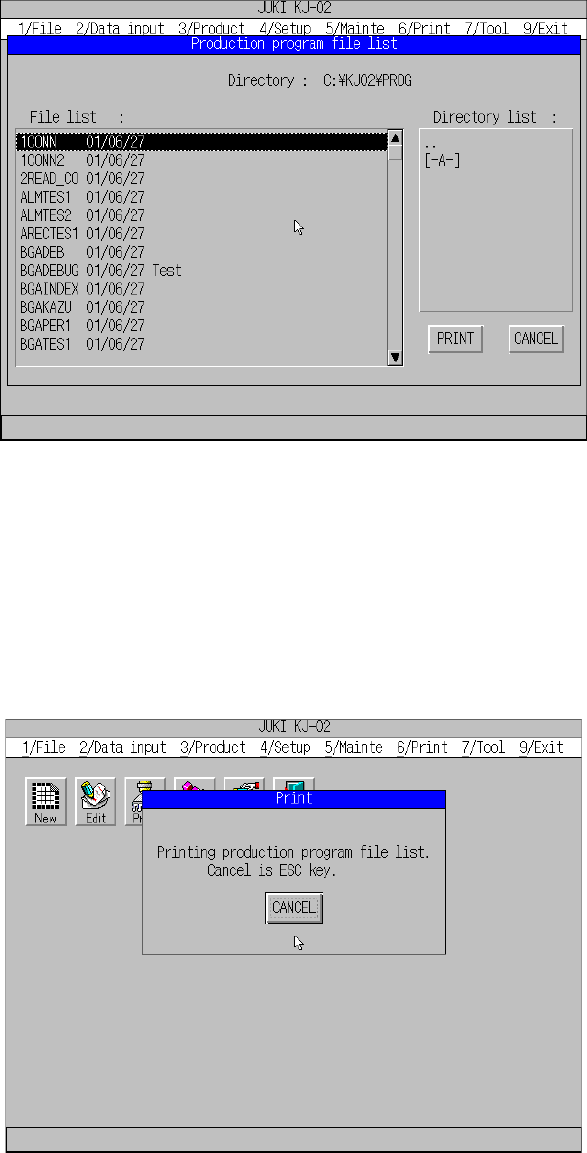
current drive appears on the screen as shown in Figure 11.2.1.2.1.
Figure 11.2.1.2.1 “Production program file list” dialog box
② The “Directory list” box allows you to change the current directory and drive.
③ When you confirm the directory whose files are to be printed, press the ENTER
key on the File list box or click the <PRINT> button. The machine starts
printing the production program file list.
④ When the machine starts printing, it displays the “PRINT” message box on the
screen as shown in Figure 11.2.1.2.2. When the machine finishes printing,
this message box disappears and the main menu reappears.
Figure 11.2.1.2.2 “PRINT” message box
⑤ When you want to cancel the printing operation after it starts, press the Esc key
or click the <CANCEL> button on the “PRINT” message box.
⑥ The machine can print up to 49 files per page.
11 − 5
11.2.1.3 Production programs
① When you select the [6/Pirnt] command from the main menu, and then the
[2/Production data] command on the displayed menu, the “Production program
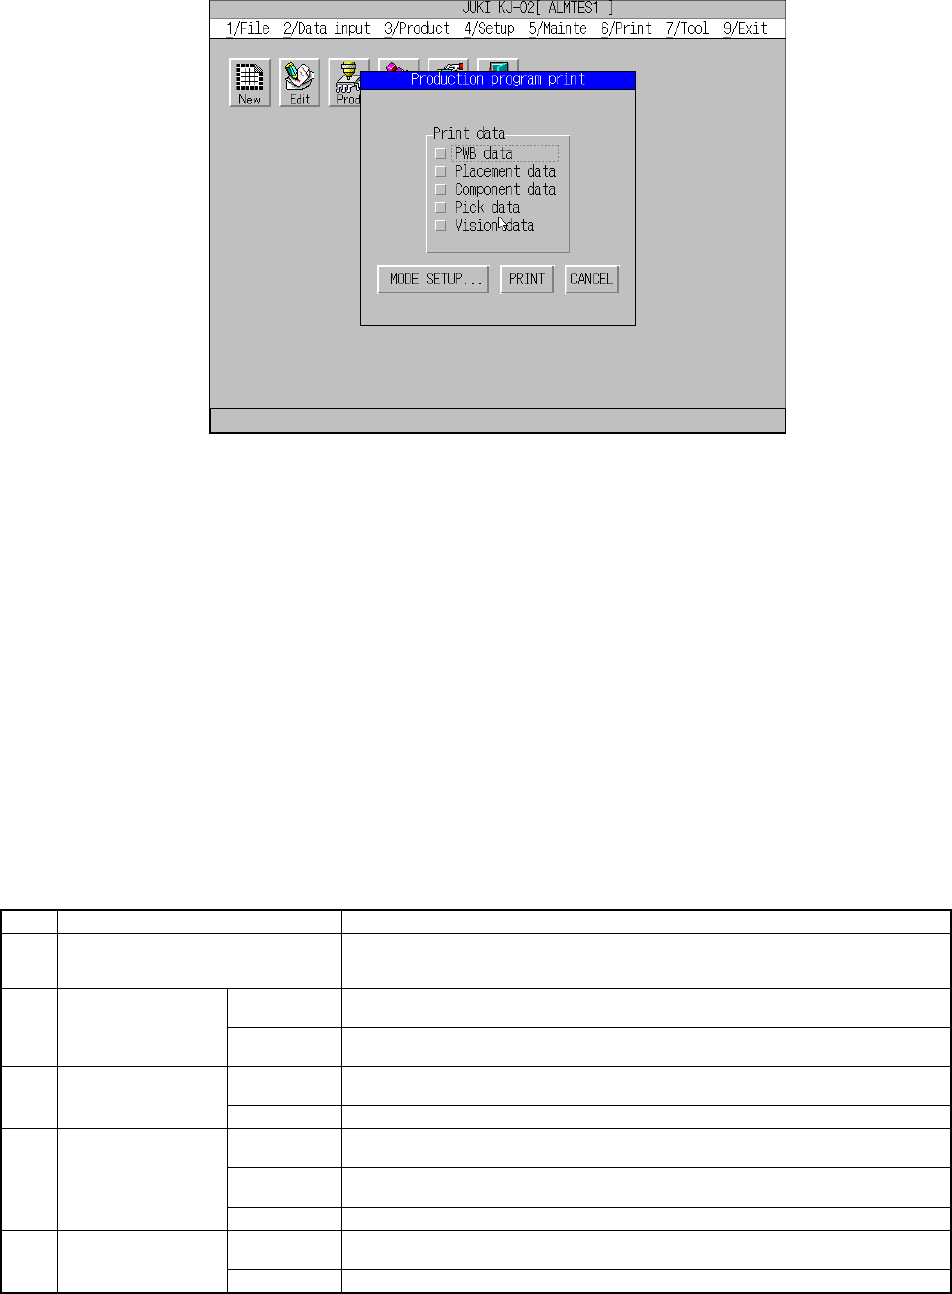
list” dialog box appears on the screen as shown in Figure 11.2.1.3.1.
Figure 11.2.1.3.1 “Production program list” dialog box
② When a production program is changed with the Data Input command, the
machine displays the message box indicating that you cannot print the specified
data.
③ Check the check box indicating data you want to print, and click the <PRINT>
button. The machine starts printing the selected data.
④ When you click the <MODE SETUP> button, the dialog box appears on the
screen and asks you to select which data you want to print: only the main data
or all data of each type of data.
⑤ When the machine starts printing, the “PRINT” message box appears on the
screen. When the machine finishes printing, this message box disappears,
and the main menu reappears.
⑥ Note that you have to press the ESC key or click the <CANCEL> button to
cancel the current printing operation after the machine starts printing.
⑦ Data of each data list that can be printed on one page is shown on Table
11.2.1.3.1.
Table 11.2.1.3.1 Printed page layout of each data list
No. Type of list Page layout
1 PWB data list Prints all data on a page.
(Note that the circuit configuration of a non-matrix board is printed on another
page.)
Main data One data record without mark information is printed on one line in the list format.
Up to 49 data records are printed on one page
2 Placement data list
All data One data record is printed on one line to three lines in the list format.
About 49 lines are printed on a page.
Main data One data record is printed on a line in the list format. Up to 49 data records are
printed on a page.
3 Component data list
All data Two data records are printed on a page in the form format.
Main data 1 One data record is printed on a line in the list format. Up to 49 data records are
printed on a page.
Main data 2 Front and rear sides setup data is printed in the list format.
Tray holder setup data is printed in the list format.
4 Pick data list
All data Up to 10 data records are printed on a page in the form format.
Main data One data record is printed on a line in the list format. Up to 49 data records are
printed on a page.
5 Vision data list
All data Up to four data records are printed on a page in the form format.
11 − 6
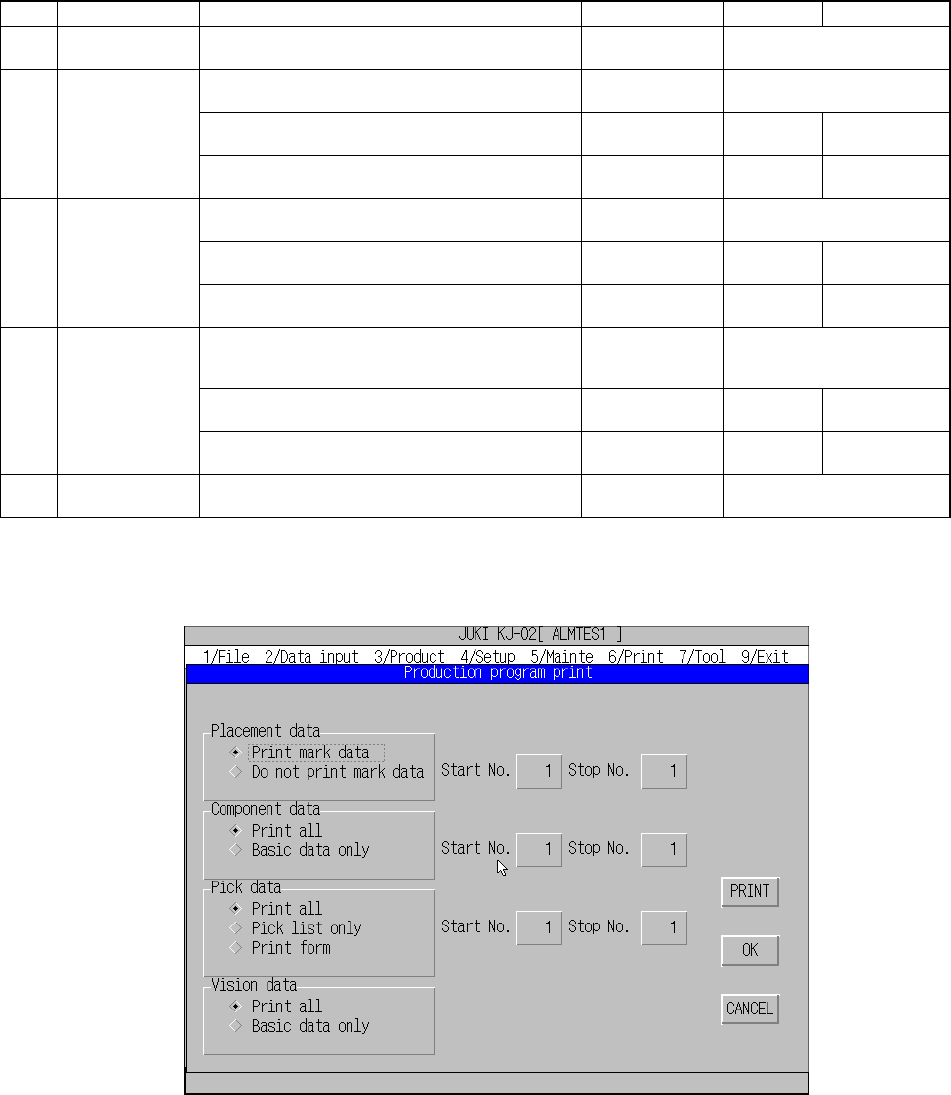
⑧ Table 11.2.1.3.2 shows the items to be set on the “Production program print”
mode setting screen.
Table 11.2.1.3.2 Each production program data list and its mode setting items
No. Data type Description Default Minimum Maximum
1 PWB data list Since all data is always printed, you cannot set
any item.
All data
Specify whether mark information is printed or not. Print mark data Print mark data/Do not print
mark data
Start No. 1 1 Number of
data records
2 Placement data
list
Stop No. Number of data
records.
1 Number of
data records.
Specify which data is to be printed: all data or
main data only.
Print all Print all/Basic data only
Start No. 1 1 Number of
data records
3 Component data
list
Stop No. Number of data
records.
1 Number of
data records.
Specify which data is to be printed: all data, main
data in the input order, or main data in the feeder
order.
Print all Print all/Pick list only/Print
form
Start No. 1 1 Number of
data records
4 Pick data list
Stop No. Number of data
records.
1 Number of
data records.
5 Vision data list Specify which data is to be printed: all data or
main data only.
Print all All data/Basic data only
The screen for setting mode items is shown in Figure 11.2.1.3.1 below.
Figure 11.2.1.3.2 “Production program print” mode setting dialog box
⑨ Note that if you select “Print form” for the “Pick data”, the specified data range
becomes invalid.