KJ-01.02.Instruction Manual.REV.02.pdf - 第290页
8 − 23 8.2.2 Start of production Aft er setting the number of PC boar ds to be produced, pr ess the ST ART key on the operator panel t o start pr oduction. CA UTION The head starts to mov e imm ediately after t he ST ART…
8 − 22
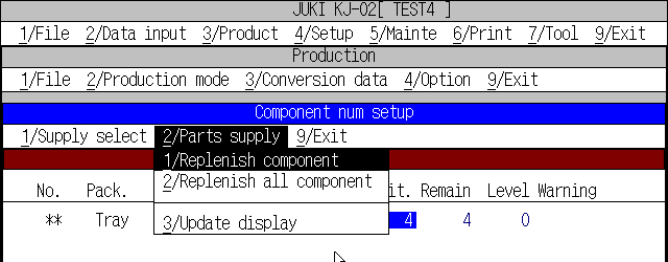
(2) [2/ Parts supply]
This command makes the value on the cursor line or all number of parts full or
clears them.
However, to supply parts, the system has to produce no part or has to stop
temporarily.
Figure of parts supply pull-down menu
① Replenish component
Resets the number of remaining components on the cursor line (when the
command is called) to the initial value and clears all warnings.
② Replenish all feeders
Performs the “1/ Replenish component” operation for all components.
③ Reflesh
Refreshes the screen. The screen is updated when the number of parts is
updated with corresponding to the execution of a pickup and placement
operation while the components number setup screen is being displayed.
(3) [9/ Exit]
Ends the setting of components number function, then returns control to the
caller (Setting of production condition or Setting of production status screen).
8 − 23
8.2.2 Start of production
After setting the number of PC boards to be produced, press the START key on the
operator panel to start production.
CAUTION
The head starts to move immediately after the START key is pressed,
and then the machine starts PC board production.
To avoid a risk of injury, do not place your hand in the machine, nor
move your face or head close to the machine during operation.
Before pressing the START key, check that there is no one who is
working in the machine.
Before pressing the START key, check that there is no one who can
be injured when the head starts to move.
Before pressing the START key, check that there are no obstacles
(tools and jigs) left in the machine.
The PC board production starts and the green signal lamp lights to indicate that PC
board production is in progress.
If home positioning has not been completed when the START key is pressed, press
the HOME key to execute home positioning, then press the START key again.
<1> Display of production status
When PC board production starts with the START key pressed, the status of
production is displayed on the screen.
(1) While PC board production is in progress
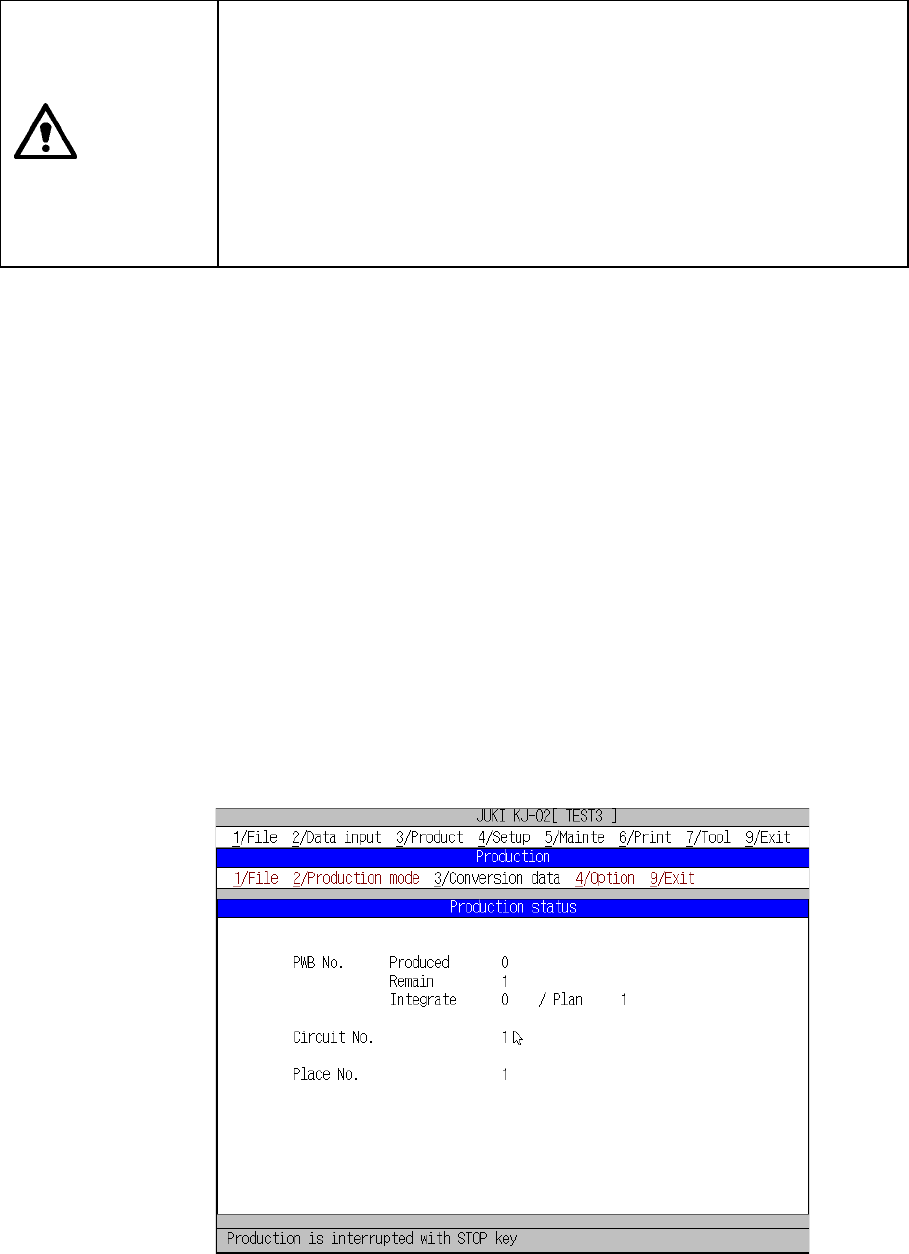
Figure 8.2.2.1 shows the “Production status” screen that is displayed
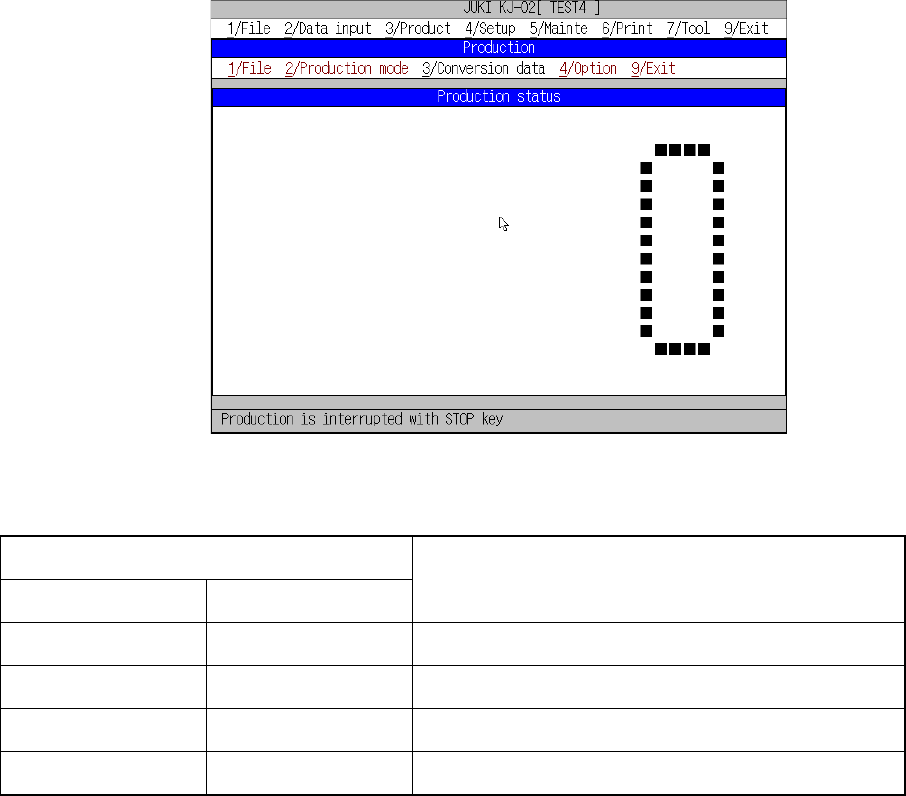
normally when the machine starts production, while Figure 8.2.2.2 shows the
“Production status” screen displayed if you check the item “Shows the
number of boards produced in large characters.” on the “Operation option”
screen.
– Display of normal production status
Figure 8.2.2.1 Production status screen (1)
8 − 24
① PWB No.
This item displays the number of PWBs already produced.
(a)Produced: displays the number of PWBs already produced since you
pressed the START key.
(b)Remain: displays the number of PWBs to be produced hereinafter.
(c)Integrate: displays the total number of PWBs already produced since
the currently loaded production program set the number of
PWBs that was planned to be produced on the Production
Conditions screen. “Plan” displays the number of PWBs
that is planned to be produced.
② Circuit No.
Shows the number of a circuit on which a component is being placed
currently. When the machine is producing a single-plane board, this item
always shows “1.”
③ Place No.
Shows the Placement data number of a component that is being placed
currently.
When the check box “Display num. of PWBs produced in capital ltr.” is
checked on the Operation option menu
Figure 8.2.2.2 Production status screen (2)
① Values displayed on the Production status screen
Checking status of the check boxes on the
“Operation option” menu
Count down num. of
PWB produced.
Integrate num. of
PWB produced.
Description
OFF OFF
Produced: Number of PWBs that were already produced since
you pressed the <START> key.
OFF ON
Total: Number of PWBs that were produced by the
production program currently loaded
ON OFF
Number of PWBs calculated by subtracting the number shown in
“Produced” from the number of PWBs planned to be produced
ON ON
Number of PWBs calculated by subtracting he number shown in
“Total” from the number of PWBs planned to be produced.
When the machine finishes producing the number of PWBs you planned, it starts the
production end process.