KJ-01.02.Instruction Manual.REV.02.pdf - 第256页
7 − 6 T o teach t wo points, follow the procedur e described below . ① 2-point teaching Enter points A and B. T he coordinates of point C, which is the center between points A and B, is then comput ed and taught . ② W he…
7 −
5
7.2.2 Teaching X/Y-axis
The X and Y axes can be taught by using each nozzle the head the bad mark sensor,
or the camera. The operator can select the device according to his/her need.
Note, however, that some device may not be selected depending on the teaching
conditions.
The following explains the teaching procedure used for each of the three different
methods.
(1) Teaching with a nozzle
When you perform teaching operation with a nozzle, an operator has to select a
head as the first teaching device.
(2) Teaching with a bad mark sensor
When you perform teaching operation with a bad mark sensor, an operator has
to select a bad mark sensor as the first teaching device.
When you use a bad mark sensor, you can select the number of input points with
the POINT SEL key.
To enter two points, after selecting a teaching device, move the device and press
the ENTER key of the HOD for two points (move the device, press the ENTER
key, move the device, and press the ENTER key).
(3) Teaching by the camera
For teaching by the camera, select the device which is to be taught with the
camera first.
To perform teaching operation with a camera, you can select a teaching point
with two methods: entering two points or entering a point with a box window
(use the POINT SEL key to select which method is to be used).
You have to enter data corresponding to a teaching point respectively when you
use a camera as the teaching device.
After selecting a camera as the teaching device, move the teaching device and
press the ENTER key of the HOD by the number of input points: that is twice
(move the device, press the ENTER key, move the device, and press the ENTER
key).
When you use a camera as the teaching device, obtain the coordinate of each
point by the center (cross point) of the crosshair cursor.
Normally, use the crosshair cursor for point-by-point teaching, and use the axis
drive key for X- and Y-axes to move the crosshair cursor.
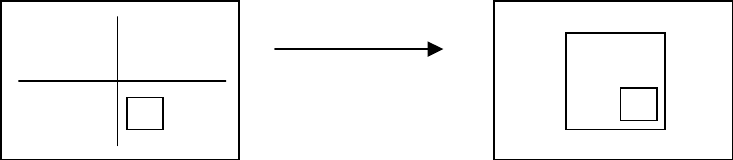
To obtain coordinates with the box window, first select WINDOW with the POINT
SEL key, and then press the SEL ENB key.
The cursor on the screen then changes from the crosshair to window.
<Normally, the crosshair cursor appears>
Window cursor
Select WINDOW with
the POINT SEL key
7 − 6
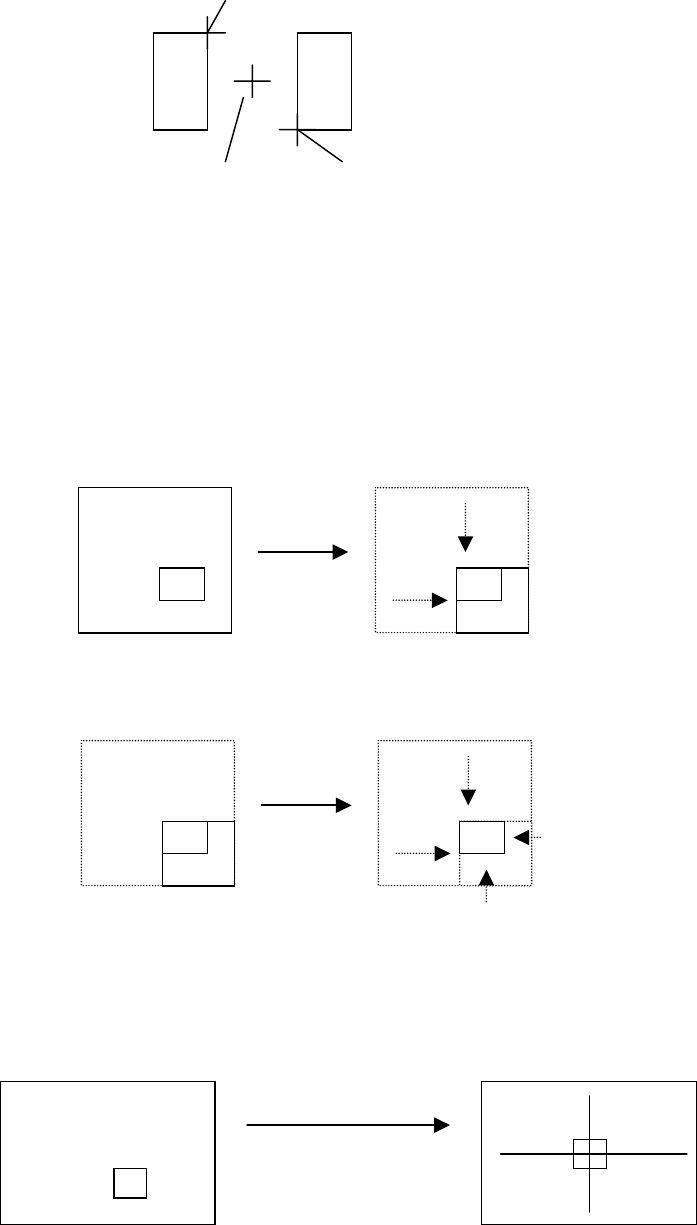
To teach two points, follow the procedure described below.
① 2-point teaching
Enter points A and B. The coordinates of point C, which is the center
between points A and B, is then computed and taught.
② When teaching by the window cursor
Move around the top, left, bottom and right side of the window frame with the
direction key (+Y, -Y, +X and/or –X) to enter coordinates.
First, move to the top and left sides, and press the ENTER key.
Next, move to the bottom and right sides of the frame, and press the ENTER
key. The center of the box window is regarded as the taught coordinates.
When the ENTER key is pressed after moving to the bottom and right, the
camera moves so that the center of the window box is placed at the center
of the previous crosshair cursor. The window box is then changed to the
crosshair cursor.
A
PWB pad
C B

7 − 7
7.2.3 Teaching Z-axis
For Z-axis teaching, the operator must first select the device with which Z-axis is to
be taught as described in the procedure given in 7.2.1 “Basic operating procedure”.
Only the head can be selected as the device. An error results with an alarm beep if
any other device is selected, and the operator must starts the operation from the
device selection.
This teaching is for height teaching. Lift down slowly the nozzle tip until it touches the
object for measurement, and measure the height. Never push the nozzle into the
object. After selection is made, the same method applies.
CAUTION
When you use the ↓-Z key to perform Z-axis teaching, the Z-axis
immediately moves down to the point 6 mm lower than the height you
set.
This may damage a nozzle, so do not perform Z-axis teaching around
the PWB transport rails (reference pin position or follower pin position)
or directly above a tall component.
7.2.4 Teaching vacuum value
Vacuum values are automatically set when component measurement is performed.
So, teaching is not necessary.