KJ-01.02.Instruction Manual.REV.02.pdf - 第193页
5 − 97 5.7.1.2. 2 Other functi ons (1) Functions – Changing the pick position The pick position can be ent ered manually or with the teaching operation. Note : The components f ed with a tray cannot be stored as t he Pic…
5 − 96
Note 1: When you select “Laser align” as the centering method, this item will
not be displayed.
Note 2: When the number of leads of a component is less than seven, the
machine cannot measure the component.
Note 3: If the outline of a component exceeds the area measurable with laser,
the machine cannot measure the height of the component.
– Pick up head
Note: If the nozzle to be used is not assigned yet, an error occurs.
– Component return
The machine returns some components already measured to their pick-up
positions and other components to the component scrap position as
described below.
① The components to be returned to the pick point
- Holder components
② Components to be discarded onto the discarding position.
- Tape components
- Stick components
- Bulk components
Note: When you select “Trash belt” at the menu item “Compo.
aband.” on the Component data screen, the machine discards
a component on the IC trash belt. When you select “Trash
box”, it discards a component in the trash box.
If the IC trash belt is full of discarded components, the
confirmation message appears on the screen. Remove the
discarded components from the IC trash belt, and reset the
belt. When you click the <OK> button, the machine discards
a component onto the IC trash belt. If the IC trash belt is full
of components even after you click the <OK> button, the
machine discards a component into the trash box.
– Pick point
The component located at the first pick point, which is linked with other
components (if there are the same type of components) is measured.
① Feeder
• The component which is picked from the first linked feeder is
measured first.
• When you are performing the “single measurement”, the system
can move onto the alternative feeder with the NEXT or PREVIOUS
of the HOD, or the F5 or F6 key.
② Holder
• Components are measured from the component which is picked
from the first position of the first tray linked.
• When you are performing the “single measurement”, the system
can move onto the alternative tray with the NEXT or PREVIOUS of
the HOD, or the F5 or F6 key.
5 − 97
5.7.1.2.2 Other functions
(1) Functions
– Changing the pick position
The pick position can be entered manually or with the teaching operation.
Note: The components fed with a tray cannot be stored as the Pick data.
– Recognition center offset
If you enter the offset from the nozzle pick-up position to the component
recognition center at the menu item “Recog. offset” on the Component data
screen, and select “VCS” as the centering method (the component
dimensions and lead information are obtained), the machine recognizes the
component with taking the offset into consideration.
It the nozzle cannot move to the specified coordinates due to the
recognition center offset you set, the machine automatically reverses the
measurement angle to measure the component.
5 − 98
5.7.1.3 Operation mode
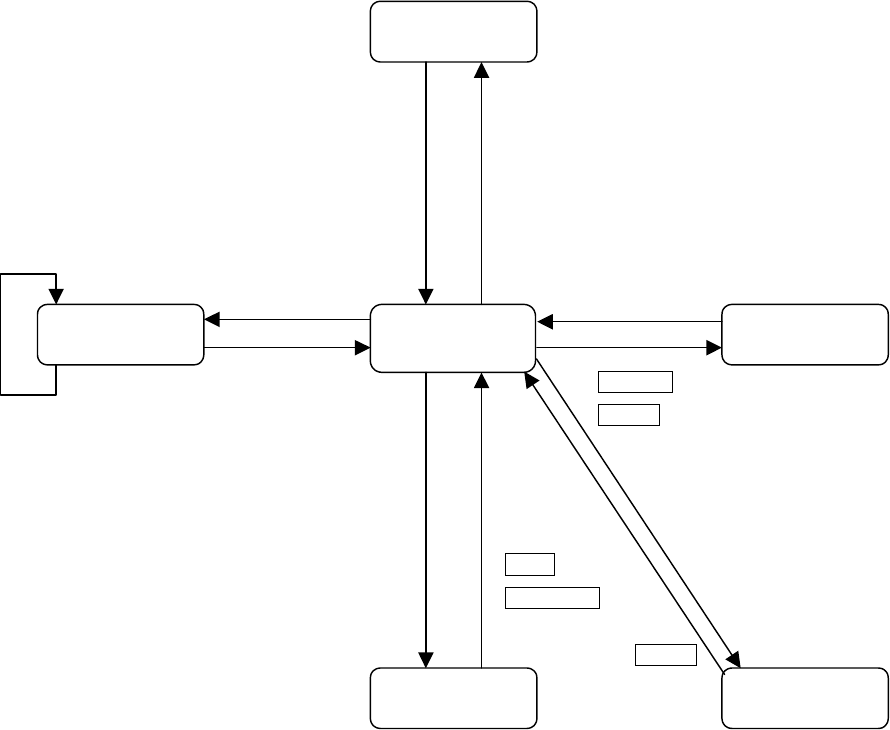
The figure below shows the mode transition in the operation mode.
The [Meas.] command can be selected on the Component data edit screen only.
Note 1: Setting is not stored as the “Pick data”.
Note 2: Mark * shows the timing when the data is stored into the component data
or pick data.
Note 3: Some components are to be returned to the pick position, and the others to
be scrapped.
Note 4: Only when you check the check box “Reflects to the pick data” and change
the component pick-up position, the machine asks you whether to store the
changed data to Pick data
Figure of operation mode transition
Measurement
conditions setting
Pick point change
Measurement
result display
Teaching
Menu selection
Manual input
1 point
measurement
completed
Remeasurement
button, F10
Clicking the <MEAS>
button or pressing the
F10 key.
Move
*
NEXT
、
F5
PREVIOUS、F6
Note 4
Keyboard input
Device key of the HOD
CANCEL
*ENTER Note 1
Moving to the Pick point
* OK button (Note 4)
Moving to the waiting position
Cancel button
Moving to the waiting position
*
ENTER
Note 1
* OK button
Cancel button
Component return
(Note 3)