KJ-01.02.Instruction Manual.REV.02.pdf - 第244页
6 − 40 6.5.4.4 Creating a ball pattern image Create the act ual patter n on the f ollowing editor screen. Figure 6.5.4.4. 1 Ball pattern editor Enlarged image of the action setting window • Setting an index mark If ther …
6 − 39
6.5.4.3 Specifying the ball pattern size and name
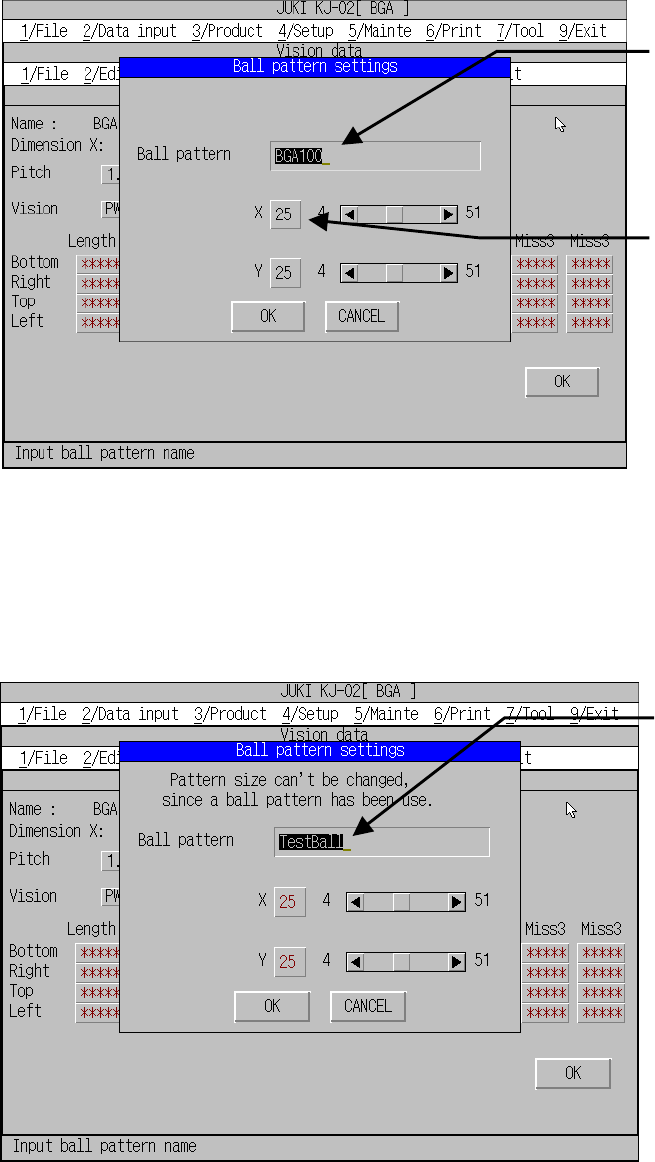
(1) Entering the ball pattern size and the pattern name
Set the pattern name and pattern size when you are to create new pattern data
or modify the created data.
Figure 6.5.4.3.1 Ball pattern setting dialog box
If the pattern is used in the BGA vision data also, only its name can be changed.
To change the size, cancel the pattern reference performed in the vision data (such
as selecting the default pattern as the ball pattern) first.
Figure 6.5.4.3.2 Ball pattern setting dialog box
(for the pattern being used in the Vision data)
Enter the pattern name.
A
t lease one character to up
to 25 characters are allowed
as a pattern name.
Specify the pattern size:
length and width in the
range from 4 to 51.
Only the pattern name
can be changed.
After changing, the
pattern name is
changed in the Vision
data too automatically.
6 − 40
6.5.4.4 Creating a ball pattern image
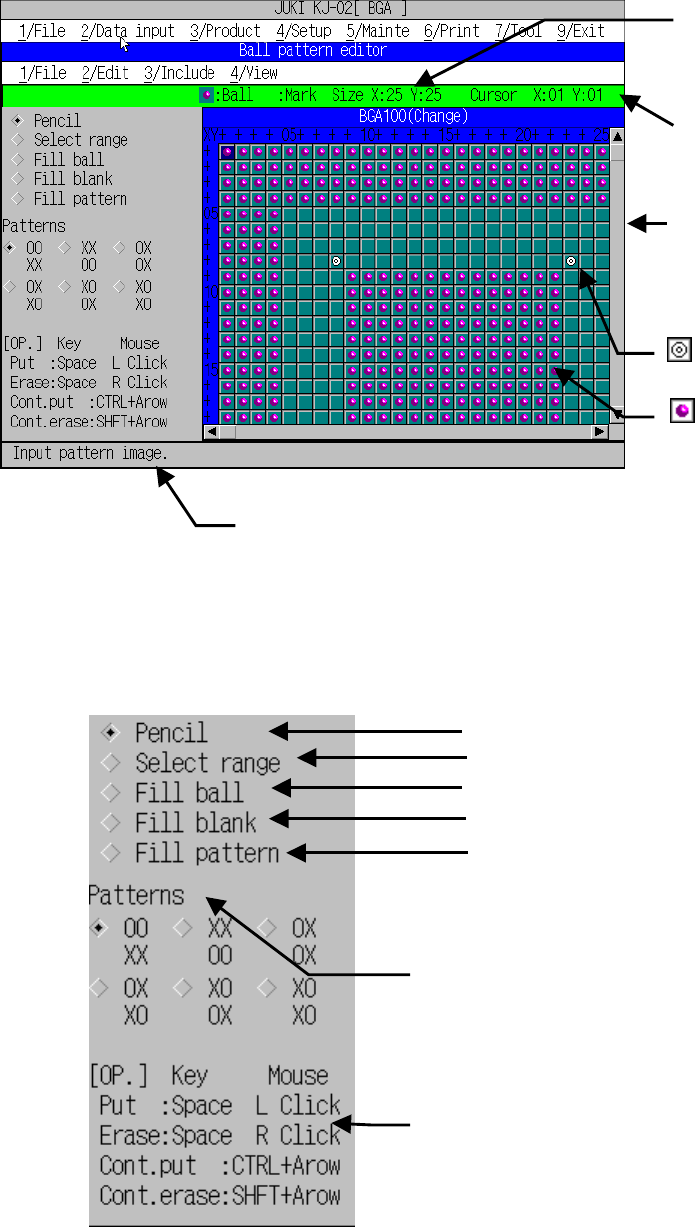
Create the actual pattern on the following editor screen.
Figure 6.5.4.4.1 Ball pattern editor
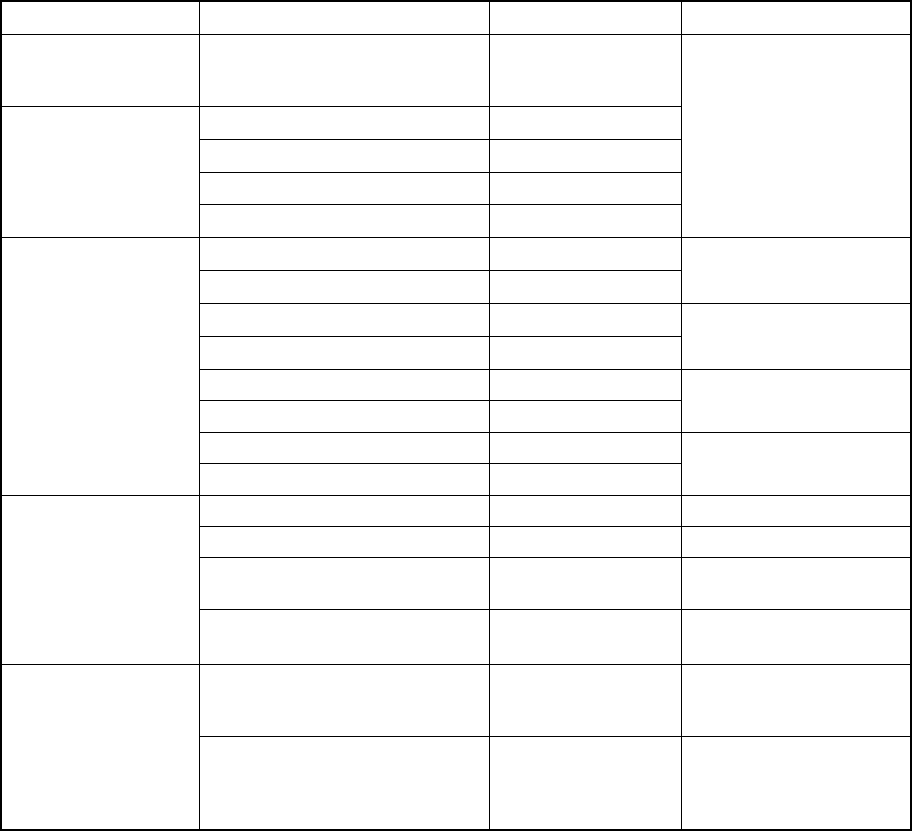
Enlarged image of the action setting window
• Setting an index mark
If there is an index mark within the ball pattern, assign its mark position on the
cell so that the system cannot recognize it as a ball.
Size:
Maximum size of this pattern
(length and width)
Cursor coordinate:
Current cursor position
Drawing window:
Window for drawing a
pattern image
Index mark
Ball
Action setting window:
Window for setting the drawing actions
Draws a picture in dots and like.
Specifies the area to be cut or pasted.
Fills the selected area with balls.
Fills the selected area with blanks.
Fills the selected area with the special
patterns.
Selects the specified pattern
(effective only if the “Pattern fill” is selected).
2 x 2 squares of pattern image O: with balls
X: with no ball
(Useful if you draws a cross pattern at a time.)
Operation help
Displays the help information corresponding to the
ti h d t d
6 − 41
• Note on creating of a pattern
Do not create any pattern that has a row or column on which no ball is located
(any index mark is not regarded as a ball). You can create such a pattern, but
it will cause an error at start of production.
(1) Operation of a keyboard or mouse
Edit a pattern with a key(s) or mouse as follows:
Table 6.5.4.4.1 Operation keys/mouse operation list
Category Usage Keyboard Mouse
Switching the windows Switching the drawing window to
the action setting window or vice
versa
Back space (BS)
To the upper direction
↑
To the down direction
↓
To the left direction
←
Moving the cursor
To the right direction
→
To the X and up direction
Alt+↑
To the X and down direction
Alt+↓
X direction scroll bar
To the Y and right direction
Alt+←
To the Y and left direction
Alt+→
Y direction scroll bar
To the beginning of the X direction PageUp
To the end of the X direction Pagedown
X direction scroll bar
To the beginning of the Y direction Home
Scrolling
To the end of the Y direction End
Y direction scroll bar
Placing a ball Space Click the left button*1.
Erasing a ball. Space Click the right button*2.
Placing balls continuously.
Ctrl+← or → or ↑ or ↓
Dragging with the left
button*2.
Drawing a dot
Erasing balls continuously.
Shift+← or → or ↑ or
↓
Dragging with the right
button*2.
Specifying the start position Space Drag the coordinates of
the start position with the
left button.
Selecting the area
Filling with balls
Filling with blanks
Filling with patterns
Specifying the end position Press the Space key
while you are
specifying the range.
Click any area other than
the range to be specified
while you are specifying
the range.
*1 Click: Press the button once.
*2 Drag: Move the mouse with holding down the button.