KJ-01.02.Instruction Manual.REV.02.pdf - 第315页
8 − 48 ④ Moving to the next component placement point W hen the machine pauses, press the NEX T k ey of t he HOD, t he head moves to the next component placem ent position. Even af ter t he head moves to the next compone…
8 − 47
To cancel the pause mode, press the START key to restart the current Dry run
operation, or the STOP key to interrupt it. When you press the STOP key, the
Dry run interruption confirmation screen appears.
CAUTION
The head starts to move immediately after the START key is pressed,
and then
placement tracking
.
To avoid a risk of injury, do not place your hand in the machine, nor
move your face or head close to the machine during operation.
Before pressing the START key, check that there is no one who is
working in the machine.
Before pressing the START key, check that there is no one who can
be injured when the head starts to move.
Before pressing the START key, check that there are no obstacles
(tools and jigs) left in the machine.
Even though you press the STOP key to interrupt the current
placement tracking
, the machine replaces a nozzle with another one.
Therefore, the XY-axis and head continue moving.
To prevent you from being injured when you interrupt the
placement
tracking
, do not place your hand in the machine, nor move your face
or head close to the machine while it is operating.
② Changing points of placement
While the machine pauses, press the CAMERA key of the HOD to teach the
component placement position. The machine cannot accept any key of the
HOD other than the CAMERA key.
CAUTION
To avoid a risk of injury, do not place your hand in the machine, nor
move your face or head close to the machine during operation of the
HOD. Note that the head moves to the X and Y coordinates according
the entered values when the cursor is moved after the X and Y values
are entered.
③ Returning to the previous point of placement
While the machine pauses, you can return to the previous point of placement
by pressing the PREVIOUS key of the HOD. The pause status is still held
even after the camera returns to the previous point of placement.
CAUTION
The head starts to move immediately after the PREVIOUS key is
pressed.
To avoid a risk of injury, do not place your hand in the machine, nor
move your face or head close to the machine during operation of the
HOD.
Before pressing the PREVIOUS key, check that there is no one who is
working in the machine.
Before pressing the PREVIOUS key, check that there is no one who
can be injured when the head starts to move.
Before pressing the PREVIOUS key, check that there are no obstacles
(tools and jigs) left in the machine.
8 − 48
④ Moving to the next component placement point
When the machine pauses, press the NEXT key of the HOD, the head
moves to the next component placement position. Even after the head
moves to the next component placement position, the machine keeps
pausing. After you check the last component placement position, the
machine performs the end of production process.
CAUTION
The head starts to move immediately after the NEXT key is pressed.
To avoid a risk of injury, do not place your hand in the machine, nor
move your face or head close to the machine during operation of the
HOD.
Before pressing the NEXT key, check that there is no one who is
working in the machine.
Before pressing the NEXT key, check that there is no one who can be
injured when the head starts to move.
Before pressing the NEXT key, check that there are no obstacles (tools
and jigs) left in the machine.
(2) Manual run
When you select “Manual” as “Place tracking” on the “Trial conditions” screen,
the monitoring camera moves over the first point of placement after blank run,
shoots the status of placement, outputs it to the monitor screen, and pauses
there.
The pause screen for “Manual” is the same as that for “Automatic”.
CAUTION
After blank run has been completed, the camera continues to move to
the the first point of placement. To avoid a risk of injury, do not place
your hand in the machine, nor move your face or head close to the
machine during operation of the HOD.
8 − 49
8.6 Production Options
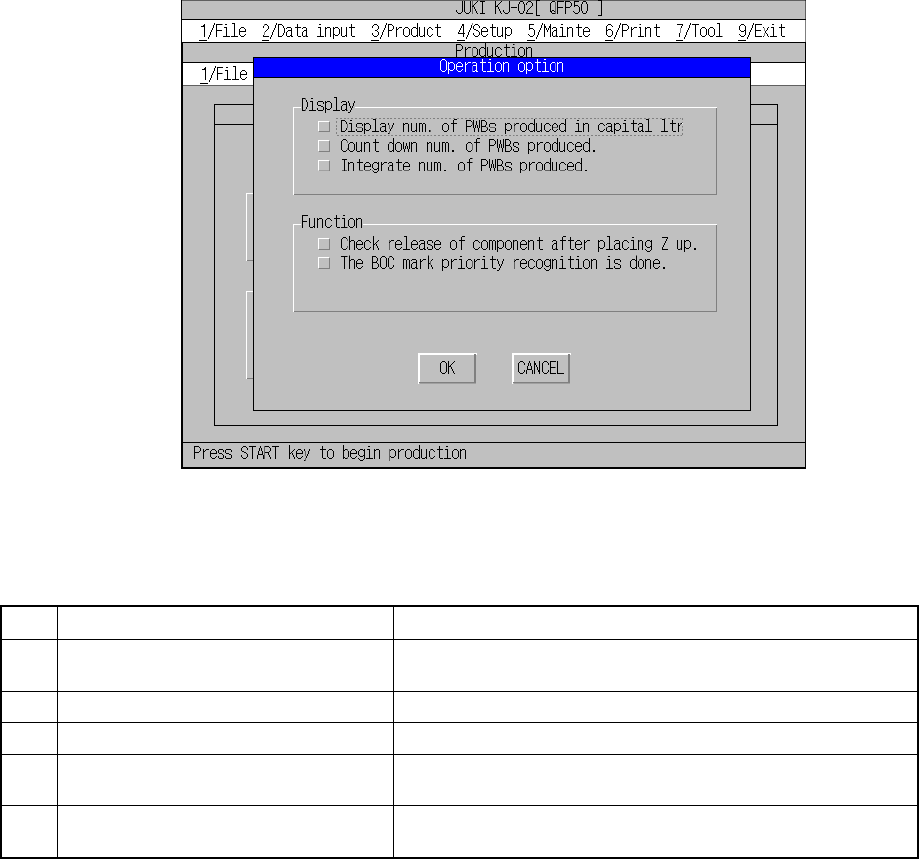
When you select the [3/Product] command on the top menu, and then the [2/ Option]
command, or you select the [3/Product] command on the top menu, and then the [1/
PWB Production] command and [4/Option] command in this order, the “Operation
option” screen appears.
Figure 8.6.1 Operation option screen
(1) Setting items
No. Item Description
1 Display num. of PWBs produced in
capital ltr.
Sets how to display the number of PWBs produced.
2 Count down num. of PWB produced. Sets how to display the number of PWBs produced.
3 Integrate num. of PWB produced. Sets how to display the number of PWBs produced.
4 Check release of component after
placing Z up.
Checks if a component is detached from a nozzle when it is
placed on a board.
5 The BOC mark priority recognition is
done.
Sets whether the machine should recognize a BOC mark
prior to a bad mark or not.
(2) How to set
① Display num. of PWBs produced in capital ltr.
− Set how to display the number of PWBs already produced by checking the
check box.
− When you check this check box, the machine displays the number of PWBs
produced during the current production in large characters.