KJ-01.02.Instruction Manual.REV.02.pdf - 第304页
8 − 37 8.3.5 Production continues This f unction allows the machine to repr oduce a PW B that was not produced completely and ejected duet to a product ion error or because you f orcibly f inished the production. The f o…
8 − 36
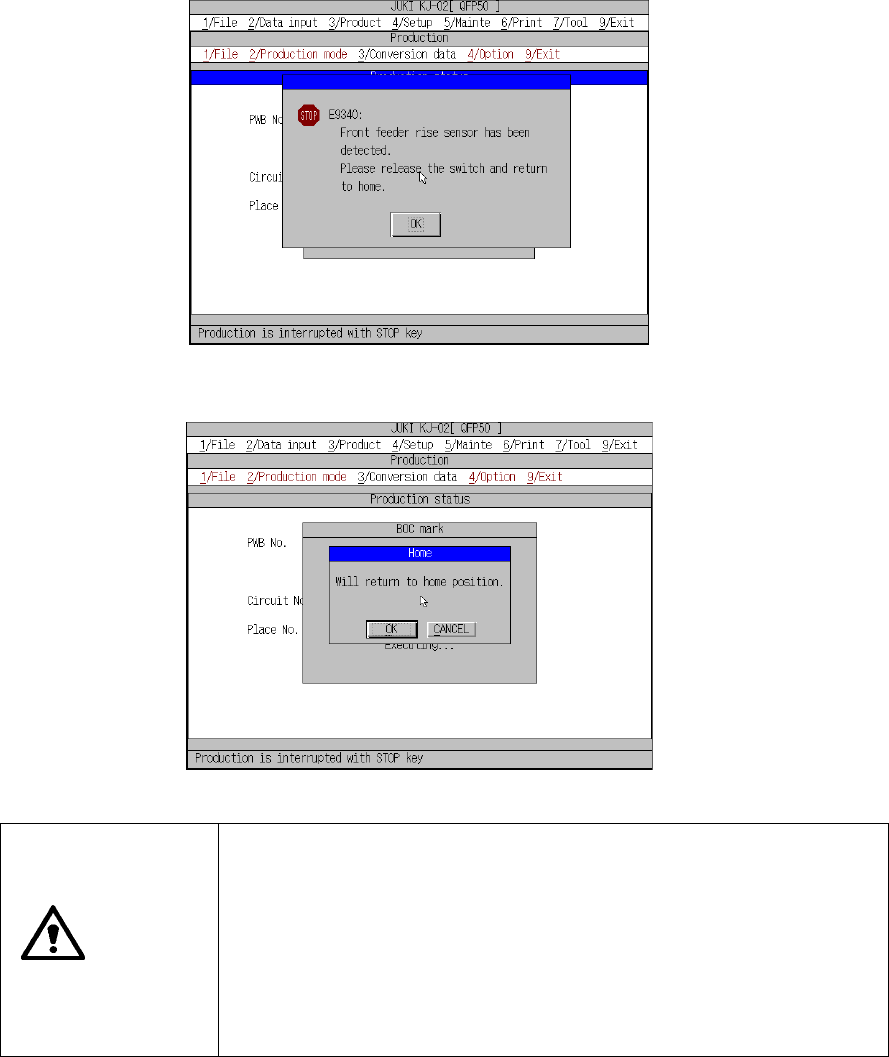
− If you check the check box “Stop by detected fdr. float” on the “Use unit” menu
invoked from the Setup menu
The following screen appears at start of the XY-axis or while it is moving. When
you click the <OK> button, the returning-to-home-position confirmation screen
appears, and then the initial production screen reappears.
Floating feeder error detection screen displayed
if you check the check box “Stop by detected fdr. float”
Returning-to-home-position confirmation screen.
CAUTION
The XY-axis starts returning to its home position immediately after you
click the <OK> button.
To avoid risk of injury, do not place your hand in the machine, nor move
your face or head close to the machine while it is operating.
Before clicking the <OK> button, check to see if there is no one who is
working the internal parts of the machine.
Before clicking the <OK> button, check to see if there is no one who is
near the machine and can be injured when the machine warms up.
Before clicking the <OK> button, check to see there is no obstacle (tools
and jigs) attached or left in the machine that may prevent any part inside
the machine from operating.
If a nozzle is still attached on the head after the axes return to their home
positions respectively, the machine returns the nozzle to the ATC holder, and
displays the initial screen again.
When you click the <CANCEL> button on the returning-to-home-position screen,
the machine displays the initial screen again without returning any axis to its
home position.
In this case, the returning-to-home-position screen reappears if you press the
START key to start production.
8 − 37
8.3.5 Production continues
This function allows the machine to reproduce a PWB that was not produced
completely and ejected duet to a production error or because you forcibly finished the
production. The following two methods are provided to reproduce an incomplete
PWB.
(1) Specifying the start position on the “Production conditions” screen
At the “Starting pos” column on the “Production conditions” screen, specify the
“Circuit No.” and “Step No.” that is entered on the PWB data screen. In this
case, an operator has to remember how the previous PWB production was
finished, and manually enter data on the “Production conditions” screen
according to this condition.
(2) Semi-automatic production restart by pressing the START key
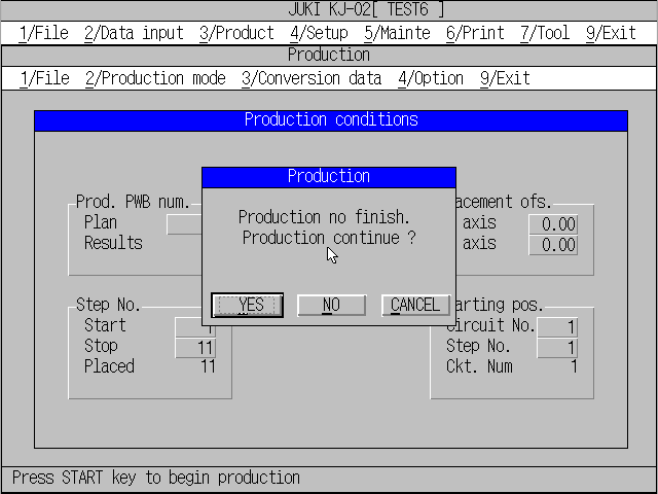
When you press the START key, the machine checks how the previous PWB
production was performed, and displays the following confirmation message if a
PWB was not completely produced. When you place an incomplete PWB on
the machine and click the <YES> button, the machine continues the previous
production form the point it was interrupted.
Continuous production confirmation message screen
When you click the <YES> button, the machine restarts the previous production from
the point where it was interrupted.
When you click the <NO> button, the machine starts production from the beginning
or the circuit No. and Step No. specified as the “Starting pos.” on the “Production
conditions” screen.
When you click the <CANCEL> button, the machine stops starting production, and
displays the “Production conditions” screen again.
8 − 38
CAUTION
The head starts moving immediately after you click the <YES> or
<NO> button.
To avoid risk of injury, do not place your hand in the machine, nor
move your face or head close to the machine while it is operating.
Before clicking the < YES> or <NO > button, check to see if there is no
one who is working the internal parts of the machine.
Before clicking the < YES> or <NO > button, check to see if there is no
one who is near the machine and can be injured when the machine
warms up.
Before clicking the < YES> or <NO > button, check to see there is no
obstacle (tools and jigs) attached or left in the machine that may
prevent any part inside the machine from operating.
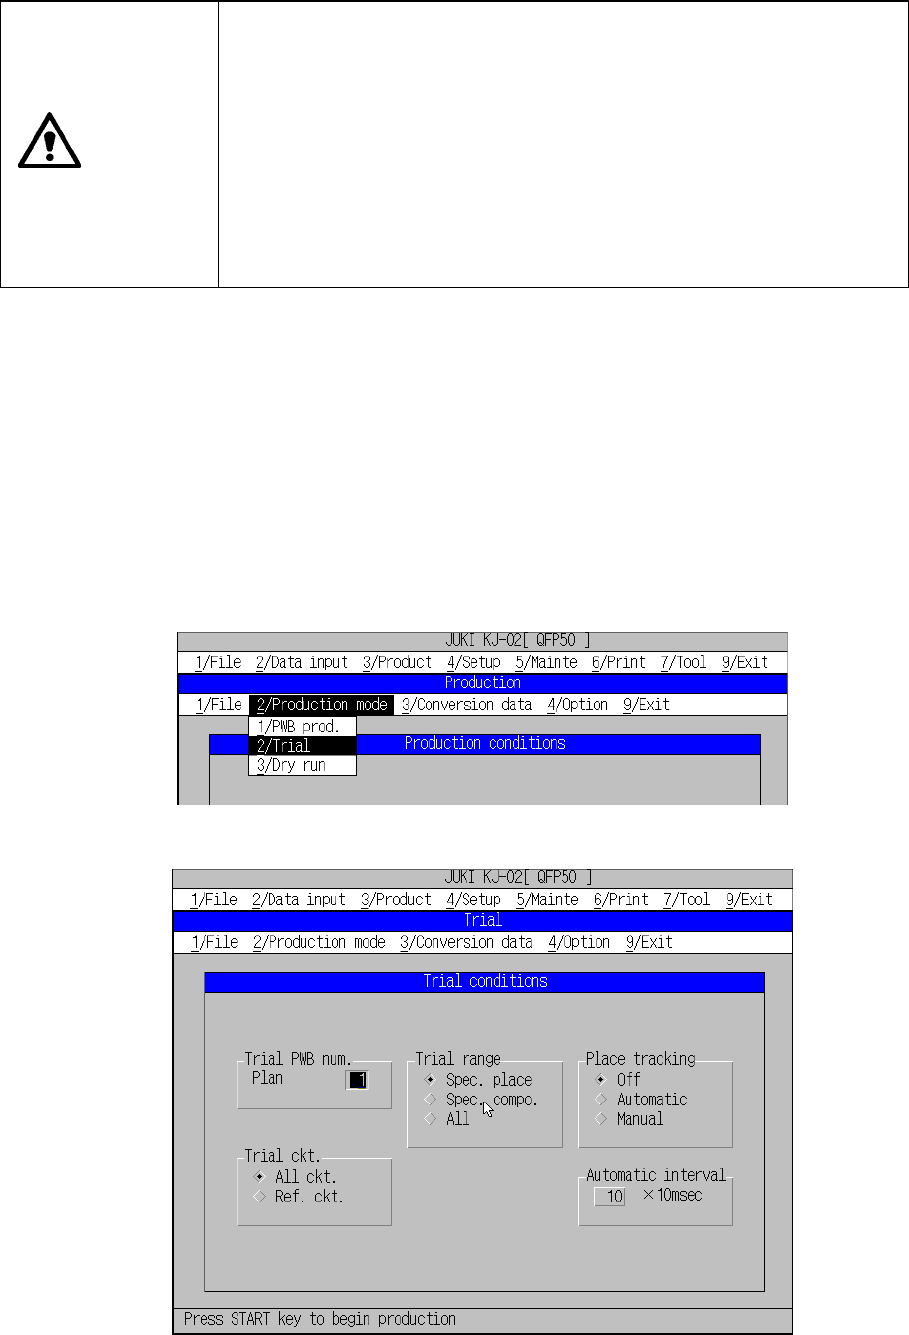
8.4 Trial Run
Select [2/ Production mode] in the Setting of producing conditions menu, then select
[2/ Trial] in the submenu box.
When you select this command, the machine actually places components on a board
according to the settings specified on the “Trial conditions” screen, and allows you to
check each operation of the PWB production process.
The machine does not place on a board as trial any component whose “Trial” item is
set to “No” on the Extension window invoked from the Component data screen or any
component whose “Try” item is set to “No” on the Placement data screen.
Figure 8.4.1 Calling “Trial run”
Figure 8.4.2 Initial trial run conditions menu box