KJ-01.02.Instruction Manual.REV.02.pdf - 第343页
10 − 18 10.4.6.2 Signal light cont rol W hen you select the [6/Others] command on the menu bar , and then the [2/Signal light cont rol] com mand on the displayed menu, t he dialog box f or controlling the signal light s …
10 − 17
CAUTION
The specified nozzle starts being replaced immediately after you click
the <CHANGE> button.
To avoid risk of injury, do not place your hand in the machine, nor
move your face or head close to the machine during operation.
Before clicking the <CHANGE> button, check to see if there is no one
who is working the internal parts of the machine.
Before clicking the <CHANGE> button, check to see if there is no one
who is near the machine and can be injured when the machine warms
up.
Before clicking the <CHANGE> button, check to see there is no
obstacle (tools and jigs) attached or left in the machine that may
prevent any part inside the machine from operating.
The positions from A to D displayed on the “Nozzle change” window of the dialog box
shown in Figure 10.4.6.1.1 are assigned as shown below when you face the front of
the machine.
A B
C D
“**” displayed as the nozzle number on the “Status” window indicates that the
corresponding nozzle is not assigned on the Setup screen. The leftmost * mark
indicates the position of the ATC to which the nozzle attached on the current head is
assigned.
10 − 18
10.4.6.2 Signal light control
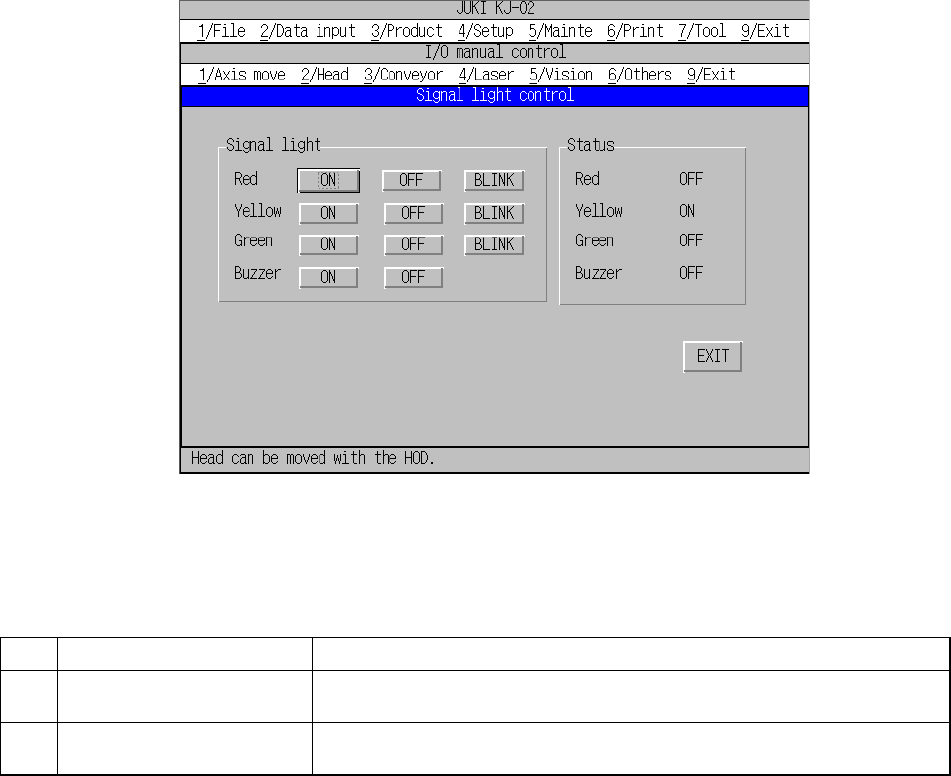
When you select the [6/Others] command on the menu bar, and then the [2/Signal
light control] command on the displayed menu, the dialog box for controlling the
signal lights appears on the screen as shown in Figure 10.4.6.2.1.
Each command is described on Table 10.4.6.2.1.
Figure 10.4.6.2.1 “Signal light control” dialog box
Table 10.4.6.2.1 Description of each command
No. Command Description
1 Signal light Controls the signal lights (red, yellow and green) (ON/OFF/BLINK), and
controls the signal buzzer (ON/OFF).
2 Status Displays the conditions of the signal lights (red, yellow and green).
Displays the condition of the signal buzzer (ON/OFF).
When you select a command on the dialog box above, the signal light lights up/goes
off/flashes according to the command you selected, or the signal buzzer turns on/off.
10 − 19
10.4.6.3 Feeder knock pin control
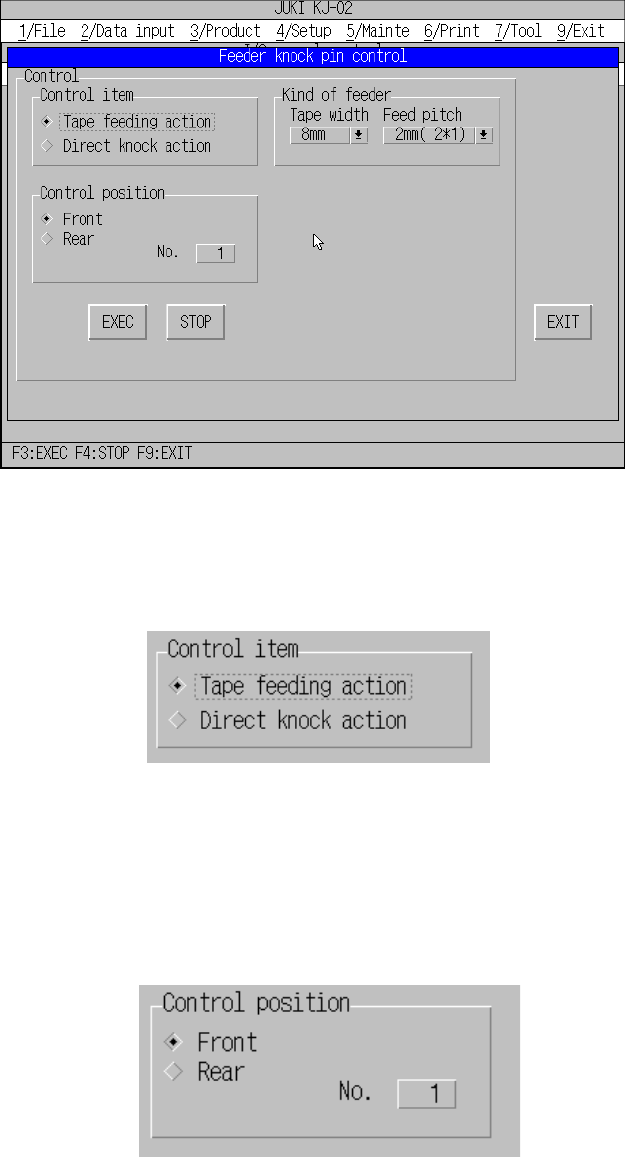
When you select the [6/Others] command on the menu bar, and then the [3/Feeder
knock pin control] command on the displayed menu, the dialog box for controlling the
feeder knock pin appears on the screen as shown in Figure 10.4.6.3.1.
Figure 10.4.6.3.1 “Feeder knock pin control” dialog box
− Control item
Select the desired control item with checking the corresponding radio button.
“Control item” dialog
− Control position
When you select the control item “Tape feeding action”, select the pin position to
be controller by checking the radio button displayed next to the side to be
controlled and selecting the number from Edit box.
“Control position” dialog