00195982-03_SM_SWS_EN.pdf - 第50页
3 SIPLACE wafer system (SWS) function 3.2 Basic die presentation process 50 Service Manual SIPLACE Wafer System (SWS) 11/2018 3.2.2 Die attach process The optional die attach unit is needed for the die attach process. In…
3 SIPLACE wafer system (SWS) function
3.2 Basic die presentation process
Service Manual SIPLACE Wafer System (SWS) 11/2018 49
3.2.1 Flip chip process
The flip chip process is the standard method for SWS. The die is rotated by 180° before placement
(face down placement).
The flip chip method is a rapidly growing technology. This process is primarily used for consumer
electronics assemblies (e.g. processors, graphics processors, memory).
The die inputs/outputs (I/O) are directly attached to the printer circuit board, which has several be-
nefits compared to the conventional die attach process:
●
Less space needed
●
Faster transmission of signals
●
Higher density of I/O per component
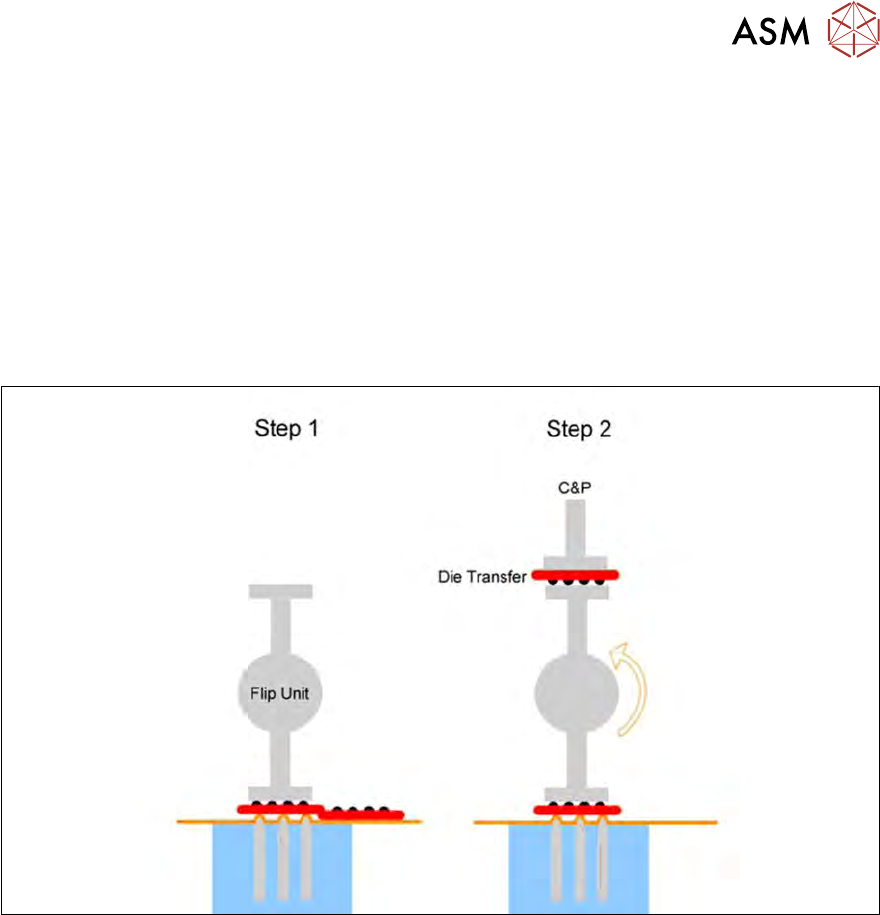
Fig.29: Flip chip process
The steps of the flip chip process are as follows:
●
Step 1: Die release
●
Step 2: The die is rotated by 180° and is passed on to the placement head. Parallel to this, the
next die is taken up by the second nozzle of the flip unit.
3 SIPLACE wafer system (SWS) function
3.2 Basic die presentation process
50 Service Manual SIPLACE Wafer System (SWS) 11/2018
3.2.2 Die attach process
The optional die attach unit is needed for the die attach process.
In this method, the die is placed in the same bottom/top orientation as it was on the wafer foil
("face-up" placement).
The die attach method is the traditionally established die placement procedure. Die attach requires
an additional step to create the connections between the die and the printed circuit board (wiring
connections).
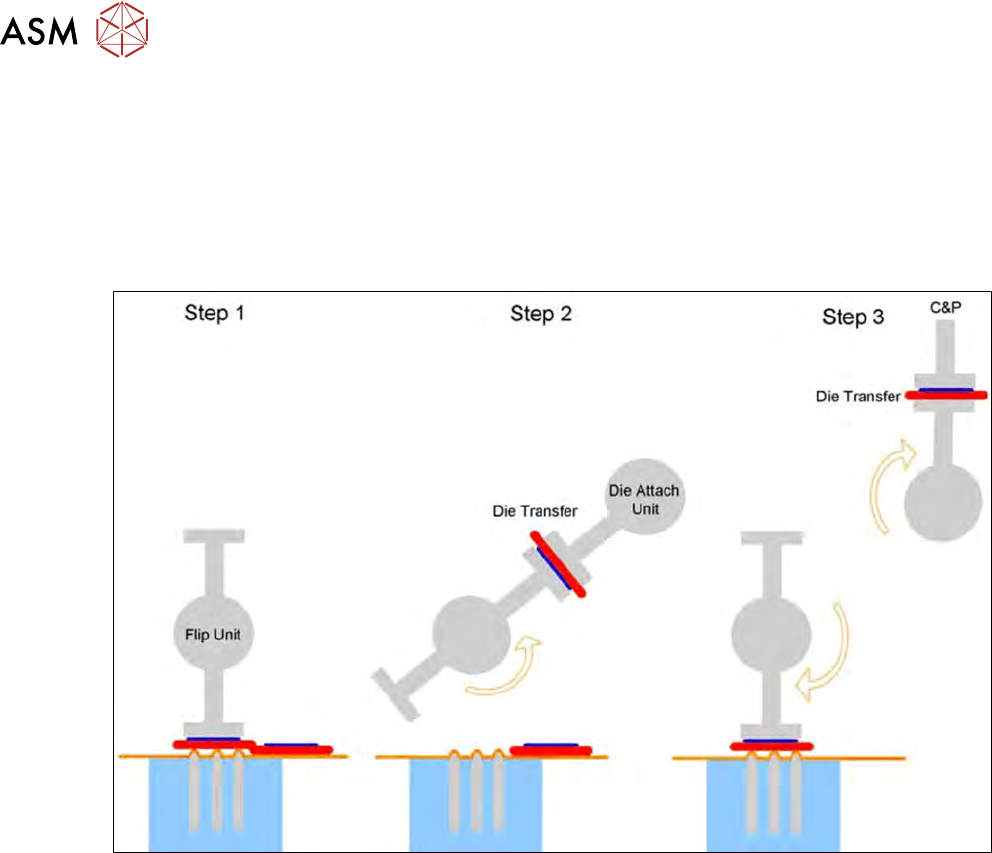
Fig.30: Die attach process steps
The steps in the die attach process are as follows:
●
Step 1: Die release
●
Step 2: The die is rotated by approx. 130°and transferred to the die attach unit.
●
Step 3: The die attach unit rotates the die into the pickup position and transfers it to the place-
ment head. Parallel to this, the next die is picked up by the flip unit.
3.2.3 Die recognition and die positioning
The wafers are fixed to the wafer foil with a specific position and angular tolerance.
It is therefore not possible to place the die reliably in the center of the ejector unit without recogni-
tion and correction. This is particularly important for small dies, in order to ensure reliable ejection.
Furthermore, you may need to process only a selection of dies. A selection can be made by mark-
ing "bad" dies with an ink spot or by using a wafer map file for the relevant wafer.
The following equipment is needed for this process step:
●
2 axis wafer table for positioning
●
Wafer camera system for the die and for optional ink spot recognition
●
Optional wafer map system
3 SIPLACE wafer system (SWS) function
3.2 Basic die presentation process
Service Manual SIPLACE Wafer System (SWS) 11/2018 51
3.2.4 Ejection procedure
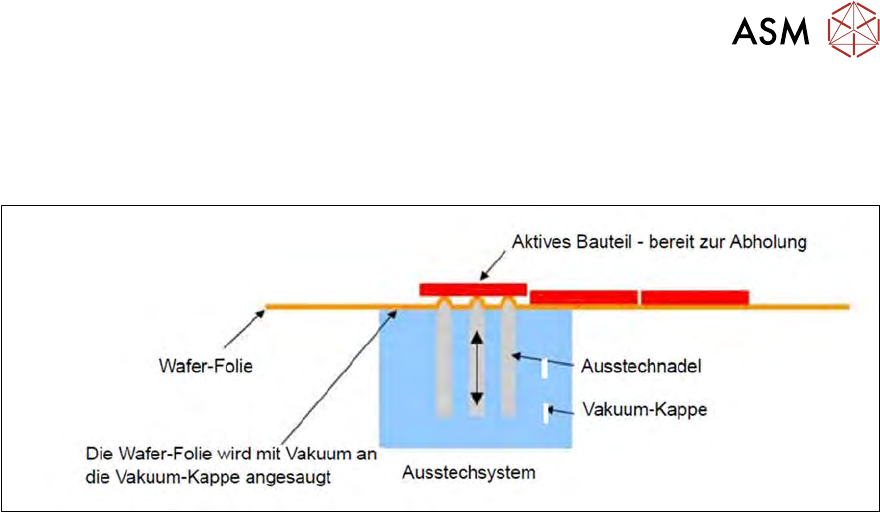
Once the die has been centered using the ejector system, it can be released from the wafer foil us-
ing needles and transferred to the flip unit. While the needles release the die from the foil, the wafer
foil is moved towards the ejection system by means of suction.
Fig.31: Die presentation process
The following equipment is needed for this process:
●
Ejection system with exchangeable ejector tool
3.2.5 Pickup process
During the pickup process, the die is transferred to the tool and to the nozzle of the flip unit. The flip
unit transfers the die on it either to the placement head (flip chip process) or to the die attach unit
(die attach process).
The die attach unit rotates the die again and then presents it to the placement head. The following
equipment is needed for this process step:
●
Flip unit
●
Die attach unit (optional)