RS-1_instruction manual.pdf - 第145页
Part 1 B asic O peration Chapter 2 Pr oduction 2- 34 Production condi tions screen When you star t up the Pro duction uti lity , the producti on requirements set ting screen ap pears. Set the requ irements f or each prod…
Part 1 Basic Operation Chapter 2 Production
2-33
2.8 Production Screen
Starting up the Production screen
When you select the “Product” button from the menu of the main screen, and then the [PWB
Production] command or when you select the “PWB Production” button on the Application shortcut
tab, the following production requirements screen appears.
Specify the desired production requirements on this screen (see Section 2.8.2 “Production
requirements screen”).
Part 1 Basic Operation Chapter 2 Production
2-34
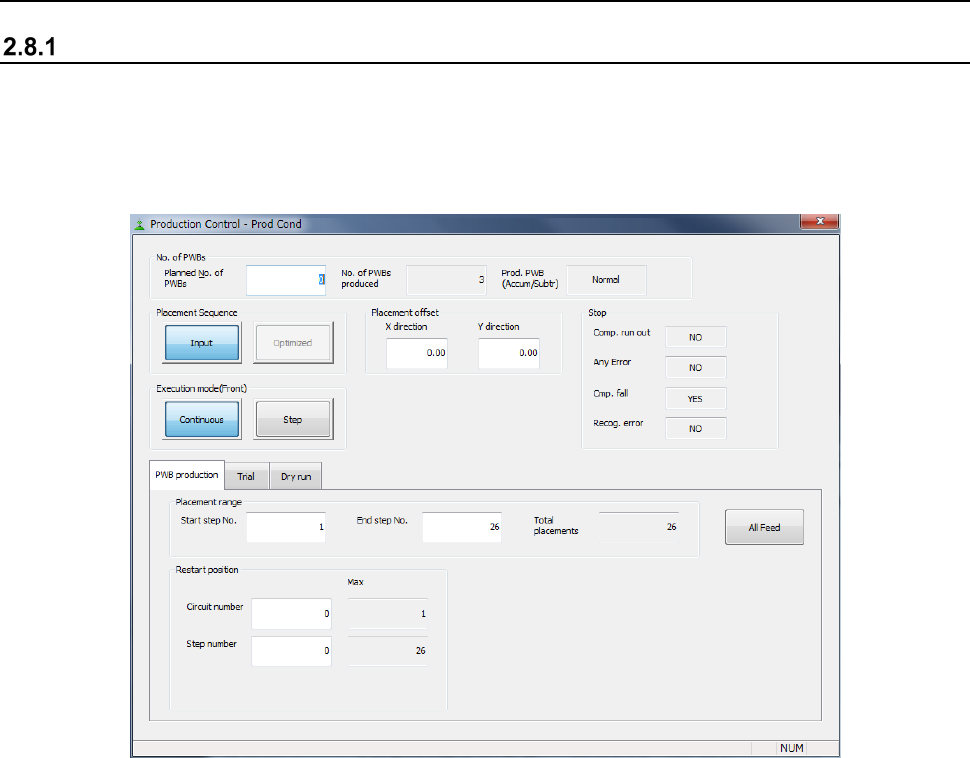
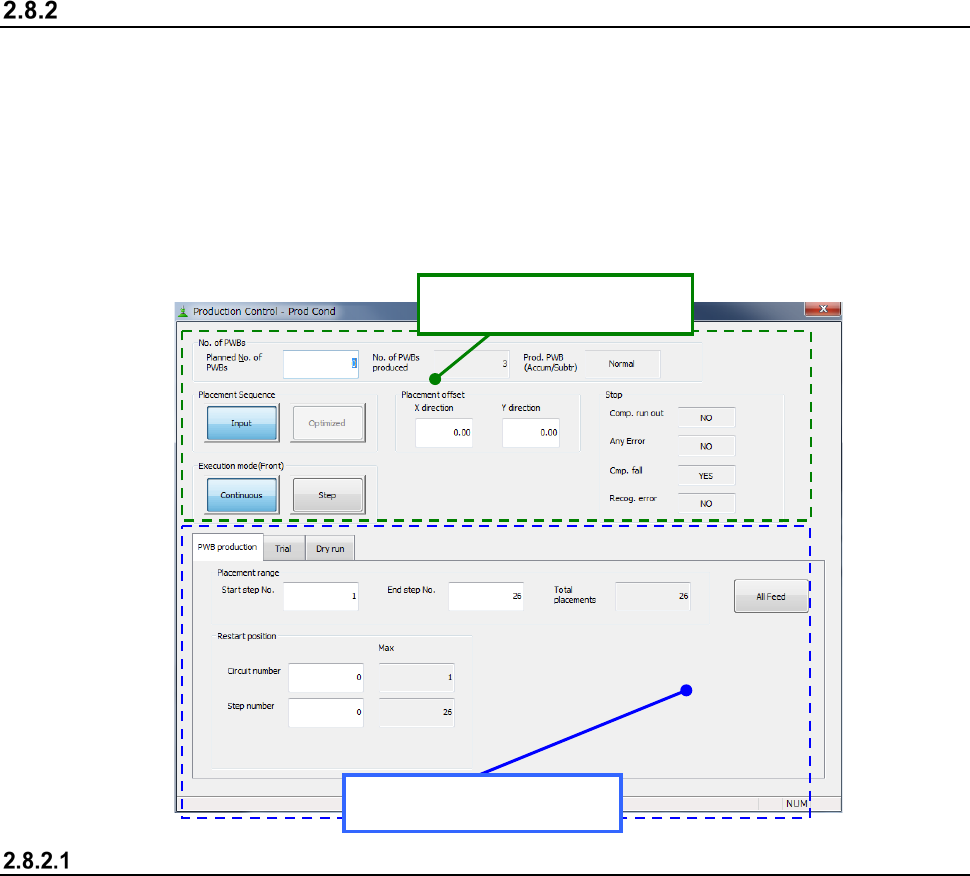
Production conditions screen
When you start up the Production utility, the production requirements setting screen appears.
Set the requirements for each production mode: PWB production, Trail, and Dry run.
• Common setting items:
Set the common conditions regardless the selected mode: “PWB production,” “Trial” or “Dry
run.”
• Individual setting items:
Select the production mode among the “PWB production,” “Trial,” and “Dry run” to set the
requirements for the selected mode.
Common setting items
(1) No of PWBs to be prod. (produced)
Enter the planned number of PWBs to be produced. The planned number of PWBs set at the
previous production appears here at first.
When the machine uses a dual-lane conveyor, this number indicates the total number of PWBs
that will be produced with the front and rear lanes. When the total number of PWBs produced
with the front and rear lanes reaches this number, the machine finishes producing a PWB.
When you display this screen for the first time, “1” appears here. When you enter “0” into the
“No. of PWBs to be prod.” field, the system will to produce PWBs infinitely.
(2) No of produced PWBs
Shows the number of PWBs that have been already produced. This number is reset to “0” at
start of production. (Note that this number is not reset when you start continuous production.)
When the machine uses the dual-lane conveyor, this number indicates the total number of
PWBs already produced with the front and rear lanes.
Normally, the initial value displayed here is set to “0.” However, when you check the item
“Accumulated planned number of boards produced” on the “Production (Display)” tag of the
“Operation option” menu, the number of PWBs that were produced during the previous
production appears here. If you start production in this condition, the system counts the
number of produced PWBs from this displayed number and continues production until the
number reaches the planned number of PWBs.
When production is aborted or ended, the number of PWBs that have been produced already
appears here.
Individual setting items
Common setting items
Part 1 Basic Operation Chapter 2 Production
2-35
If you clear the production management information, you can set this number to “0” to start
production also.
(3) Prod. PWB
This item displays whether to accumulate the number of PWBs produced already or not.
The setting shown here is determined according to the settings of the menu items “Count down
the number of boards produced” and “Accumulate planned number of boards produced”
displayed on the “Production (Display)” tab of the “Operation option” screen.
♦Normal: When the machine starts producing PWBs, the value shown in the “No. of
PWBs produced” is reset to “0.” (This rule is not applied when the machine operates in
Continuous Production mode.)
♦Accumulate: When the machine starts producing PWBs, the machine starts counting the
number of produced PWBs from the previous value.
♦Subtract: The machine displays not the number of produced PWBs but the number of
PWBs to be produced.
♦Accum./Subtr.:The machine displays the number of PWBs to be produced with taking into
consideration the previous value.
(4) Placement Sequence
Specify in which order components should be placed on a board: Input order or Optimized
order.
You cannot select the <Optimized> button (Optimized order) for data not optimized with the
Program Editor.
The Input order is selected initially, but the Optimized order is selected initially only if a created
production program has been already optimized when it is displayed on the Production screen
for the first time.
♦Input: the system produces PWBs in order entered on the Placement data screen.
Normally, the production tact time becomes longer. Select this order to check
data.
♦Optimized: the system produces PWBs in the optimized order.
Normally, select this order.
(5) Execution mode
Two execution modes are provided to execute each production mode.
No. Execution mode Description
1 Continuous
The system continues producing PWBs until the specified production ends or
until you press the <STOP> switch to stop the current production when the
system is put in the pause state.
2 Step
Every time the system moves to the certain position, the system is put in the
pause state.
Where to pause:
1 After moving to a component pick-up position
2 After moving to a component placement position
3 After moving to a bad mark position
4 After moving to the area mark position
5 After moving to the component discard position
6 After moving to any other XY position
To restart the current production, press the <START> switch.
Even when the system continues producing PWBs, your pressing <STOP> switch puts the
system in the pause state.
(6) Placement offset
If a certain lot requires its unique offset (offset required due to an error generated during the
reference hole making process), enter the XY offset value here. The entered offset becomes
effective for the entire PWB.
♦When a BOC mark is not used: the entered offset value is effective for components to be
placed on the entire board.
All component placement positions are offset by the value you
entered here.