RS-1_instruction manual.pdf - 第773页
Part 2 D etaile d Descript ion of E ach Functi on Chapter 9 M anual Control 9-1 Chapter 9 Manual Control 9.1 Ove rvi ew The Manua l control utility provides you w ith the items for chec ki ng variou s types of operat i o…
Part 2 Detailed Description of Each Function Chapter 8 Machine Setup
8-64
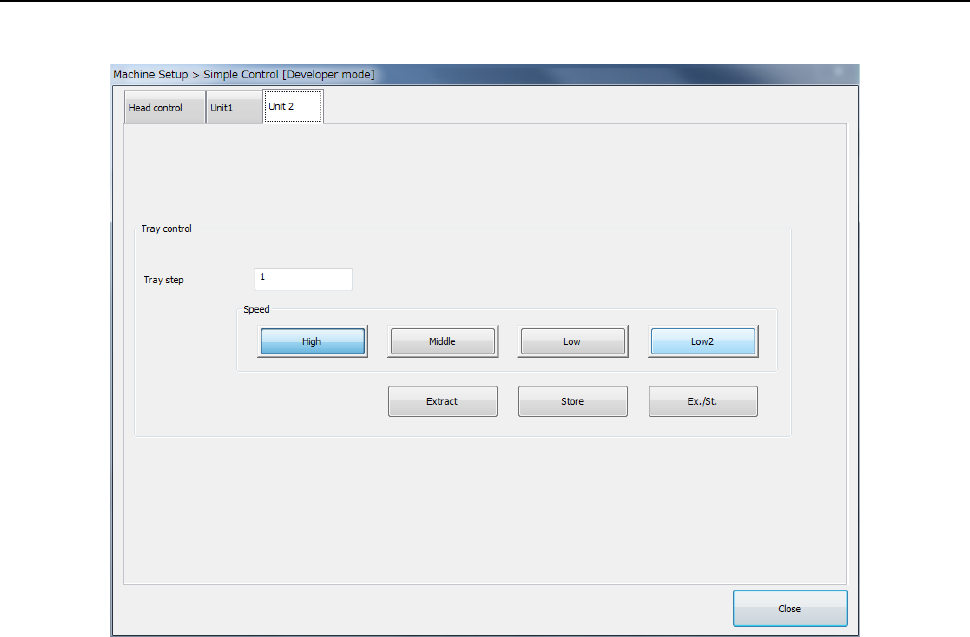
8.4.7 Unit 2
Controls the MTS tray.
When you select “Speed” of “Tray Control” and then press the <Extract> button, the tray can be
extracted at the selected speed.
(1) Tray step
Designates the tray step controlled.
(2) Speed
Designates the speed of tray extraction.
(3) Extraction
Executes tray extraction.
Part 2 Detailed Description of Each Function Chapter 9 Manual Control
9-1
Chapter 9 Manual Control
9.1 Overview
The Manual control utility provides you with the items for checking various types of operations and
for checking the ON/OFF status of each sensor.
The functions such as changeover of a PWB (see Section 2.7.1 “Setting up a PWB”), moving of a
head and checking of laser are mainly used. In addition, you can check an LED that may
malfunction (with turning it on and off).
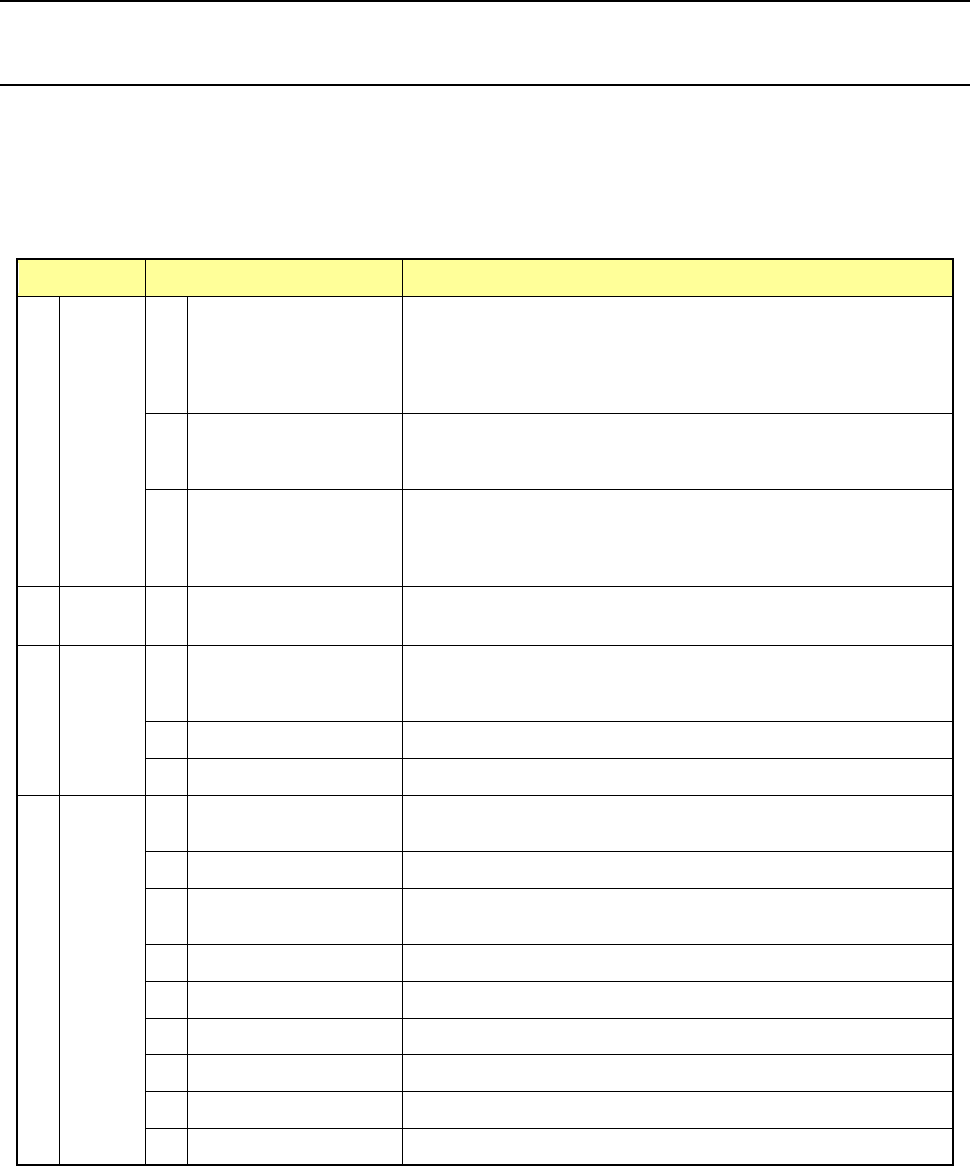
Main menu Sub menu Description
1 Head
1
Head control
XY axes movement control and display in X and Y coordinates
relative to each head.
Z, θ and ZA axes movement control and coordinate display of
each head Vacuum control, blow control, and pressure value
display of each head.
2 Head device control
XY axes movement control and display in X and Y coordinates of
each head device (OCC, bad mark sensor, HMS).
Control of each head device and display of sensor status
3 Laser/sensor control
Vacuum control of each head, vacuum ON.OFF display, Z-axis
movement control of each head, coordinate display, algorithm
changeover measurement, result display, image display edge
check, and edge check display
2 Conveyor
1 Conveyor control
Board conveyor, auto PWB width adjustment, conveyor motor
control, support table control, and signal status display
3 Feeder
1 Electric feeder control
Return-to-home, forward rotation (reverse rotation) one-pitch feed,
optional amount feed, forward rotation (reverse rotation) step
operation, profile setting, and cutter control
2 MTS control Tray control and status control
3 MTC control Tray control and status control
4 Others
1 ATC control
ATC slide plate control, sensor status display, and nozzle pick-up
control
2 Signal light control Signal light control, buzzer control, and status display
3 Other controls
LED control, vacuum control, status control, and vacuum pump
control
4 Other sensors Status display of the air pressure drop sensor, etc.
5 Driver status Status display of the X/Y/Z theta axis driver status
6 Servo status Servo status display
7 Component verification Probe control, component measurement, and status display
8 Cutter control Cutter control
9 VCS control VCS control
Part 2 Detailed Description of Each Function Chapter 9 Manual Control
9-2
9.2 Starting Up or Quitting the Manual Control Utility
9.2.1 Starting up the Manual control utility
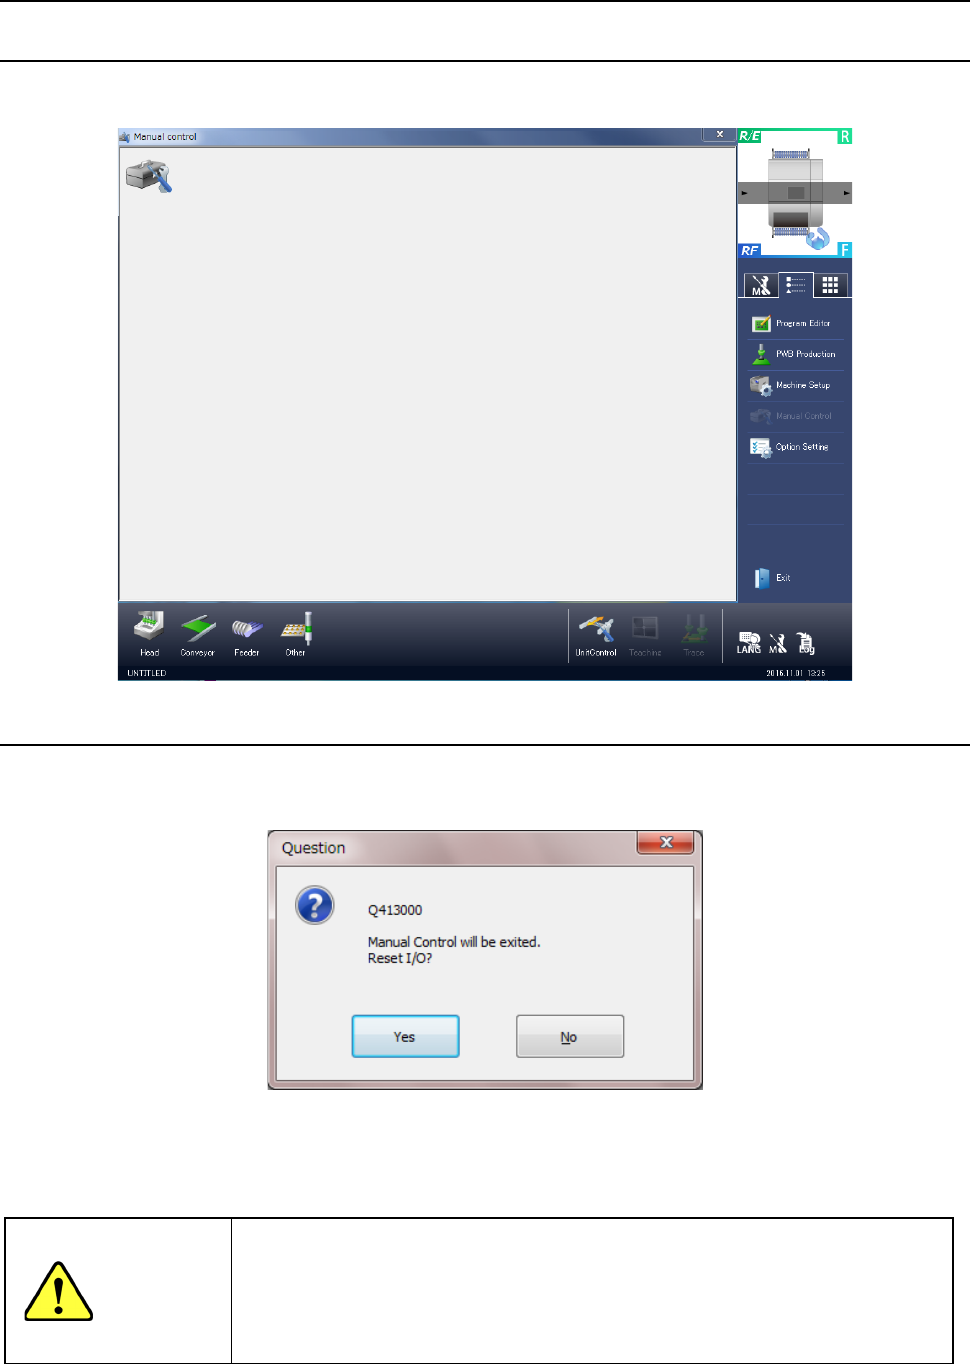
When you select [Maintenance] → [Manual control] in the menu, the manual control initial screen
shown in the following figure appears.
9.2.2 Quitting the Manual control utility
When you select “Exit” of the information area or press the close [x] button in the upper right part
of the screen, manual control is terminated.
< Ye s >: Manual control is terminated after an I/O safety direction setting is executed. As an
example, when the head is provided with a nozzle, the manual control screen is
terminated after the nozzle is returned to the ATC.
<No>: The manual control screen reappears.
WARNING
When you click the <Yes> button, the axes move, and the system starts setting each
I/O safety direction.
Before clicking the <Yes> button, be sure to check to see if there is no one who
operates the inside of the machine.
To avoid a risk of injury, do not put your hands inside the machine nor move your
face or head close the machine while the machine is operating.