RS-1_instruction manual.pdf - 第147页
Part 1 B asic O peration Chapter 2 Pr oduction 2- 36 ♦ When a BO C mark is us ed: The enter ed value is u sed as an offset for f inding a BOC mark. Even thoug h you enter the offset value, the pla cement r esult is not a…

Part 1 Basic Operation Chapter 2 Production
2-35
If you clear the production management information, you can set this number to “0” to start
production also.
(3) Prod. PWB
This item displays whether to accumulate the number of PWBs produced already or not.
The setting shown here is determined according to the settings of the menu items “Count down
the number of boards produced” and “Accumulate planned number of boards produced”
displayed on the “Production (Display)” tab of the “Operation option” screen.
♦Normal: When the machine starts producing PWBs, the value shown in the “No. of
PWBs produced” is reset to “0.” (This rule is not applied when the machine operates in
Continuous Production mode.)
♦Accumulate: When the machine starts producing PWBs, the machine starts counting the
number of produced PWBs from the previous value.
♦Subtract: The machine displays not the number of produced PWBs but the number of
PWBs to be produced.
♦Accum./Subtr.:The machine displays the number of PWBs to be produced with taking into
consideration the previous value.
(4) Placement Sequence
Specify in which order components should be placed on a board: Input order or Optimized
order.
You cannot select the <Optimized> button (Optimized order) for data not optimized with the
Program Editor.
The Input order is selected initially, but the Optimized order is selected initially only if a created
production program has been already optimized when it is displayed on the Production screen
for the first time.
♦Input: the system produces PWBs in order entered on the Placement data screen.
Normally, the production tact time becomes longer. Select this order to check
data.
♦Optimized: the system produces PWBs in the optimized order.
Normally, select this order.
(5) Execution mode
Two execution modes are provided to execute each production mode.
No. Execution mode Description
1 Continuous
The system continues producing PWBs until the specified production ends or
until you press the <STOP> switch to stop the current production when the
system is put in the pause state.
2 Step
Every time the system moves to the certain position, the system is put in the
pause state.
Where to pause:
1 After moving to a component pick-up position
2 After moving to a component placement position
3 After moving to a bad mark position
4 After moving to the area mark position
5 After moving to the component discard position
6 After moving to any other XY position
To restart the current production, press the <START> switch.
Even when the system continues producing PWBs, your pressing <STOP> switch puts the
system in the pause state.
(6) Placement offset
If a certain lot requires its unique offset (offset required due to an error generated during the
reference hole making process), enter the XY offset value here. The entered offset becomes
effective for the entire PWB.
♦When a BOC mark is not used: the entered offset value is effective for components to be
placed on the entire board.
All component placement positions are offset by the value you
entered here.
Part 1 Basic Operation Chapter 2 Production
2-36
♦When a BOC mark is used: The entered value is used as an offset for finding a BOC mark.
Even though you enter the offset value, the placement result is
not affected. If the absolute position of a BOC mark is shifted
due to the change of the lot or other reason, so the BOC mark
is out of the camera window, enter an offset value so that the
BOC mark can come to the center of the camera window.
(7) Stop
This item shows whether to stop the current PWB production temporarily if components run out
or if an error occurs.
Individual setting items
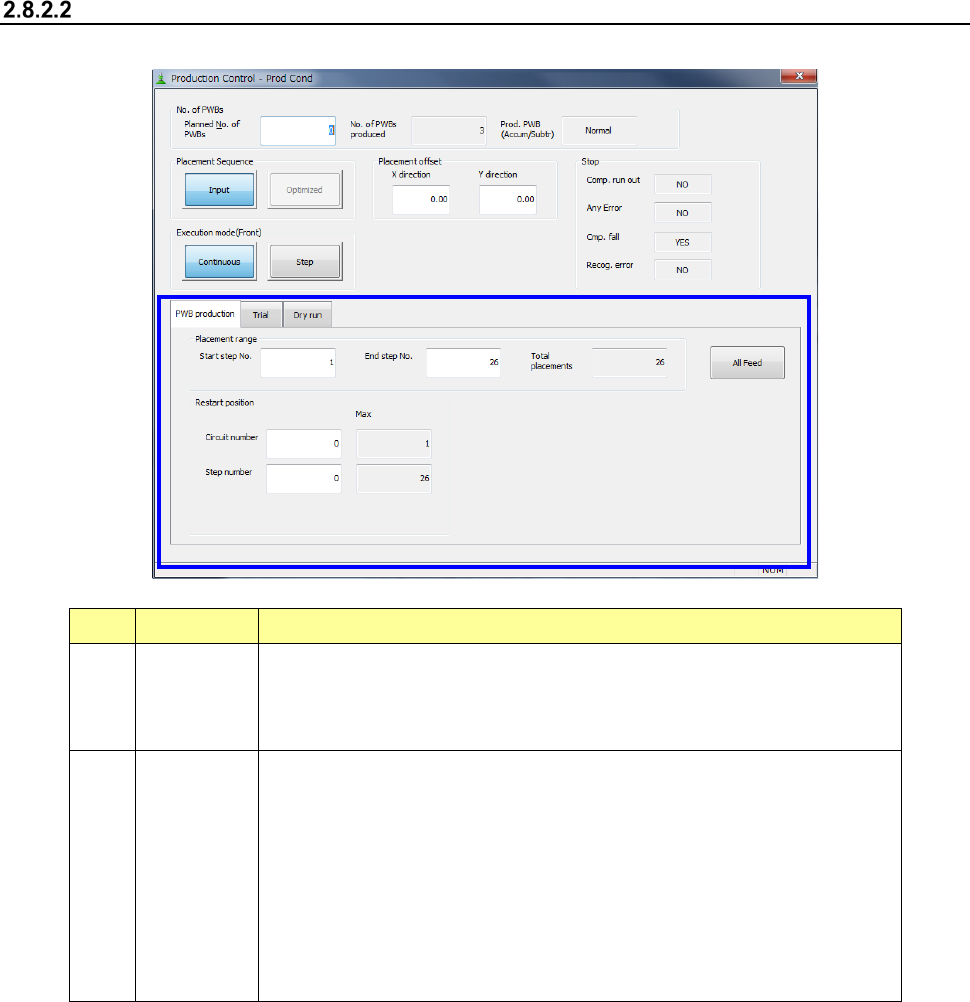
(1) PWB production
No. Item Description
1
Placement
range
To limit the area on which components are placed, enter the “Start step No.”
and “End step No.” The total number of placement steps per circuit is
displayed in the “Total placements” field. You can specify this item only when
you select the Input order as the “Placement Sequence.”
2
Restart
position
You have to set the restart position on the front side and that on the rear side
respectively for the simultaneous PWB production.
If production is suspended for any reason, and the clamped board is released,
specify this option to produce the PWB completely by placing the remaining
components onto it. You can start placing components from the specified
area of a board.
This setting is valid for the first board only. This starting position is ignored for
the second and following boards, and components are placed on all of
placement positions.
This setting is initialized at start of production.
Part 1 Basic Operation Chapter 2 Production
2-37
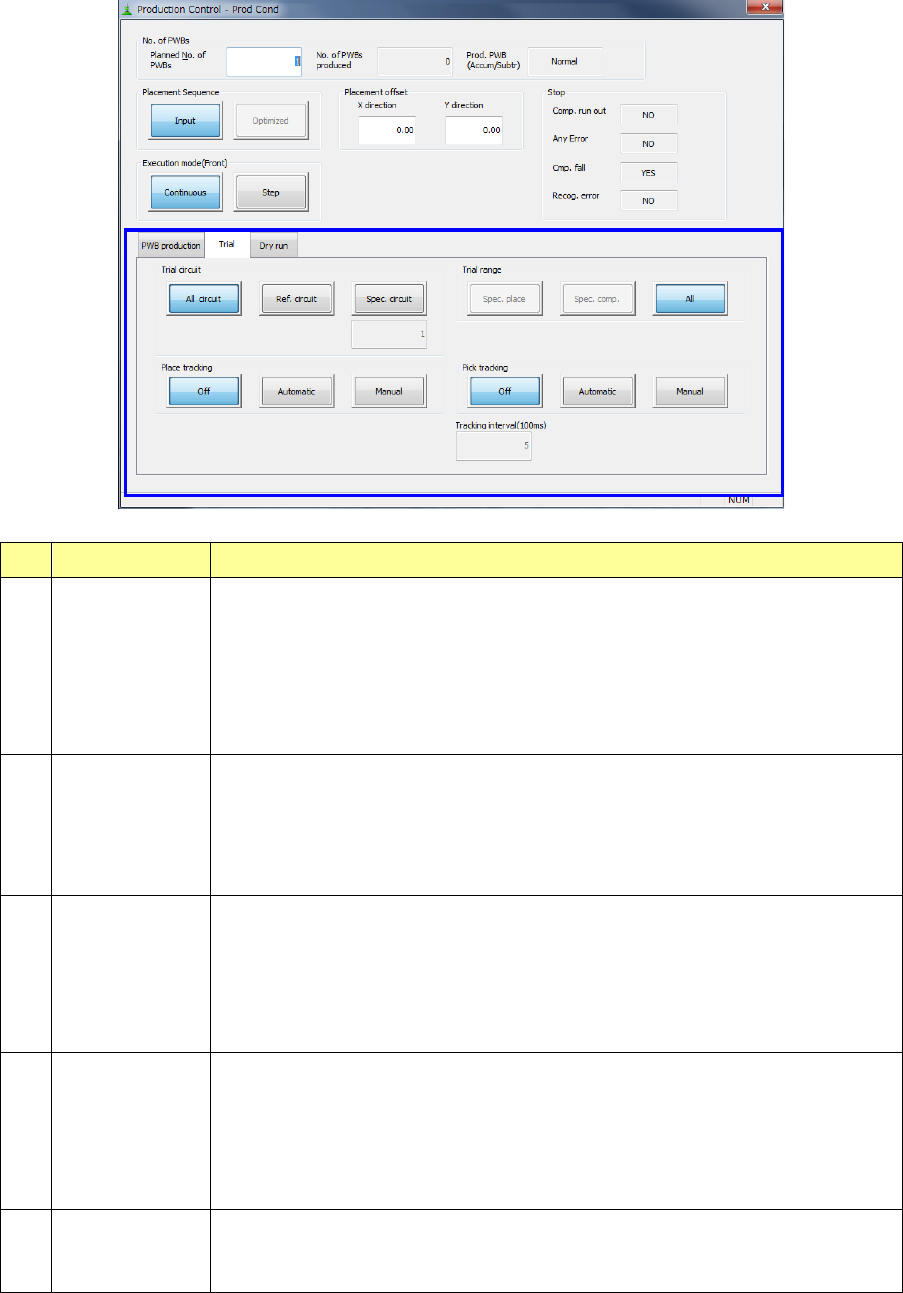
(2) Trial
No. Item Description
1 Trial circuit
Select the desired circuit for trial production. You do not have to make a selection if
you are to produce a single plane PWB.
- All circuit: Components set for trial production are placed on all circuits.
- Ref. circuit: Components set for trial production are placed on reference circuits
only.
- Spec. circuit: Components for trial production are placed on the specified circuits
only
The specified circuit number is shown here.
2 Trial range
Specify the range for trail production.
- Spec place: Components are placed on the placement positions for which “YES”
is selected in the “Trial” field on the Placement data menu.
- Spec comp: All components for which “YES” is selected in the “Trial” filed on the
Component data menu are placed.
- All: Components are placed on all placement positions.
3 Place tracking
After components are placed on a board with trial production, designate whether or
not to perform placement-tracking operation by the camera. If performed, select
whether it is manual or automatic.
- Off: Placement tracking operation is not performed.
- Automatic: Placement tracking is performed automatically.
- Manual: Stops at each placement position, and then goes to the next
placement position in response to input by an operator.
4 Pick tracking
Before components are placed on a board with trial production, designate whether
or not to perform pickup-position tracking operation by the camera. If performed,
select whether it is manual or automatic.
- Off: Pickup-tracking operation is not performed.
- Automatic: Pickup-tracking operation is performed automatically.
- Manual: Stops at each pickup position, and then goes to the next pickup
position in responses to input by an operator.
5 Tracking
When tracking is performed automatically, designate the stop time duration at a
stop position.
The unit is in 100 ms, and 1 is equivalent to 100 ms (0.1 second).