RS-1_instruction manual.pdf - 第727页
Part 2 D etaile d Descript ion of E ach Functi on Chapter 8 Machine Set up 8- 19 Manually enter it. - If registered nozz l e data does not match or nozz l e data has not y et been reg istered, the Nozz le Data Registr at…
Part 2 Detailed Description of Each Function Chapter 8 Machine Setup
8-18
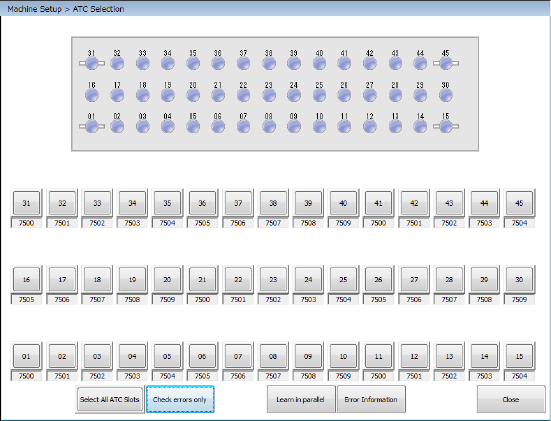
6) Automatic Assignment
When you press the <Auto-assign> button on the right side of the screen shown in
Figure, the following screen appears.
Check the check boxes corresponding to the ATC numbers to which nozzles are to be
assigned, and press the <Auto-acquisition> button. The system sets the nozzles to the
checked ATC numbers sequentially.
- The <Select All ATC Slots> button permits selecting or releasing all ATCs/all nozzles.
- Nozzle height is obtained by measuring the height of the attached nozzle tip.
- The nozzle number is set from the from the external diameter of the attached nozzle.
- The vacuum value to be obtained is set with the nozzle attached.
Notes:
- When you are to set two or more ATC slots automatically, the <STOP> switch allows
you to stop the automatic setting process. When you press the <STOP> switch
while the system is automatically setting the ATC slots, the system displays the
“Question” dialog box for stopping the automatic setting. When you select the
<Yes> button on this dialog box, the automatic ATC slots setting process is
terminated at this point.
When you press the <No> button, the process continues.
You cannot stop this process with the <CANCEL> button.
- When you automatically set the ATC slots, you do not have to enter any nozzle
number because the system sets it automatically. However, if the nozzle number
you set before this automatic setting operation is different from the one automatically
set, the latter is preferred.
- When you automatically set the ATC slots, you do not have to enter any nozzle type
either because the system sets it automatically. Note that the nozzle type is set to
“Normal.” However, the nozzle type you validated before this automatic setting is
preferred.
- If the width of the nozzle obtained with this automatic ATC slot setting process is
different from that of any standard nozzle, the system checks it with the information
on the customized nozzles registered.
When multiple nozzles have matching data, the Nozzle No. Setting List screen
opens. Make a selection from the list.
When they match each other, the nozzle number is automatically set.
If the width matches widths of two or more nozzles registered in the nozzle
information, the system sets the selected nozzle number to the ATC shown in the
“Nozzle no. table”.
When you press the <CANCEL> button at this point, the nozzle number does not
change if it is already set. Otherwise, the system does not set any nozzle number.
Part 2 Detailed Description of Each Function Chapter 8 Machine Setup
8-19
Manually enter it.
- If registered nozzle data does not match or nozzle data has not yet been registered,
the Nozzle Data Registration screen appears. At this time register the appropriate
nozzle data from the USB Flash memory.
7) Various
When you press the <Open> button of <Select ATC>, the ATC selected at Device
selection can be opened. When you press the <Close> button, the ATC selected at
Device selection can be closed.
When you press the <ATC Operation> button of the “Move Axis” column, the machine
moves heads to the ATC operation positions.
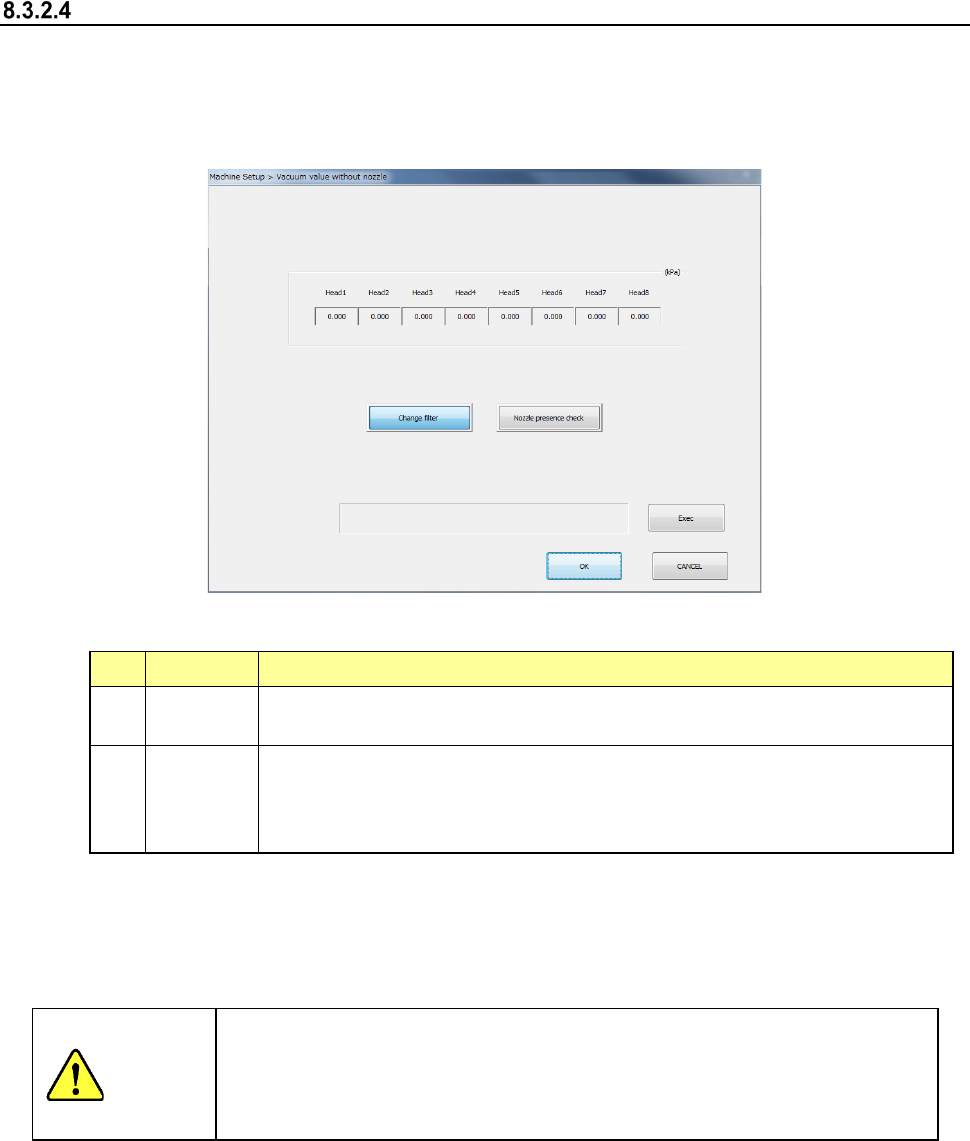
Vacuum value without nozzle
The system sets a vacuum value of each head on which no nozzle is attached, and checks
variations of vacuum values among heads.
If the value changes greatly when compared to the value set at filter replacement (about 10 % as
a reference), check and clean each head.
When you select the [Vacuum value without nozzle] command, the following screen appears.
(1) Setting items
No. Item Description
1
Change
filter
Obtains the vacuum value when no nozzle is attached. (Automatic obtaining only)
This setting item is used to judge the nozzle inspection and cleaning.
2
Nozzle
presence
check
Obtains the vacuum value to judge the nozzle attachment presence.
The obtained value is used as threshold value when the nozzle presence is judged
using the vacuum during origin return. (The value is updated even during origin
return.)
(2) How to set a nozzle
a) Acquire with the <ENTER> button
Press the <ENTER> button to get the vacuum value.
If a nozzle is attached to the head, the vacuum value is given after the nozzle has been
returned.
WARNING
When you click the <Exec> button, the axes move and the nozzle is
attached or removed. Before clicking the <Exec> button, be sure to
check to see if there is no one who operates the inside of the machine.
To avoid a risk of injury, do not place your hand in the machine, nor move
your face or head close to the machine.
Part 2 Detailed Description of Each Function Chapter 8 Machine Setup
8-20
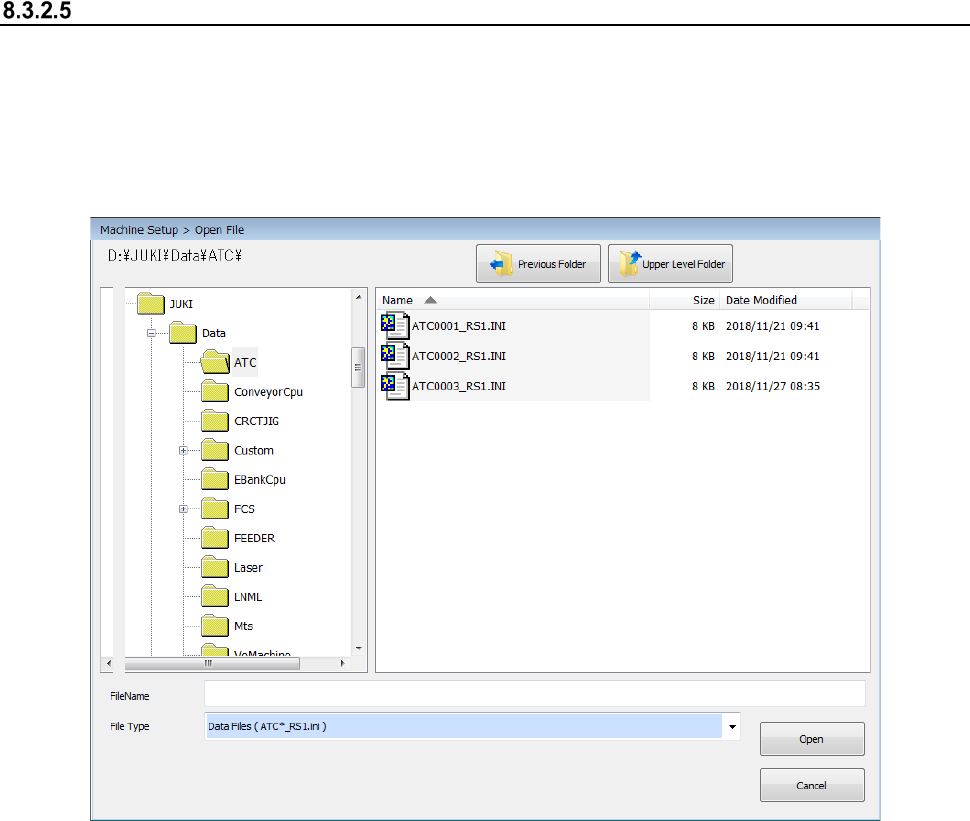
Read ATC Data
To use an ATC, add information on the ATC to the system.
The file format of ATC information is as follows: ATC***_RS1.ini, where *** indicates the
corresponding ATC number, and the file is an ini file.
Follow the procedure below to register the ATC information to the machine.
When you select the [Read ATC data] command from the “File” menu, the “Open File” screen
appears.
Select the specified file, and then press the <Open> button. You have finished registered the
ATC information at this point.
When you press the <Cancel> button, no information is registered.
Check to see if the added ATC has been registered by the [ATC Setting].