RS-1_instruction manual.pdf - 第812页
Part 2 D etaile d Descript ion of E ach Functi on Chapter 9 M anual Control 9- 40 9.6.9 VCS control When you select [I mage] – [V C S contr ol] in th e menu, the “ VCS contro l ” dialog appears. Y ou can select any desir…

Part 2 Detailed Description of Each Function Chapter 9 Manual Control
9-39
9.6.8 Cutter control
When you select [Other] – [Cutter control] in the menu, the cutter control dialog appears. Select
an operation by the radio button (“Tape cut” or “Continuous tape cut”) of the control item and press
the <EXEC> button. When you press the <EXEC> button, the inquiry dialog is displayed. Them,
press the <OK> button to start the operation.
The sensor status of the cutter unit and the sensor reaction time are displayed in the status
display.
To stop the continuous tape cut operation, press the <Stop> button.
Any cutter operation cannot be performed under the following conditions:
- When the cover of the main unit opens,
- When the main unit is stopping in emergency situations and/or
- When the MTS is stopping in emergency situations.
Part 2 Detailed Description of Each Function Chapter 9 Manual Control
9-40
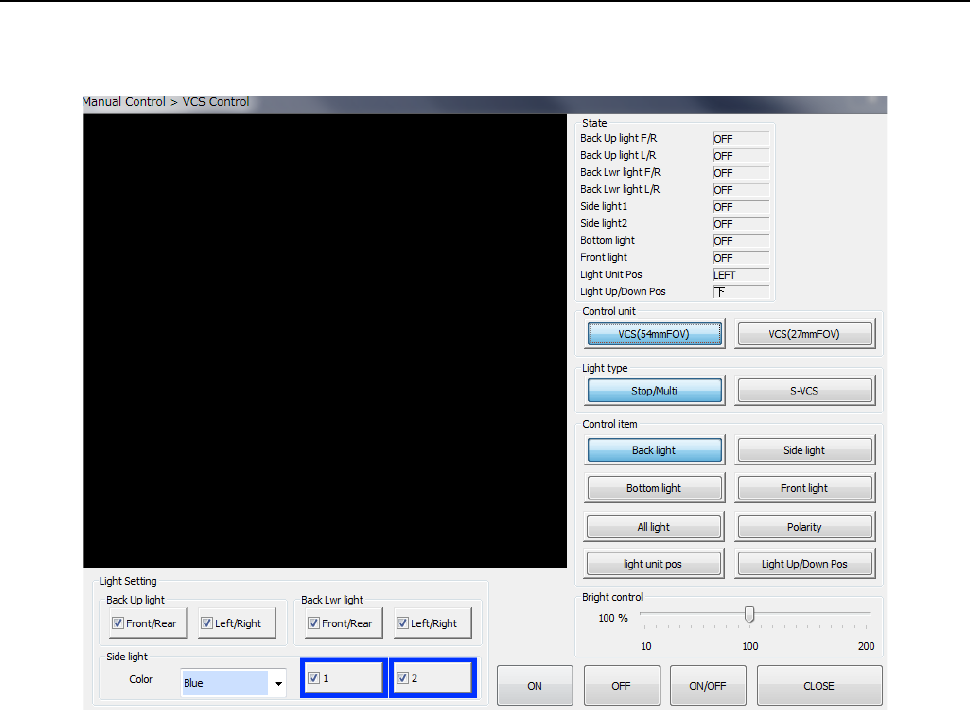
9.6.9 VCS control
When you select [Image] – [VCS control] in the menu, the “VCS control” dialog appears. You can
select any desired bank-side unit control by the “Select device” button.
(1) Status
The status of each unit is displayed at completion of control.
(2) Control unit
Select a control target by radio button.
You cannot select any unit that is set (not mounted) by MS parameter. This has no effect
on the setting by “Device enable” in Machine setup.
(3) Light type
Select a light type by radio button. The light type to be controlled and the brightness vary
depending on the light type.

Part 2 Detailed Description of Each Function Chapter 9 Manual Control
9-41
(4) Control items
Select control items with the radio button.
Control each light status by pressing the <ON>, <OFF>, or <ON/OFF> button.
1) Back up light control
Controls back up light ON/OFF.
2) Side light control
Controls ON/OFF of side lights.
3) Bottom light control
Controls ON/OFF of bottom light.
4) Front light control
Controls ON/OFF of front light.
5) All light control
Controls ON/OFF of back up, side, bottom and front lights.
Necessary setting items for each light
a) Brightness control
Brightness is controlled by moving the slide bar.
b) Back up light
Make settings with the check box.
c) Side light
Make settings with the check box.
Select the light color with the radio button.
d) Bottom light
Make settings with the check box.
6) Polarity control
Controls normal and reverse of polarity.
Control the polarity by pressing the <Positive> button, <Negative> button, or
<Position/Negative> button.
7) Light unit position
Moves the light unit to the left and right sides. Control the light unit by pressing the
<Right> button, <LEFT> button, or <Right/LEFT> button.
The position of the light unit cannot be selected if two VCSs have not been set in the
MS parameter.
8) Light unit vertical position
Moves the light unit to the <Up> and <Down> sides. Control the light unit by pressing
the <Up> button, <Down> button, or <Up/Down> button.
9.6.10 Simple Control
When you press the <Simple Control> button, you can move each axis with the corresponding
button displayed in the Operation area.
See the section “8-4 Simple Control” of Chapter 8 “Machine Setup” for details.