RS-1_instruction manual.pdf - 第481页
Part 1 B asic O peration Chapter 4 Cr eating a Produc tion Progra m 4- 146 2) Moving/ copying a f eeder After selec ting a fee der to be moved, dr ag it to t he desired l ocation a nd drop it (that is, leave your hand fr…
Part 1 Basic Operation Chapter 4 Creating a Production Program
4-145
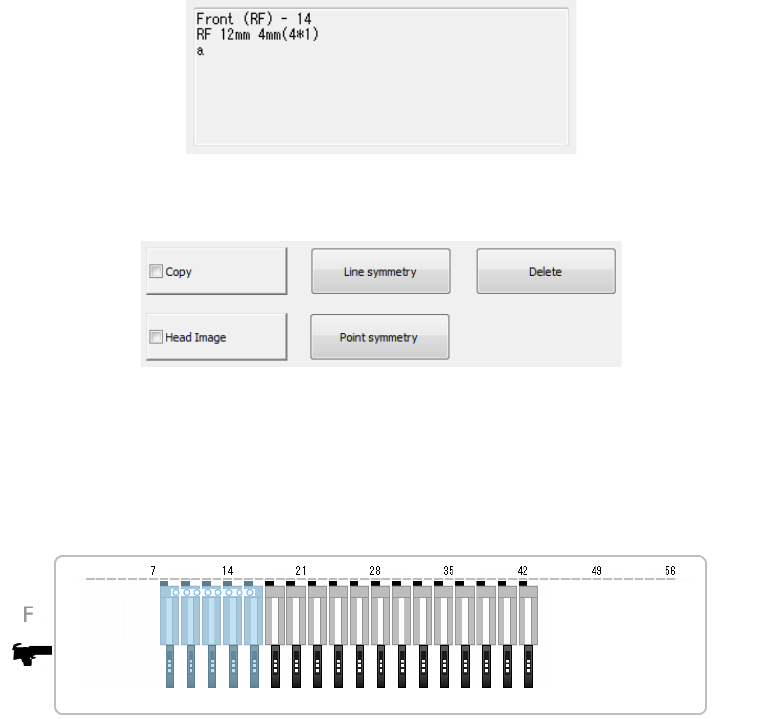
2) Component pick-up information
Information on the selected feeder is displayed here. As information on a feeder, the
component pick-up position, the supply unit and the component name are displayed.
For the feeder or the tray holder, the bank type is displayed at the pick-up position.
3) Operation buttons
The buttons used on the “Feeder Layout” screen are shown below.
(2) Display of an image of heads
If you check the <Head Image> button of the operation buttons, the head image appears on
the screen when you touch the “Feeder Layout” screen. Feeders from which the system
may be able to pick up components at the same time are displayed in light blue.
(3) Copying/moving/deleting a feeder
You can change the feeder layout by copying/moving/deleting a feeder on the bank image
screen.
1) Selecting a feeder
To copy/move/delete a feeder on the bank image screen, select the desired feeder. You
can select a feeder from only one bank. You cannot select any feeder from two or more
banks. The selected feeder is displayed in orange.
Part 1 Basic Operation Chapter 4 Creating a Production Program
4-146
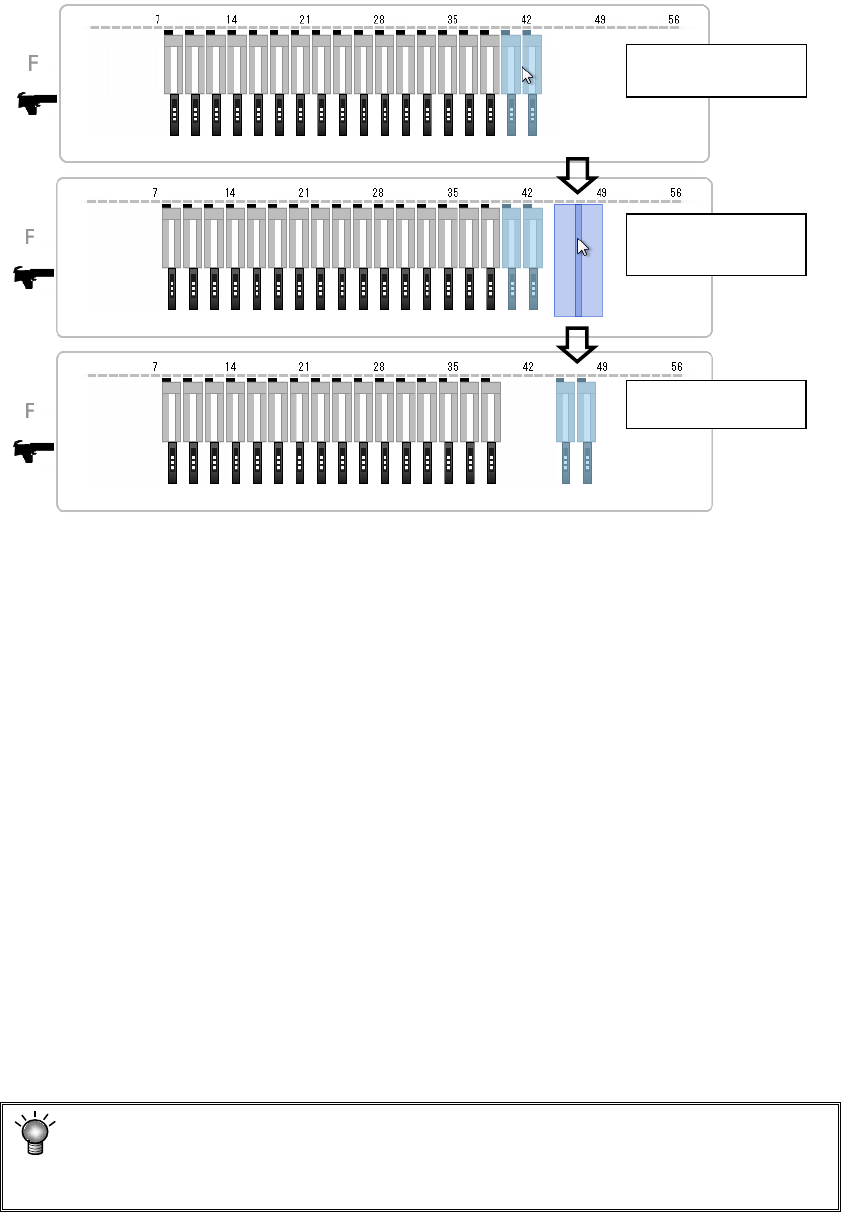
2) Moving/copying a feeder
After selecting a feeder to be moved, drag it to the desired location and drop it (that is, leave
your hand from the panel). The feeder is moved to the mounting position nearest that
position.
When you check the <Copy> button in this case, the selected feeder is copied to that
position.
3) Moving/copying a feeder symmetrically with respect to a line or a point
If you press the <Line symmetry> button or the <Point symmetry> button when a feeder is
selected, the system moves the feeder.
If the <Copy> button is checked in this case, the feeder is copied.
When a feeder on the front is selected, it is moved/copied to the rear side. When a feeder
on the rear side is selected, it is moved/copied to the front side.
If any feeder is already assigned to the copy destination, the system does not copy the
feeder.
● Line symmetry
The system moves/copies a feeder to the position on the opposite side that the current
hole number faces.
As for an electric 8-mm double-lane feeder, the system copies a feeder with respect to a
line without changing the lane.
● Point symmetry
The system moves/copies a feeder to the hole position symmetrical to the current
position so that both feeder exchange trollies on the front/rear sides can use.
4) Deleting a feeder
If you press the <Delete> button when a feeder is selected, the system deletes the feeder.
When a “rear component supply device” option is disabled, any feeder cannot be
moved or copied from the front to the rear.
In addition, you can select neither the <Line symmetry> button nor the <Point
symmetry> button.
Touch a feeder.
Drag the feeder.
Drop the feeder.
Part 1 Basic Operation Chapter 4 Creating a Production Program
4-147
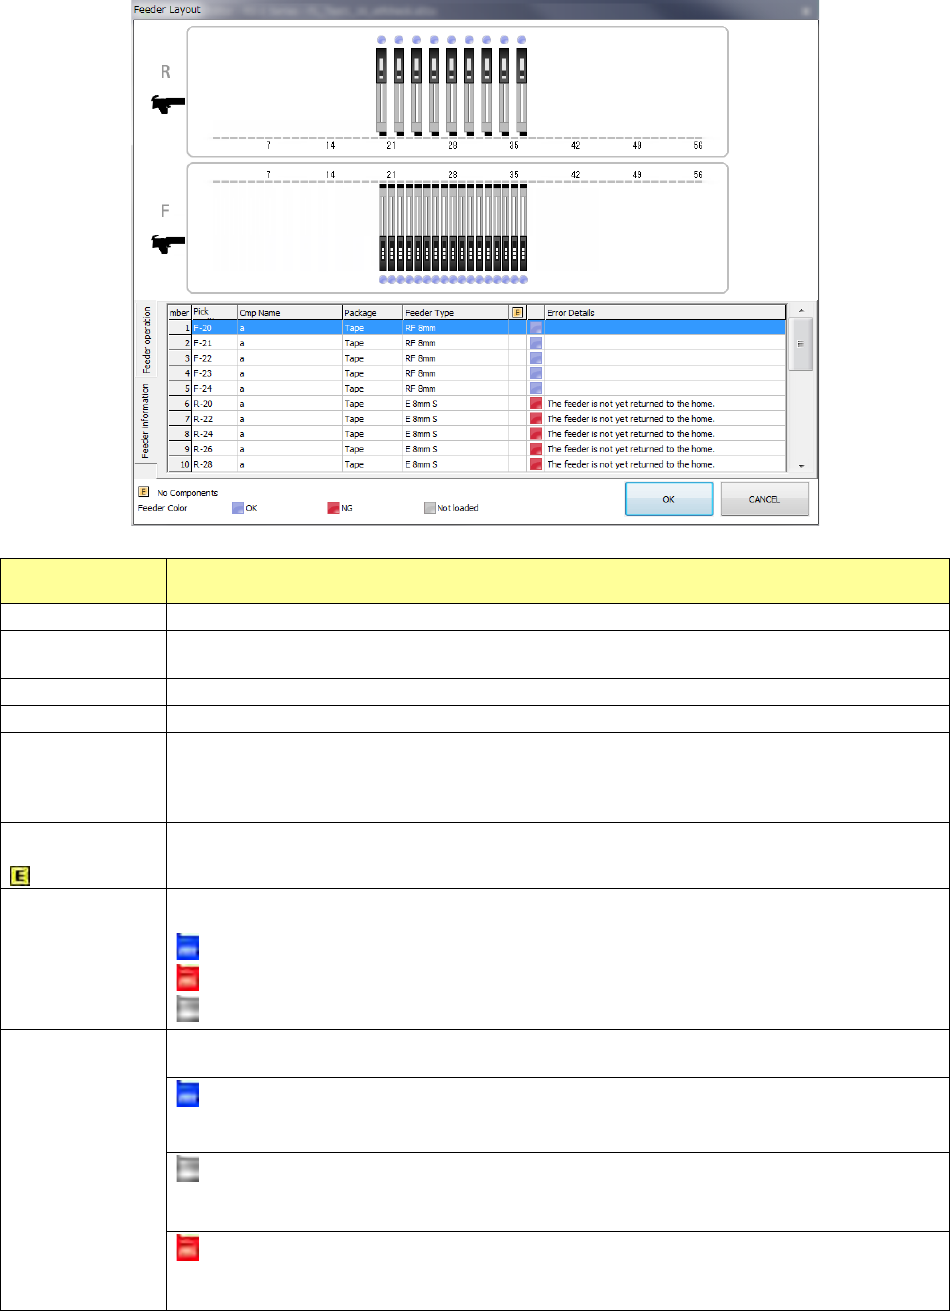
4) List
When you select the “Feeder information” tab, the detailed information on components
attached on the feeder is displayed on the screen.
Menu item Description
No.
Displays a feeder number.
Pick position
Displays a component pick-up position in the format: “Bank-Hole number.”
The lane number is not displayed if not needed.
Component name
Displays a component name specified with a production program.
Package
Displays a package of a feeder specified with a production program.
Feeder type
Displays a feeder type specified with a production program.
When a feeder type is an electric feeder (EF), “E xxxx” is displayed.
When a feeder type is an electric stick feeder, “E stick xxxx” is displayed.
When a feeder type is an electric feeder (RF), “RF xxxx” is displayed.
Components run
out.
This icon is displayed on a feeder whose components run out.
You have to unload the corresponding feeder/components, and then reload components.
Icons for an
electric feeder
setting mistake
Displays the result of an electric feeder setting state check.
The following icons show the various states respectively: “OK,” “NG” and “Unloaded.”
: Electric feeder is OK.
: Electric feeder is NG.
: Electric feeder is not loaded yet.
Error details
Displays information on a feeder.
The following errors are displayed.
An electric feeder is specified with a production program, and it is attached on the electric bank
correctly.
Unloaded
This error is displayed if an electric feeder is specified with a production program, but it is not
attached on the electric bank yet. Attach an electric feeder on the electric bank.
An electric bank has not been connected yet.
If an electric feeder is specified with a production program and the electric bank has not been
connected yet, this error is displayed on the screen. Attach the electric bank onto the machine.