RS-1_instruction manual.pdf - 第303页
Part 1 Basic Operat ion Chapter3 D aily maintenance 3- 11 3.2 Clea ning Where to clean XY axis direct drive uni t Cleaning fr equency : Every month How to clean Rem oval of dust on t he rail, the ball screw , and of stai…

Part 1 Basic Operation Chapter3 Daily maintenance
3-10
1) Insert a nozzle into the inspection hole of the inspection jig to check to see if the nozzle can be
inserted into the rear end without any resistance.
* You can check the nozzle mounting condition also by mounting a nozzle on the Z-axis shaft
manually.
2) If you cannot insert the nozzle smoothly (with some resistance), check to see if the nozzle is
neither stained nor scratched, and then clean the mounting part.
Cleaning
Polishing of the nozzle mounting
part
Tools to be used:
Nozzle inspection jig
Sponge polishing material
Cleaning frequency:
Every two months
3) Fit the nozzle in the groove on the opposite side of the inspection hole of the nozzle inspection jig.
Push the sponge polishing material against the nozzle mounting part and rotate it to polish the
nozzle mounting part. Be sure to polish the nozzle evenly on the overall circumference thereof.
Do not polish just a part of it.
* You cannot polish a nozzle whose tip diameter is φ8.2 or more or whose length is 10 mm or
more with the inspection jig.
* You can polish standard nozzles other than a No. 7507 nozzle with the inspection jig.
* You can polish approximately 500 nozzles with one piece of sponge polishing material.
4) As a guideline, polish a nozzle for approximately one minute. However, be sure to polish the
nozzle while checking the fitting condition with the inspection hole.
Inspection item
Nozzle
Inspection frequency:
Every two months
What to inspect
Check the nozzle mounting condition Tool to be used: Nozzle inspection jig
Nozzle inspection jig
Inspection hole
Polish here.
Sponge polishing
material
Inspection jig
Before polishing
After polishing
Nozzle mounting part
= Area of a nozzle to
be polished

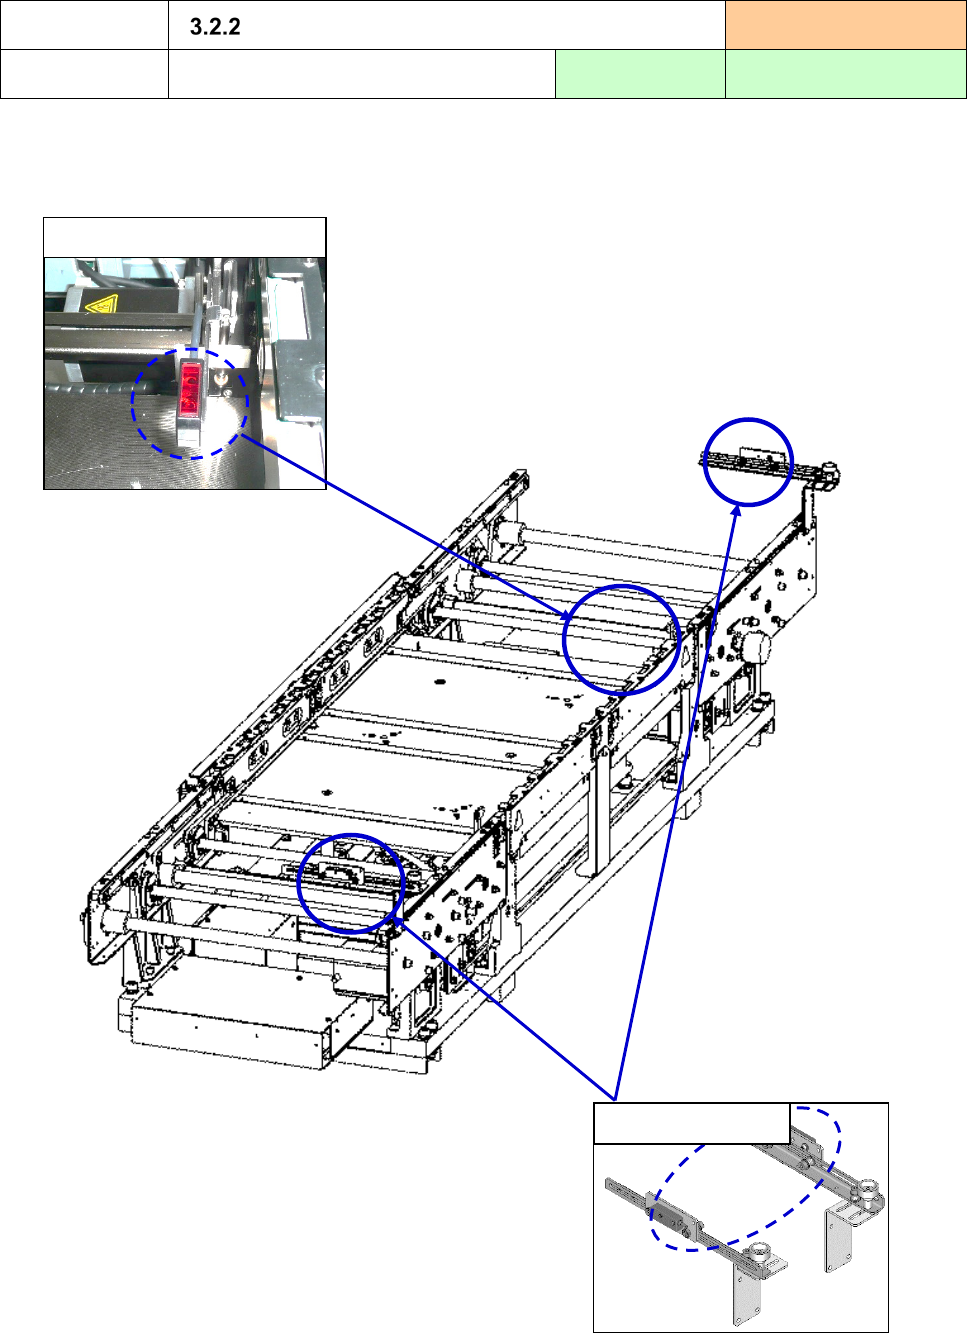
Part 1 Basic Operation Chapter3 Daily maintenance
3-11
3.2 Cleaning
Where to clean
XY axis direct drive unit
Cleaning frequency:
Every month
How to clean
Removal of dust on the rail, the ball
screw, and of stained grease
Tools to be used:
Brush and
waste cloth
Grease to be used:
LM guide rail: 6459 Grease N
Ball screw: NSL Grease
1) Check to see if any dirt or dust is stuck to the rails of the X-axis unit and Y-axis units, and clean them
if any.
After wiping off the grease, apply new one to the rail.
X-axis direct drive unit
Y-axis direct drive unit
Part 1 Basic Operation Chapter3 Daily maintenance
3-12
Where to clean
Transport sensor
Cleaning frequency:
Every month
How to clean
Cleaning of the sensor window
Tools to be used:
Waste cloth
Recommended solution:
IPA
1) Remove dirt and dust stuck to the surface of the sensors shown below.
If the smudges cannot be removed completely, apply a little amount of alcohol (IPA) to the waste
cloth and clean the sensor window with it.
IN, OUT sensor
STOP sensor