RS-1_instruction manual.pdf - 第529页
Part 1 B asic O peration Chapter 4 Cr eating a Produc tion Progra m 4- 194 3) Setting t he shape of a mark After sett ing the noise c ut level, the syst em automatical ly recogn izes the shap e of the mark, and t hen app…
Part 1 Basic Operation Chapter 4 Creating a Production Program
4-193
(1) Teaching a board mark
To teach a board mark, follow the procedure below after teaching starts.
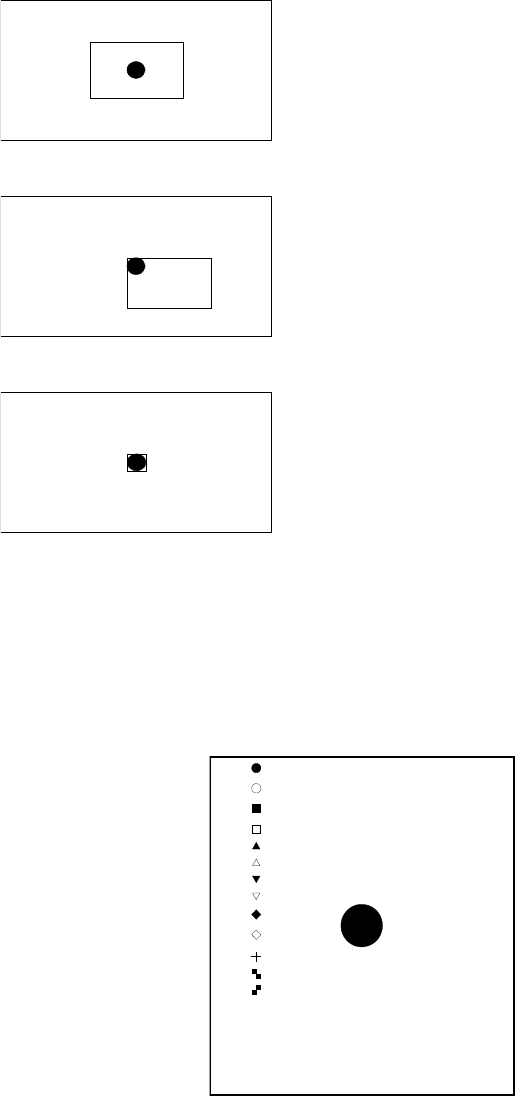
1) Setting the scale frame
Align the upper side and the left side of the scale frame with the upper edge and the
left edge of the mark, and then select the <OK> button to validate these two sides.
After validating two sides, align the lower side and the right side of the scale frame with
the lower edge and the right edge of the mark in the same manner, and then select the
<OK> button to validate these two sides.
At this point, the system automatically recognizes the mark, and obtains data
necessary for correction.
2) Setting the noise cut level
The system automatically obtains the noise cut level around the mark, and then
displays it.
Adjust the noise cut level with pressing the upper/lower sides of the frame so that the
mark can be displayed clearly and the noise around the mark can be reduced as much
as possible.
After adjustment, press the <OK> button.
[*]
[ ]
[ ]
[ ]
[ ]
[ ]
[ ]
[ ]
[ ]
[ ]
[ ]
[ ]
[ ]
[ ]PR
The image shot with the camera and the scale frame are displayed
on the screen.
First, set the upper side and the left side of the scale frame.
Adjust these sides so that they match the upper edge and the left
edge of the mark respectively.
After adjustment, press the <OK> button.
In the same manner, set the lower side and the right side of the
scale frame.
After adjustment, press the <OK> button.

Part 1 Basic Operation Chapter 4 Creating a Production Program
4-194
3) Setting the shape of a mark
After setting the noise cut level, the system automatically recognizes the shape of the
mark, and then appends a “*” mark next to the corresponding mark displayed in the list
of mark shapes on the left side of the screen.
If the system misjudges the mark shape, press the top/bottom of the frame to select
the correct mark.
When you press the <OK> button, the system allows you to go to the next step.
4) Setting the detection frame
Next, the system teaches the detection frame.
After the mark shape is set, the system automatically displays the window whose size
is 1.5 times as big as that of the mark so that its center can be aligned with that of the
screen.
To change the position or size of the detection frame, set it in the same manner as the
scale frame.
When you press the <Prev> button at this point, you can return to the procedure for setting
the scale frame.
Set the detection frame in the same manner as the scale frame.
See “1) Setting the scale frame” for how to set the detection frame.
S After adjustm
ent, press the <OK> button.
Part 1 Basic Operation Chapter 4 Creating a Production Program
4-195
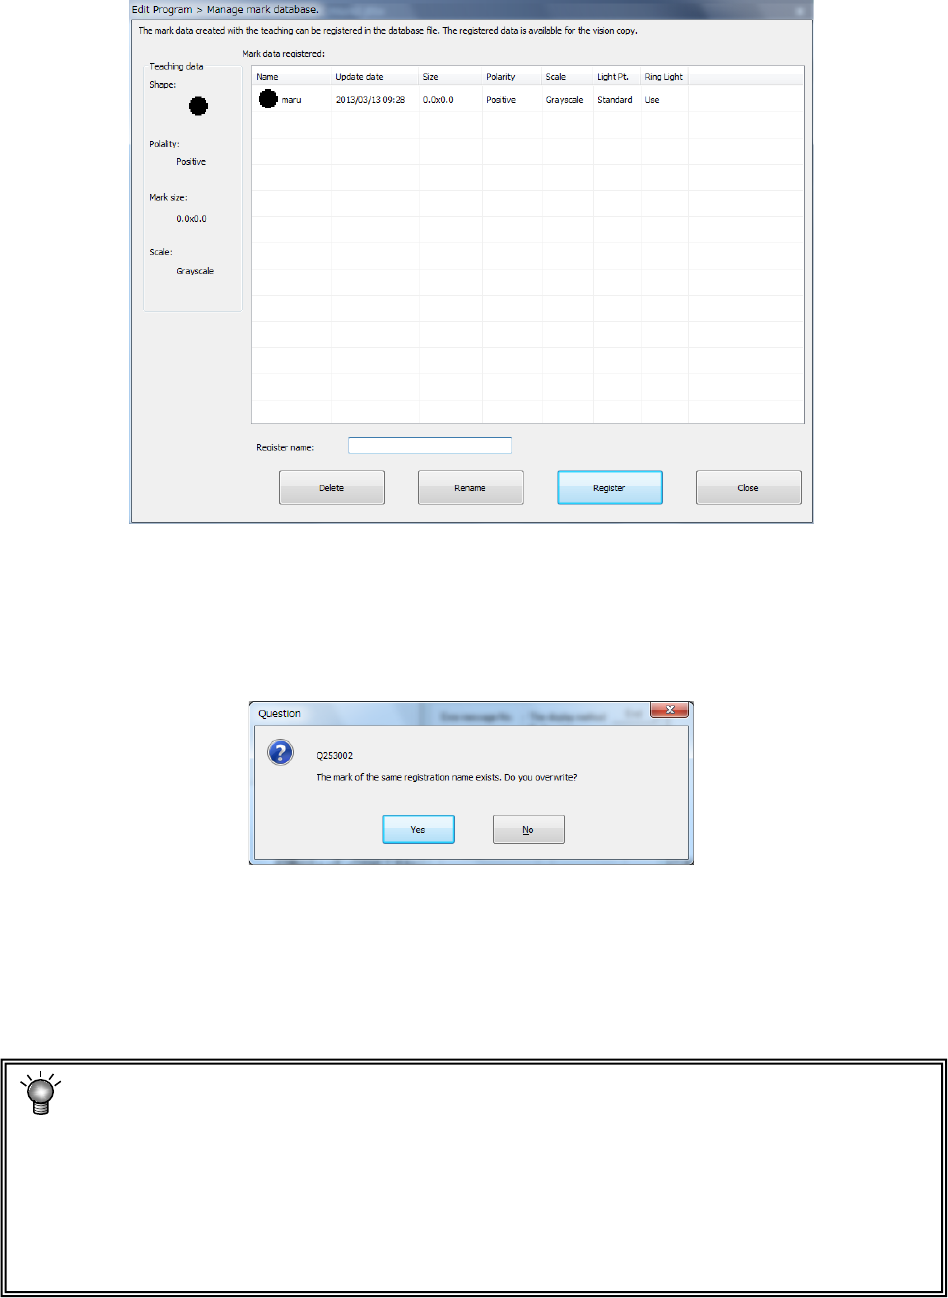
5) Registering a mark
When the system finishes teaching a mark, the dialog box for registering mark data
into the database appears on the screen.
To register the taught data into the mark database, enter its name, and then press the
<Register> button.
To replace the mark data with that already registered in the database, select the data to be
replaced or enter its name directly, and then press the <Register> button. When the
following dialog box appears on the screen, select the <Yes> button.
If you do not want to register the taught data into the mark database, press the <Close>
button.
When the system finishes teaching operation for recognizing the mark, “OK” is displayed in
the field of the item next to the mark data to indicate that it has been already taught.
Perform teaching operation for recognizing all marks to be used.
* If there is no pattern to be taught on the screen, check to see if the entered coordinates
are correct.
* As for a mark (its color is white) on a ceramic board, press the “Teaching” button, and
then press the camera button of the “Device Select” column. The polarity is switched,
and the mark that has looked black on the board looks white. Switching of the polarity
with the camera button is effective only when the scale frame is entered.