RS-1_instruction manual.pdf - 第435页
Part 1 B asic O peration Chapter 4 Cr eating a Produc tion Progra m 4- 100 ⑨ A ngle check Specify whether to chec k the dire ction of a com pone nt. When you se lect the <Y es> button, t he “V ision 4” tab is enabl…
Part 1 Basic Operation Chapter 4 Creating a Production Program
4-99
④ Ball Pattern
Set a ball arrangement pattern here.
Combination of a base style and a ball pattern is used as a recognition pattern.
Choice
Remarks
Standard BGA
Peripheral BGA
Staggered std. BGA (More out) You can select this only when the pitch is from 2.00 mm to 3.00 mm.
Staggered per. BGA (More out)
You can select this only when the pitch is from 2.00 mm to 3.00 mm.
Staggered std. BGA (Fewer out)
You can select this only when the pitch is from 2.00 mm to 3.00 mm.
Staggered per. BGA (Fewer out)
You can select this only when the pitch is from 2.00 mm to 3.00 mm.
⑤ User pattern name
If you already created and registered a ball pattern(s) with the BGA editor, which is
described later, you can select a registered pattern here.
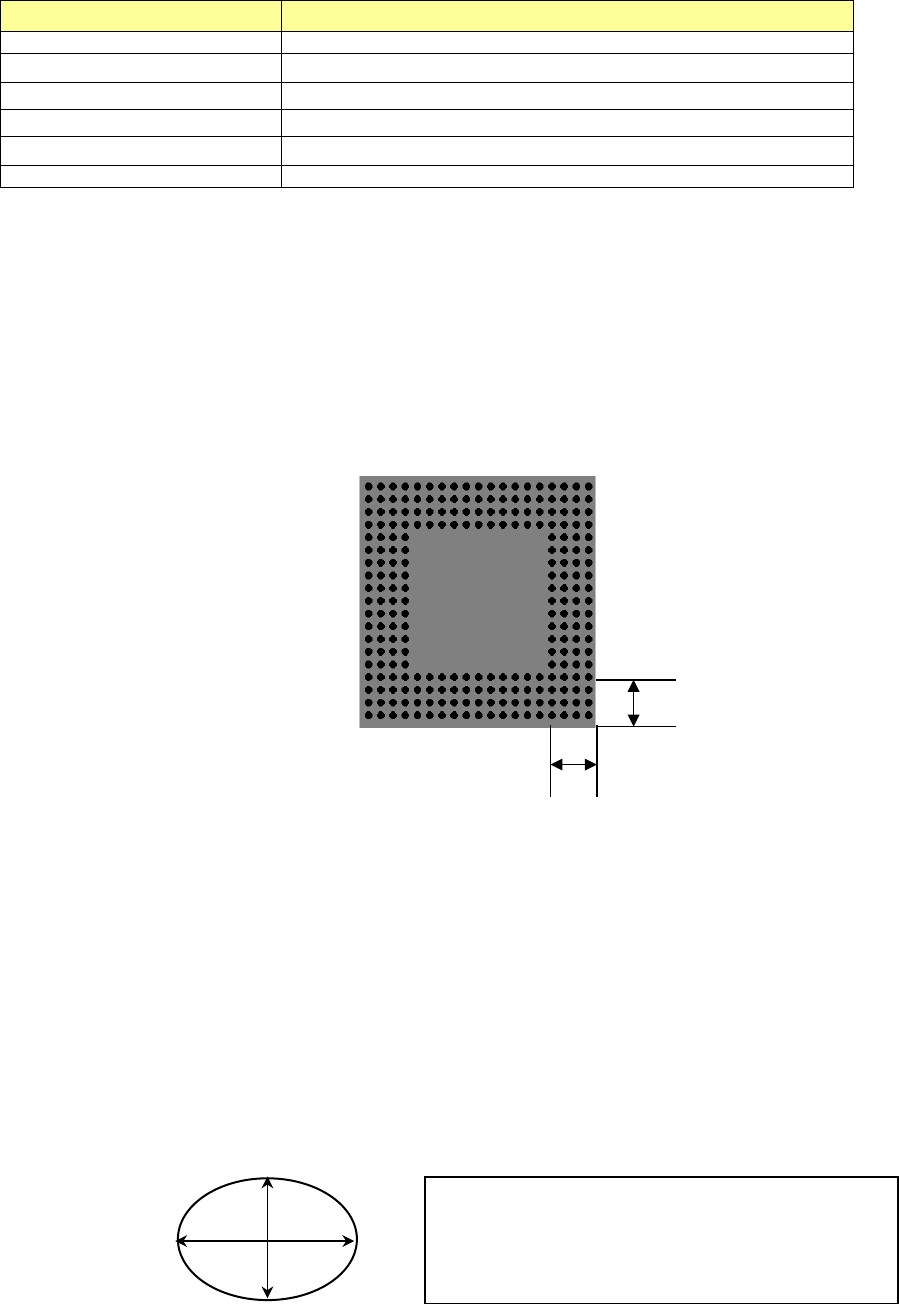
⑥ Peripheral Line
When you select “Peripheral BGA,” “Staggered per. BGA (More out)” or “Staggered per.
BGA (Fewer out) as a ball pattern, set the number of lines on which balls are located by
counting them from the outer periphery.
When you select any other type of ball pattern, “0” is displayed here, and this item is
disabled.
Example: When “4” is set as the Peripheral Line
⑦ Diameter check level
⑧ Variant check level
When “All balls-PWB” or “All balls-Ceramic” is selected as the “Contrast,” you can specify
whether to check the diameter/variant or not and the threshold value.
The input range of the level is from 1 to 100 %. The default value is 50 %.
When you specify the stricter check (by setting the smaller value), the rate of error becomes
higher.
- Diameter check level: The system measures the length and the width of each ball, and if
either of them exceeds (falls below) the set value, the system handles this as a recognition
error. It is recommended to specify 40 % or a bigger value.
- Variant check level: When the number of counted pixels per area of a ball that is
converted from the entered ball diameter is less than or greater than the set value, the
system handles this as a recognition error. It is recommended to specify 45 % or a bigger
value.
4
4
If either “1-(H/R)” or “1-(V/R)” is greater or less than the
set value (%) on the supposition that the entered
diameter value is “R,” the system will regard it as an
error.
H
V
Part 1 Basic Operation Chapter 4 Creating a Production Program
4-100
⑨ Angle check
Specify whether to check the direction of a component.
When you select the <Yes> button, the “Vision 4” tab is enabled, and you can make the
detailed settings of the direction check.
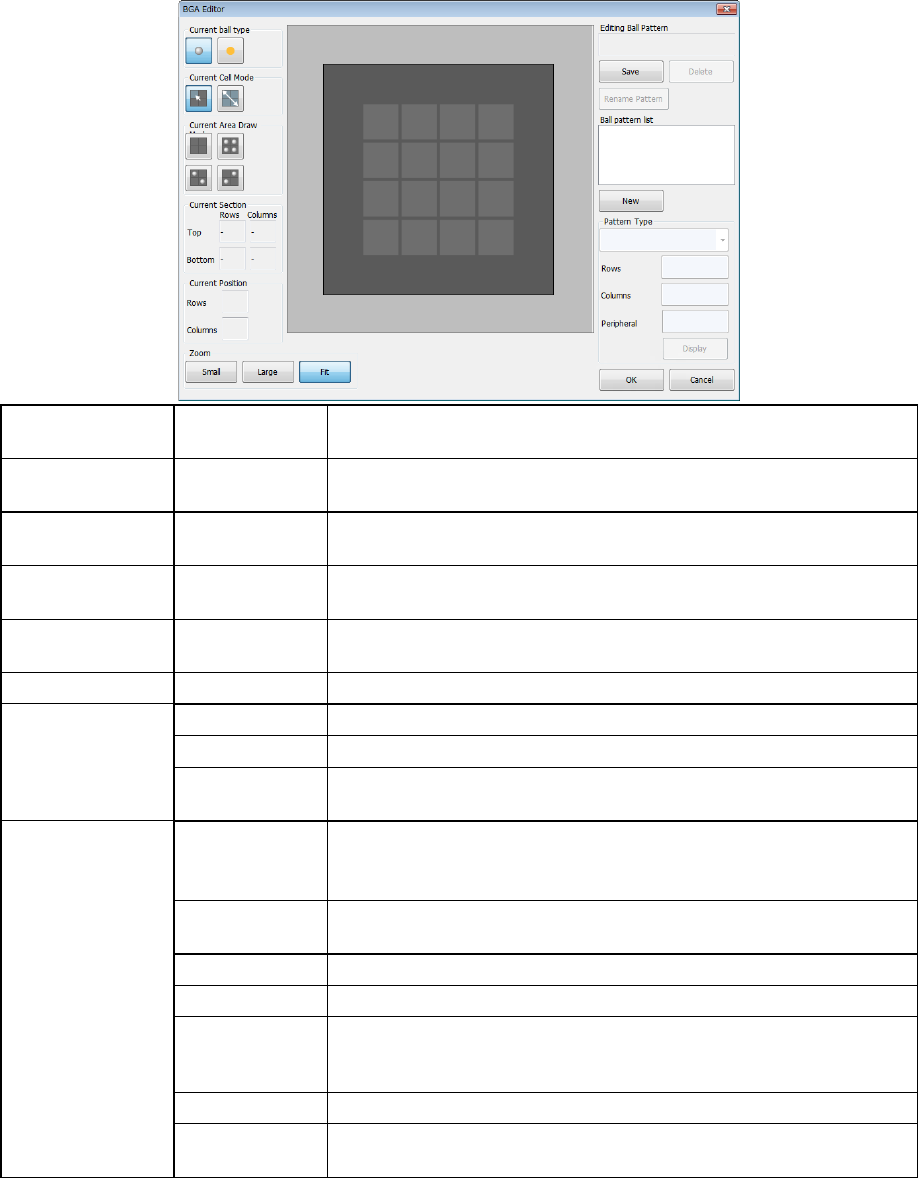
⑩ Edit
This button displays the BGA Editor, which is the ball pattern editing screen. This screen
allows you to register the desired ball pattern.
Up to 70 patterns can be registered, and the registered pattern name is added to patterns
displayed on the dialog box for setting recognition patterns.
Current ball type Ball, index
When you touch the screen, you can create a ball pattern. When you
touch it again, the ball pattern is cleared.
Current Cell Mode Point, Range
You can select whether a ball is set at each point or balls are set over
one area.
Current Area Draw Pattern setting
When you select the range for the “Current Cell Mode,” select a fill
pattern.
Current Section Rows, Columns
The coordinates of the start point and those of the end point of the
selected area are displayed here.
Current Position Rows, Columns
The cursor position is displayed with a lateral coordinate and a vertical
coordinate
Zoom Small, Large, Fit Each button changes the displayed ball size.
Pattern Type
List box Select a ball pattern type here.
Rows, Columns Set the maximum number of balls.
Peripheral
When you select a peripheral type as a ball pattern type, set the
number of peripherals here.
Other buttons
Save
Use this button to save the edited ball pattern.
If the edited ball pattern is a new one, specify the ball pattern name
before saving it
Delete
Use this button to delete a registered pattern. It deletes a ball pattern
selected from the ball pattern list box.
Rename Pattern This button allows you to change a pattern name.
Ball pattern list The registered ball patterns are displayed here.
New
This button allows you to create a new ball pattern. When you press
this button, you can enter the “Pattern Type,” “Rows” and “Columns”
displayed below.
OK Editing of a pattern is enabled.
Cancel
Editing of a pattern is disabled. Note that a registered pattern
remains.
Part 1 Basic Operation Chapter 4 Creating a Production Program
4-101
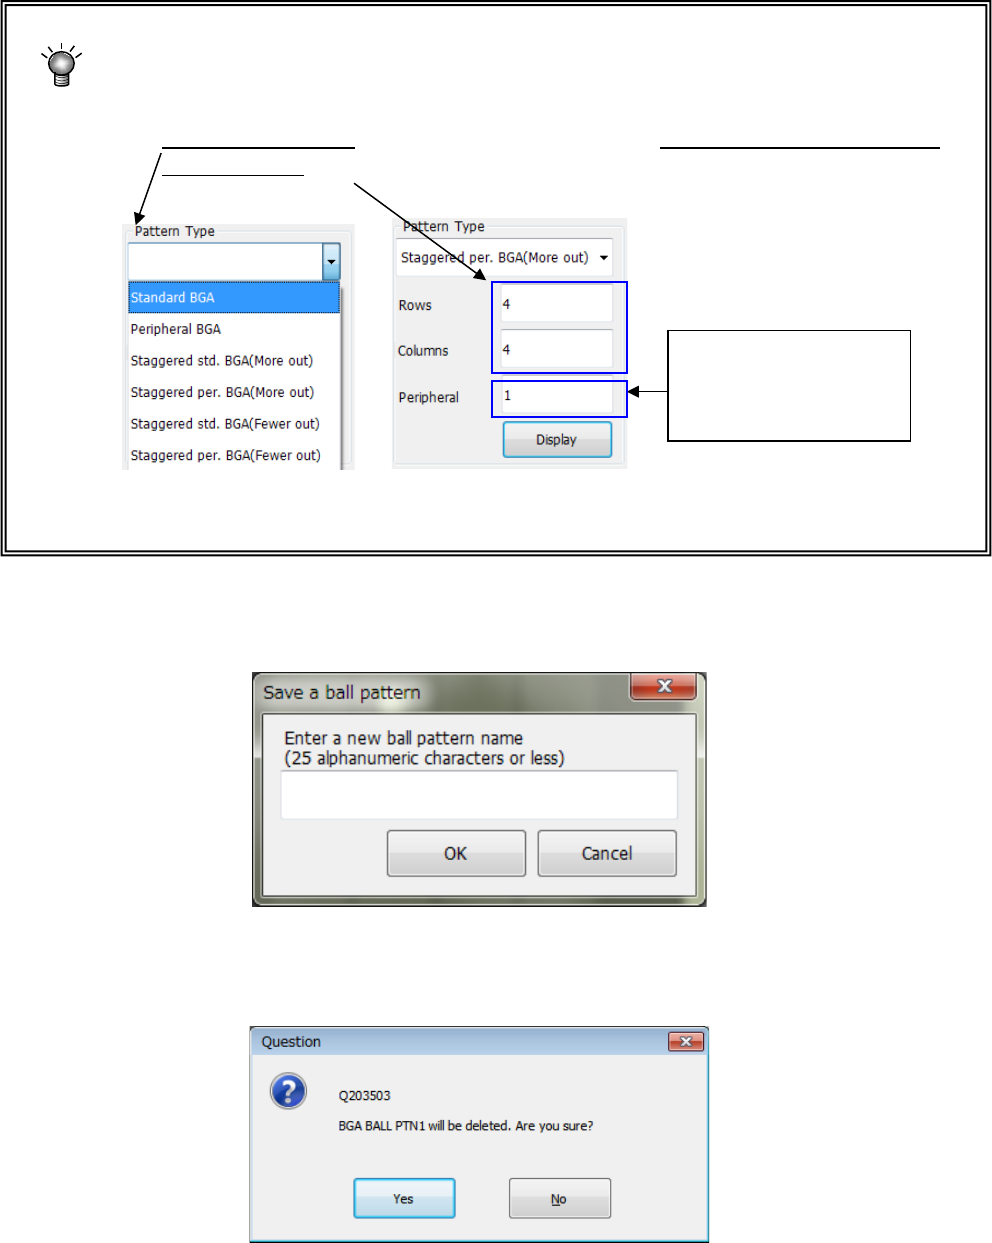
<How to create a new ball pattern>
① Press the <New> button.
② Select a pattern type from the “Pattern Type” list, and enter the number of rows and
that of columns of a new pattern in the “Rows” field and the “Columns” field
respectively.
③ When you press the <Display> button, the selected ball pattern is displayed in the “ball
pattern creating area.” Add and/or delete a ball(s) to edit the pattern.
After creating/editing a ball pattern, press the <Save> button, and then the <OK> button.
When you save a new ball pattern, the dialog box for entering a ball pattern name appears
on the screen.
If you press the <Save> button or <Delete> button, or if you press the <OK> button or the
<Cancel> button after editing the pattern, the confirmation message appears on the screen
(the message shown below appears when you press the <Delete> button).
When you select a
peripheral type, enter the
value set in the “Peripheral
Line” field.