RS-1_instruction manual.pdf - 第150页
Part 1 B asic O peration Chapter 2 Pr oduction 2- 39 Start of production Specify the pr oduction r equire ments, and the n press the <START> switch on t he operat ion panel. When the < Mainten ance Key> is se…
Part 1 Basic Operation Chapter 2 Production
2-38
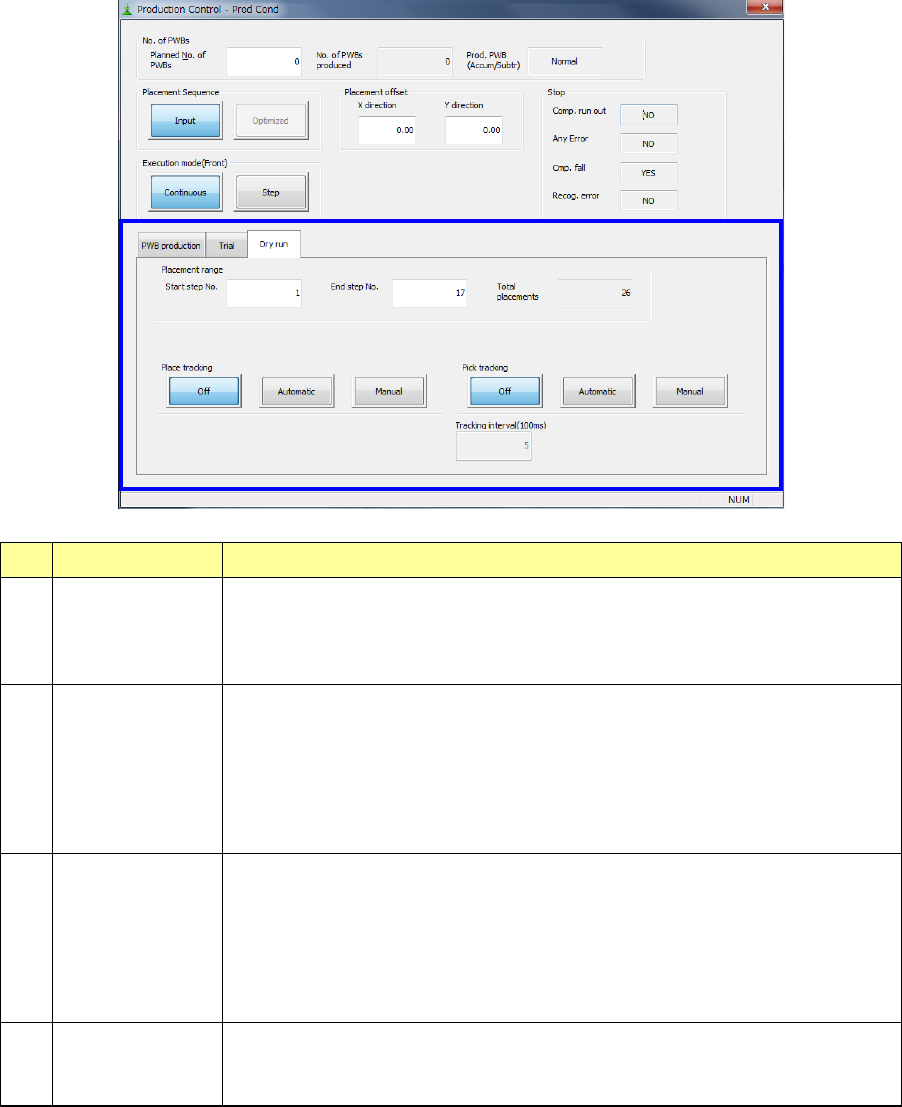
(3) Dry run
No. Item Description
1 Placement range
To limit the area on which components are placed, enter the “Start step No.” and
“End step No.”
The total of step numbers per circuit is displayed in the “Total placements” field.
You can specify this item only when “Input” is selected as “Placement Sequence.”
2 Place tracking
After dry run operation of a board, designate whether or not to perform
placement-tracking operation by the camera. If performed, select whether it is
manual or automatic.
- Off: Placement-tracking operation is not performed.
- Automatic: Placement-tracking operation is performed automatically.
- Manual: Stops at each placement position, and then goes to the next
placement position in response to input by an operator.
3 Pick tracking
Before dry run operation of a board, designate whether or not to perform pickup
position tracking operation by the camera. If performed, select whether it is
manual or automatic.
- Off: Pickup-tracking operation is not performed.
- Automatic: Pickup-tracking operation is performed automatically.
- Manual: Stops at each pickup position, and then goes to the next pickup
position in responses to input by an operator.
4 Tracking
When tracking is performed automatically, designate the stop time duration at a
stop position.
The unit is in 100 ms, and 1 is equivalent to 100 ms (0.1 second).
Part 1 Basic Operation Chapter 2 Production
2-39
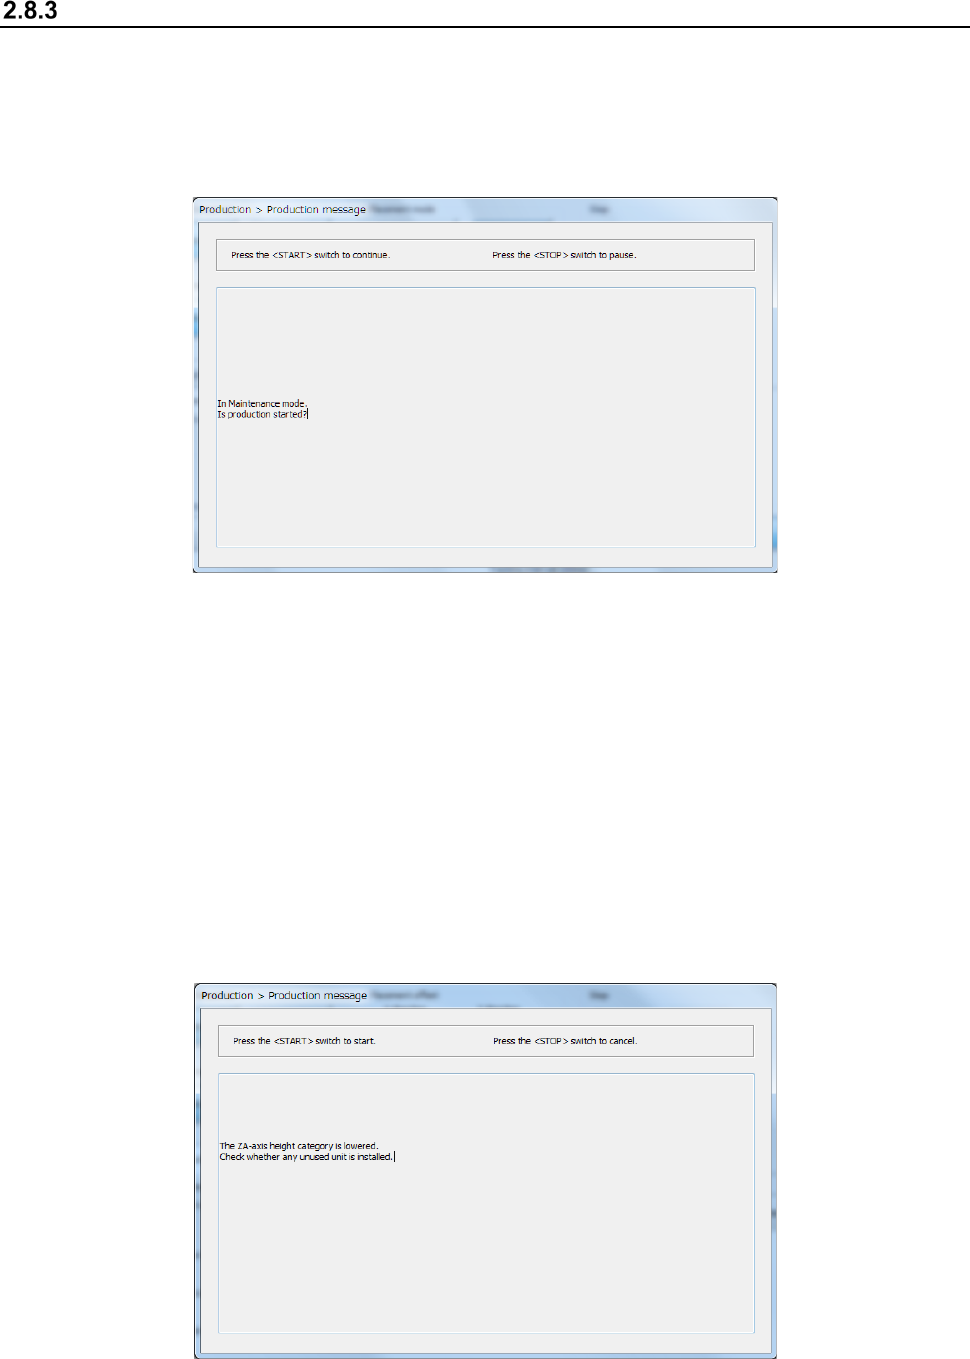
Start of production
Specify the production requirements, and then press the <START> switch on the operation panel.
When the <Maintenance Key> is set to Maintenance mode, the following screen appears. Set the
<Maintenance Key> to Production mode, and then press the <START> switch on the operation
panel. If you do not want to start PWB production, press the < STOP> switch on the operation
panel.
When you press the <START> button to start PWB production, one of the following screens
appears according to the previous setting: “Production status (Production condition)” screen (see
Section 2.8.3.1 “Production condition”), “Production status (Vision)” screen (see Section 2.8.3.2
“Vision”), “Production status (Operation condition)” screen (see Section 2.8.3.3 “Operation
condition”), and “Production status (Number of produced PWBs)” screen (see Section 2.8.3.4
“Number of produced PWBs”).
If the system has never performed the origin return operation before you press the
< START > switch, press the < START > switch at first to return each device to its home position,
and then press the < START > switch again.
When the ZA-axis operates at a 3mm-height at the production start, the following notice message
will appear. Carefully check that there is no unused unit that interferes with the head, and then press
the <START> switch again.
Part 1 Basic Operation Chapter 2 Production
2-40
CAUTION
Immediately after you press the <START> switch, the head starts moving and the
system starts production.
To avoid injuries, do not put your hands inside the machine or keep your face or
head away from the machine.
Before pressing the <START> switch, check to see if there is no one who is
working the internal parts of the machine.
Before pressing the <START> switch, check to see if there is no one who is near
the machine and may be injured.
Before pressing the <START> switch, check to see if there is no obstacle such as
an adjustment tool that is located or attached inside the machine and may prevent
the machine from operating normally.
When the ZA-axis operates at a low height, carefully check that the head unit does
not interfere with any unused unit.
CAUTION
If the system has never recognized the feeder bank (for example, immediately after
each device of the machine returned to its home position or after the bank moved
down, then up), the system automatically tries to recognize the feeder bank before
moving to the component pick-up position. While the system is recognizing the
feeder bank, the head moves across the feeder. Do not move your hands or face
close the machine.
CAUTION
Note on use of the IFS-NX
Only after checking the component collation state, press the <START> switch.
If a component is not collated yet, or if the collation result has any problem, you
cannot start PWB production with the machine. Refer to the “IFS-NX Instruction
Manual” for details.