RS-1_instruction manual.pdf - 第873页
Pa r t 2 Det ai l ed Des c r i pti on o f Ea c h Fu nc ti on Chapte r 1 1 S el f - diagnosis Func ti on 11 - 15 11. 3. 3.5 .1 Ho w to se t W hen you fol low the instr uct ion di sp layed in th e “ Op er ati on ” col um n…

Part 2 Detailed Description of Each Function Chapter 11 Self-diagnosis Function
11-14
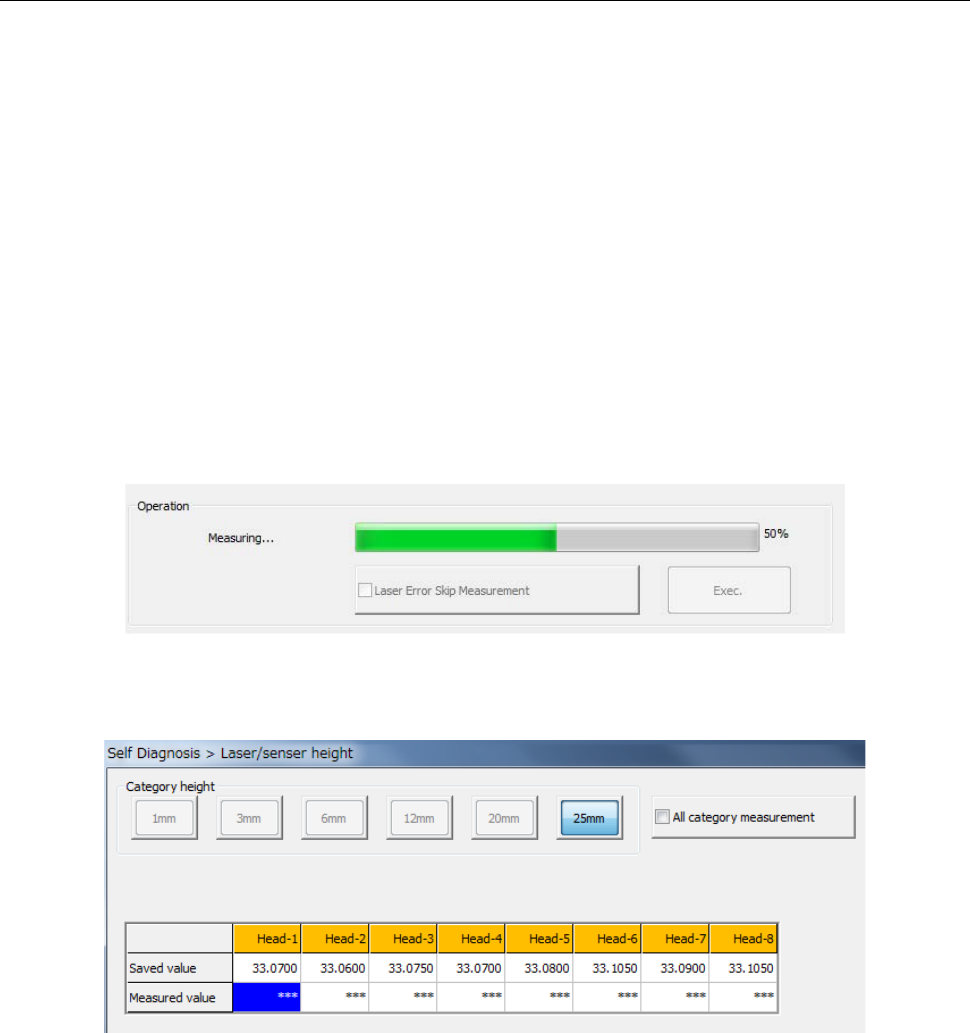
(4) Operation
1) Progress bar
The progress of measurement is indicated with this bar. When measurement finishes, the
progress bar indicates “100 %.”
2) Laser Error Skip Measurement
When you check off the check box “Laser Error Skip Measurement” and press the <Exec.>
button, the machine skips a laser error.
Even though a laser recognition error occurs or the measurement result is not within the
regulated range, the machine just displays “Err” without displaying the “Question” message,
and then measures a head if there is any head not measured yet within the target head unit.
To measure again a head causing an error, select the head, and then press the <Exec.>
button after the machine finishes the current measurement (that is, after the progress bar
indicates 100 %).
3) <Exec.> button
When you press the <Exec.> button, each head unit moves to the waiting position to start
measurement.
See the following subsection “How to set” for details.
WARNING
When you press the <Exec> button, the axes start moving.
Before pressing the <Exec> button, be sure to check to see if there is
no one who is operating inside the machine. To prevent injuries, do
not put a hand inside the machine or close your face or head to the
machine while the machine is operating.
Part 2 Detailed Description of Each Function Chapter 11 Self-diagnosis Function
11-15
11.3.3.5.1 How to set
When you follow the instruction displayed in the “Operation” column, the machine automatically
obtains the values.
(1) Nozzle allocation
One of the nozzles whose number is from 7500 to 7503 or from 7505 to 7507 is used to
measure the height of the laser/sensor.
If any nozzle described above is not assigned to the ATC of a head to be measured, an error
occurs. If so, assign a nozzle with the menu item “ATC nozzle setup” invoked from the
“Machine Setup” screen.
(2) Selection of a head
Select a head to be measured. You can select two or more heads.
(3) Start of measurement
Press the <Exec.> button to start measurement.
The column corresponding to the head being measured is displayed in blue.
Part 2 Detailed Description of Each Function Chapter 11 Self-diagnosis Function
11-16
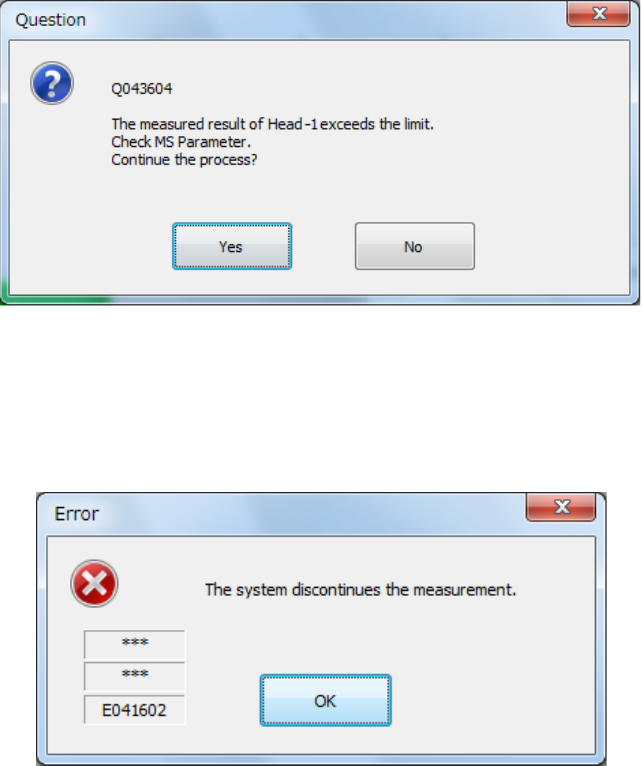
If a laser recognition error occurs or the measurement result is not within the regulated range,
the following message appears on the screen.
If an error other than above occurs: neither a laser recognition error nor measurement value
exceeding the regulated range, the machine displays the corresponding error message, and
then the following message on the screen. When you press the <OK> button on this screen,
the machine aborts measurement operation even though there is any head not measured yet.
(4) End of measurement
When the system finishes measurement, the progress bar indicates “100 %,” and the
measured values are displayed in blue.
When you press the <OK> button, the measured values become valid, but are not saved/set
yet at this point.
These values are actually set only when you quit the application. See Section 11.3.3.6.2
“Saving the setting values and exiting the screen” for details.
When you press the <CANCEL> button, the measured values become invalid.