RS-1_instruction manual.pdf - 第735页
Part 2 D etaile d Descript ion of E ach Functi on Chapter 8 Machine Set up 8- 27 Support tabl e When you se lect [Support table], the follow ing scree n appears. When you clic k each ta b, you can spec ify [PWB con vey o…
Part 2 Detailed Description of Each Function Chapter 8 Machine Setup
8-26
(2) How to set
1) Delay unit selection
a) Set the delay unit by radio button.
b) When you select [Time], the value set for PWB transport sensor delay is treated as
ms for a delay.
c) When you select [Length], the value set for PWB transport sensor delay is treated
as mm, 1/100 mm or inch for a delay.
2) Sensor delay time setting (standard and option)
a) Select “Standard” or “Option” by pushbutton.
b) When Option is selected, the delay time or length can be set for each sensor.
c) A value of 0 ~ 2500 (ms) or 0 ~ 1000 (mm: Unit is mm) can be set.
d) The value should be 60 ms as standard for a 320 mm notching.
3) Ready In signal delay function
a) A value of 0 to 300 can be set.
4) Conveyor motor speed
a) This speed can be set for transfer of a board (“Transferring PWB”), for loading a
board from the previous process (“Preceding process”) and for ejecting a board
from the post process (“Next process”) respectively.
b) The speed can be set by 4 steps from the combo box.
5) Sensor delay when re-clamp
a) A value of 0 to 5000 (ms) or 0 to 200 (mm: Unit is mm) can be set.
6) Board loading restriction
a) Function ON/OFF can be set from the check box.
7) Reduce PWB in process
a) Function ON/OFF can be set from the check box.
8) Hold Wait Sensor active until PWB moves out
a) Function ON/OFF can be set from the check box.
9) ZA-axis operation with the substrate size for 3 buffers
a) This function can be set to ON/OFF with the check box.
10) Change of standby position of a short substrate
a) This function can be set to ON/OFF with the check box.
11) Short substrate judgment size
a) You can set the size in the range of 50.00 to 300.00 (mm).
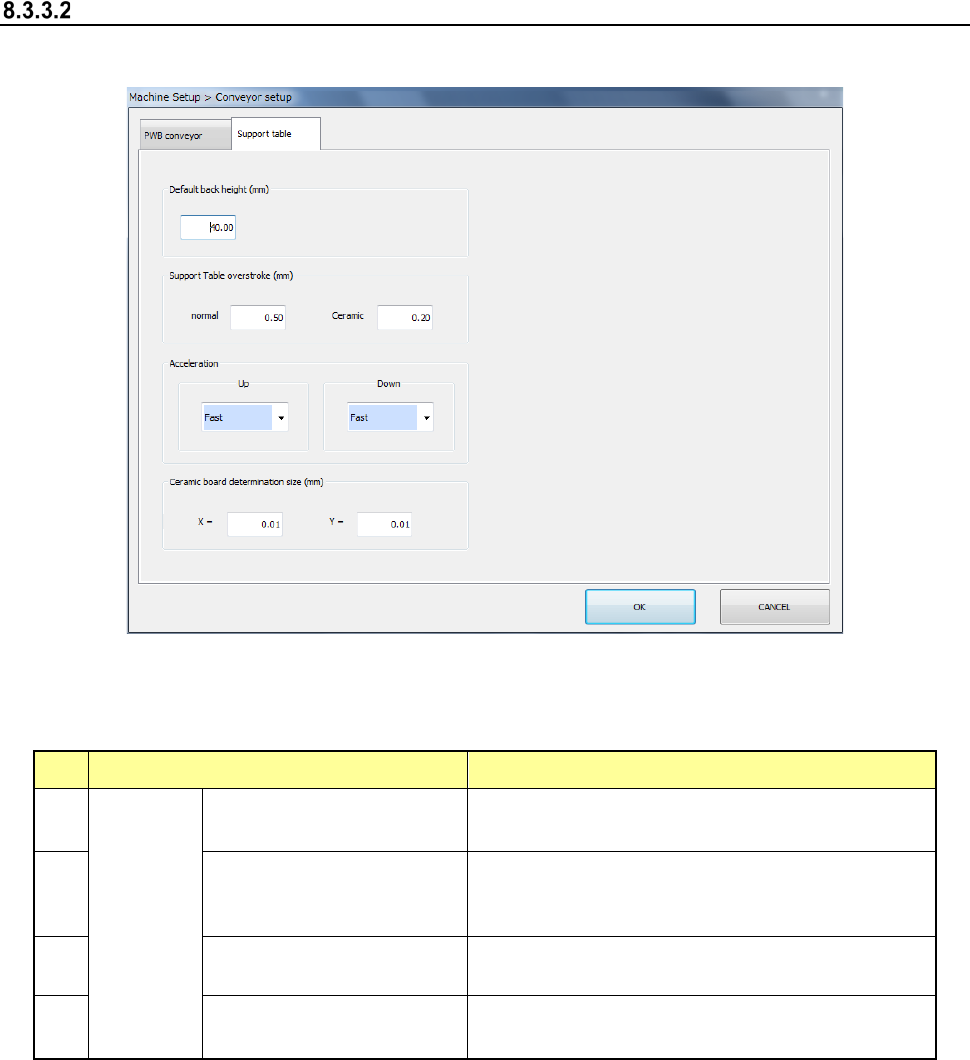
Part 2 Detailed Description of Each Function Chapter 8 Machine Setup
8-27
Support table
When you select [Support table], the following screen appears.
When you click each tab, you can specify [PWB conveyor] or [Support table].
(1) Setting item
No. Item Description
1
Support
table
Default back height (*2)
Set the PWB lower limit value of the support
table.
2
Support Table overstroke
(*2) (usually ceramic (*1))
Set the inserting stroke of the support table.
3
Acceleration (*2)
(ascent, descent)
Set the acceleration of the support table.
4
Ceramic board
determination size (X, Y)
Set the ceramic board size.
*1 Stroke in the item of ceramic
When "The ceramic board is used" of production, etc. is checked and the board size (XY)
is less than 150 mm, it is judged that the ceramic board is used and the stroke input to the
item of ceramic is used. As for the PWB other than the ceramic PWB, the stroke input to
the item of ceramic is applied when a PWB size of less than 150 mm and an optional
operation are set. However, a usual stroke is applied for the PWB of 150 mm or more as
for the ceramic PWB.
*2 If a production program makes settings of the conveyor, those settings are applied here.
Part 2 Detailed Description of Each Function Chapter 8 Machine Setup
8-28
(2) How to set
1) Default back height
a) When the unit is mm, a value of -0.5 to 48 can be set.
2) Support table overstroke (available only when a board is transported with the
single-lane conveyor)
a) When the unit is mm, a value of 0.00 to 5.00 can be set.
3) Acceleration
a) This item can be set by 4 steps from the combo box.
4) Ceramic board determination size
a) When the unit is mm, a value of 50.00 to 905.00 can be set.