RS-1_instruction manual.pdf - 第508页
Part 1 B asic O peration Chapter 4 Cr eating a Produc tion Progra m 4- 173 4.5.2 .6 Transpor t conveyor This comma nd allows you to adjust t he board tr ansport width. After you se lect this com mand from the men u, the …
Part 1 Basic Operation Chapter 4 Creating a Production Program
4-172
(1) Operation
① Conveyor operation
You can select a board transport operation among loading of a board, ejecting of a board,
releasing of the clamped board and re-clamping of a board by selecting the corresponding
button: <Pwb load>, <Pwb eject>, <Unclamp PWB> and <Reclamp>.
The <Pwb load> button is selected at start-up.
② Display of the conveyor operation
The specified board transport operation and the transporting condition changed with the
operating station are shown graphically.
③ BOC alignment mode for loaded PWB
Select whether to perform BOC alignment operation immediately after a board is loaded to
the machine.
<Use operation option setting.> : Determines whether to recognize a BOC mark according to
the setting of the Operation option.
<Execute.> : Always recognizes a BOC mark.
<Do not execute.> : Does not recognize any BOC mark.
④ State
Information obtained during board transportation is displayed here.
The board transport direction, usage of a BOC mark and the clamping condition are
displayed also.
⑤ Move Axis
This button moves the axis to the waiting position.
⑥ Execution
When you press the <Execution> button, the system performs the operation selected with
the “Conveyor operation” button: <Pwb load>, <Pwb eject>, <Unclamp PWB> and
<Reclamp>.
⑦ Exit
This button quits the “Pwb conveyor” dialog box.
To execute board transport operation, press the <START> switch (or <Execution> button).
To finish the operation, press the <Exit> button.
To abort the operation for some reason during board transportation, press the <STOP>
switch to stop it.
(2) Condition of the board transport path
① Pwb load
This button loads a board to the buffer that clamps it, and then clamps it.
The clamping position varies depending on the settings of the setup screen and/or the
external size of a board.
If any board is already located at the clamping position, a new board is loaded only after it is
ejected.
② Pwb load (2nd)
This button clamps a board for the second time.
③ Pwb eject
This button ejects a board from the clamping position.
The board transport speed is reduced immediately before a board reaches the OUT sensor
when it is ejected, and the OUT sensor detects it when it is transported at low speed.
When a board is ejected from the clamped condition, it is ejected at low speed.
④ Unclamp PWB
This button releases the clamped board if the board is clamped.
⑤ Reclamp
When a board is located at the clamp position, this button re-clamps it at the stopper
position.
⑥ Reclamp (2nd)
When a board is located at the clamp position, this button re-clamps it at the second clamp
position.

Part 1 Basic Operation Chapter 4 Creating a Production Program
4-173
4.5.2.6 Transport conveyor
This command allows you to adjust the board transport width.
After you select this command from the menu, the following dialog box appears.
Automatic conveyor width adjustment
(1) Move
This button changes the board transport width to the “PWB dimensions” + “Margin.”
(2) PWB dimensions
Enter the outer dimensions of a board. The “PWB dimensions (Y)” of the PWB data is
entered here by default.
(3) Margin
Enter the margin between a board and the conveyor rail.
(4) State
The operation condition of the board transport path is displayed here when a board is
transported or when the automatic board width adjustment unit returns to the origin.
(5) Conveyor
This button starts up the “Pwb conveyor” dialog box.
(6) Origin width
This button returns the automatic board width adjustment unit to the origin.
(7) Close
This button quits the “Automatic conveyor width adjustment” dialog box.
Part 1 Basic Operation Chapter 4 Creating a Production Program
4-174
4.5.3 Functions to be invoked from the “List” screen
These are the auxiliary functions for creating a production program. The Edit buttons are
displayed on the lower right corner of the “List” screen.
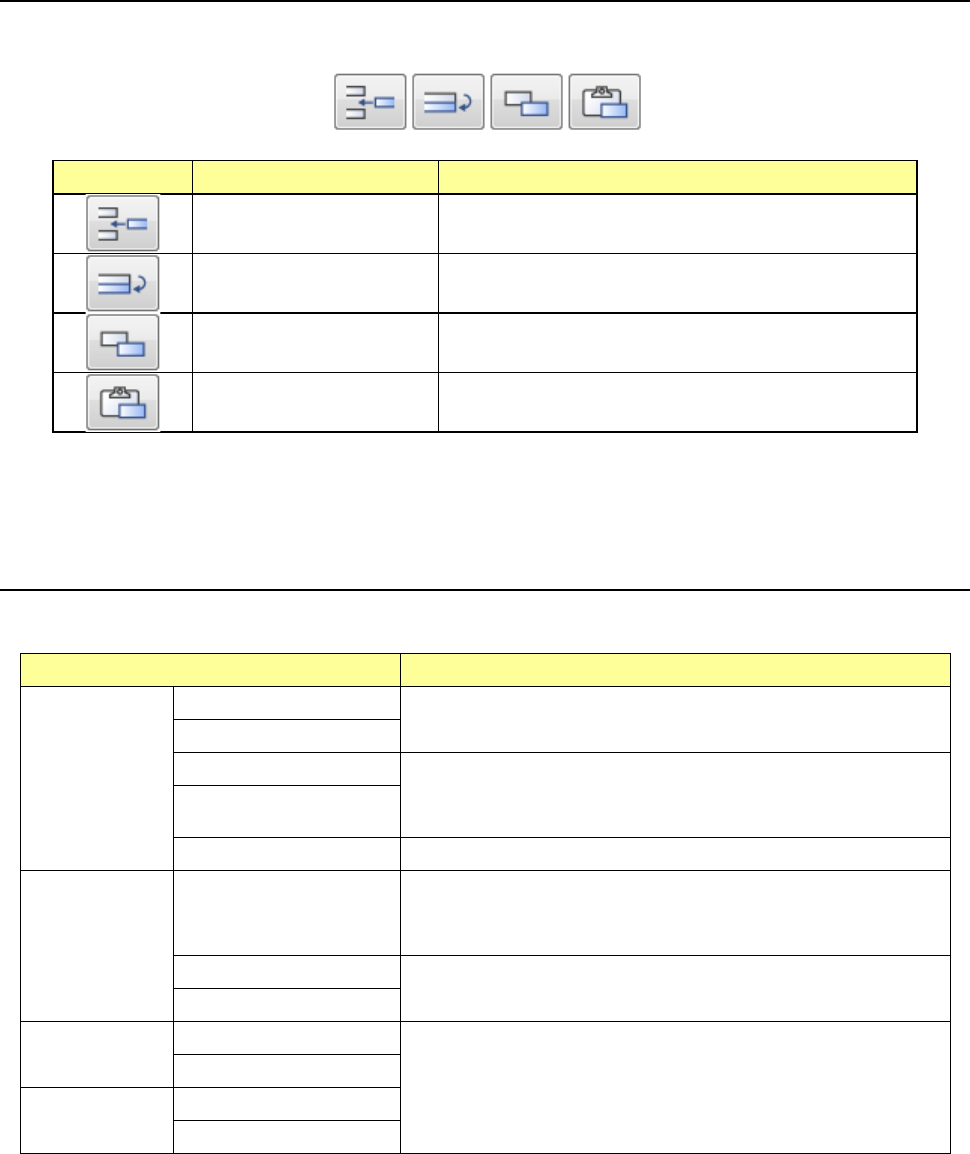
Icon Function Description
Inserting of a line Inserts a blank record to the selected line.
Duplicating of a line Copies a record of data of the selected line and inserts it.
However, all data may not be copied.
Copy of a cell Stores a cell(s) whose range is selected and highlighted
into the memory buffer.
Pasting of a cell
Pastes data stored in the memory buffer with the [Copy of
a cell] command.
You can change the width of a cell or sort data on each “List” screen of the Program Editor.
4.5.3.1 Inserting a line
This function inserts a bank record in the selected line.
Screen Function
PWB data
Basic setting screen
This function cannot be used.
Dimension setup screen
Circuit Layout screen This command inserts a blank line to the cursor position.
After this command is executed, the cursor moves to the leftmost
input field of the blank line.
Ex. Bad Mark screen
PWB Conveyor screen This command cannot be used.
Placement
data
List screen
This command inserts a blank line to the cursor position.
The placement ID becomes “#.” The cells for the placement
positions, “Angle” and “Component name” are blank.
Area Mark screen
This command cannot be used.
Area Bad Mark screen
Component
data
List screen
This command cannot be used.
Form screen
Pick data
List screen
Form screen
* If you used the sort function, you cannot select the command for inserting a line.