semi合集-English.pdf - 第6438页
SEMI G75.11-06 98 © SEMI 1998 4 NOTICE: T hese standards do n ot purport to address safety issues, if any, ass o ciated with their use. It is the responsibility of t he user of these standards to establish appropriate sa…

3
SEMI G75.11-0698 © SEMI 1998
6.3 Dielectric constant and dielectric dissipation factor should be calculated by the following equation:
ε
=
C
x
/C
o
tan
δ
= G
x
/2
π
fC
x
w
h
ere
:
ε
:
dielectric constant
tan
:
dielectric dissipation factor
C
x
:
capacity of measuring condenser
C
c
balances
C
o
:
electrostatic capacity for
ε
=1
calculated by the following equation using the area of
the main electrode and thickness of specimen
C
o
=
r
2
/3.6 t
where :
r
:
radius of main electrode
t
:
thickness of specimen
G
x
:
conductance of specimen calculated
by the following equation
G
x
=g
×
Sv/100
where :
g
:
conductance between "m" and "d"
of conductance shifter in Figure 1
Sv/100
:
resistance ration of conductance
shifter at balance
f
:
the frequency of measurement
:
the ratio of the circle's circumference
to its diameter
7 Related Documents
7.1 ASTM Specification
2
ASTM D 150-64T — Standard Test Methods for Dielectric Constant and Dissipation Factor of Insulating Materials
2 American Society of Testing and Materials, 100 Barr Harbor Drive, West Conshohoken, PA 19428-2959 (all cited standards may be found in
Volume 10.05 of the Annual Book of ASTM Standards)

SEMI G75.11-0698 © SEMI 1998 4
NOTICE: These standards do not purport to address
safety issues, if any, associated with their use. It is the
responsibility of the user of these standards to establish
appropriate safety and health practices and determine
the applicability of regulatory limitations prior to use.
SEMI makes no warranties or representations as to the
suitability of the standards set forth herein for any
particular application. The determination of the
suitability of the standard is solely the responsibility of
the user. Users are cautioned to refer to manufacturer’s
instructions, product labels, product data sheets, and
other relevant literature respecting any materials
mentioned herein. These standards are subject to
change without notice.
The user’s attention is called to the possibility that
compliance with this standard may require use of
copyrighted material or of an invention covered by
patent rights. By publication of this standard, SEMI
takes no position respecting the validity of any patent
rights or copyrights asserted in connection with any
item mentioned in this standard. Users of this standard
are expressly advised that determination of any such
patent rights or copyrights, and the risk of infringement
of such rights, are entirely their own responsibility.
Copyright by SEMI® (Semiconductor Equipment and Materials
International), 3081 Zanker Road, San Jose, CA 95134. Reproduction o
f
the contents in whole or in part is forbidden without express written
consent of SEMI.
SEMI G75.12-0698 © SEMI 19981
SEMI G75.12-0698
TEST METHOD FOR MEASUREMENT OF BREAKDOWN STRENGTH
OF LEADFRAME TAPE
1 Summary of Method
1.1 An increasing voltage is applied between
electrodes placed on both sides of the leadframe tape
until breakdown, a large increase in current and voltage
collapse, is observed.
2 Equipment
2.1 Power Source — DC High Voltage Generator (50
kv capability)
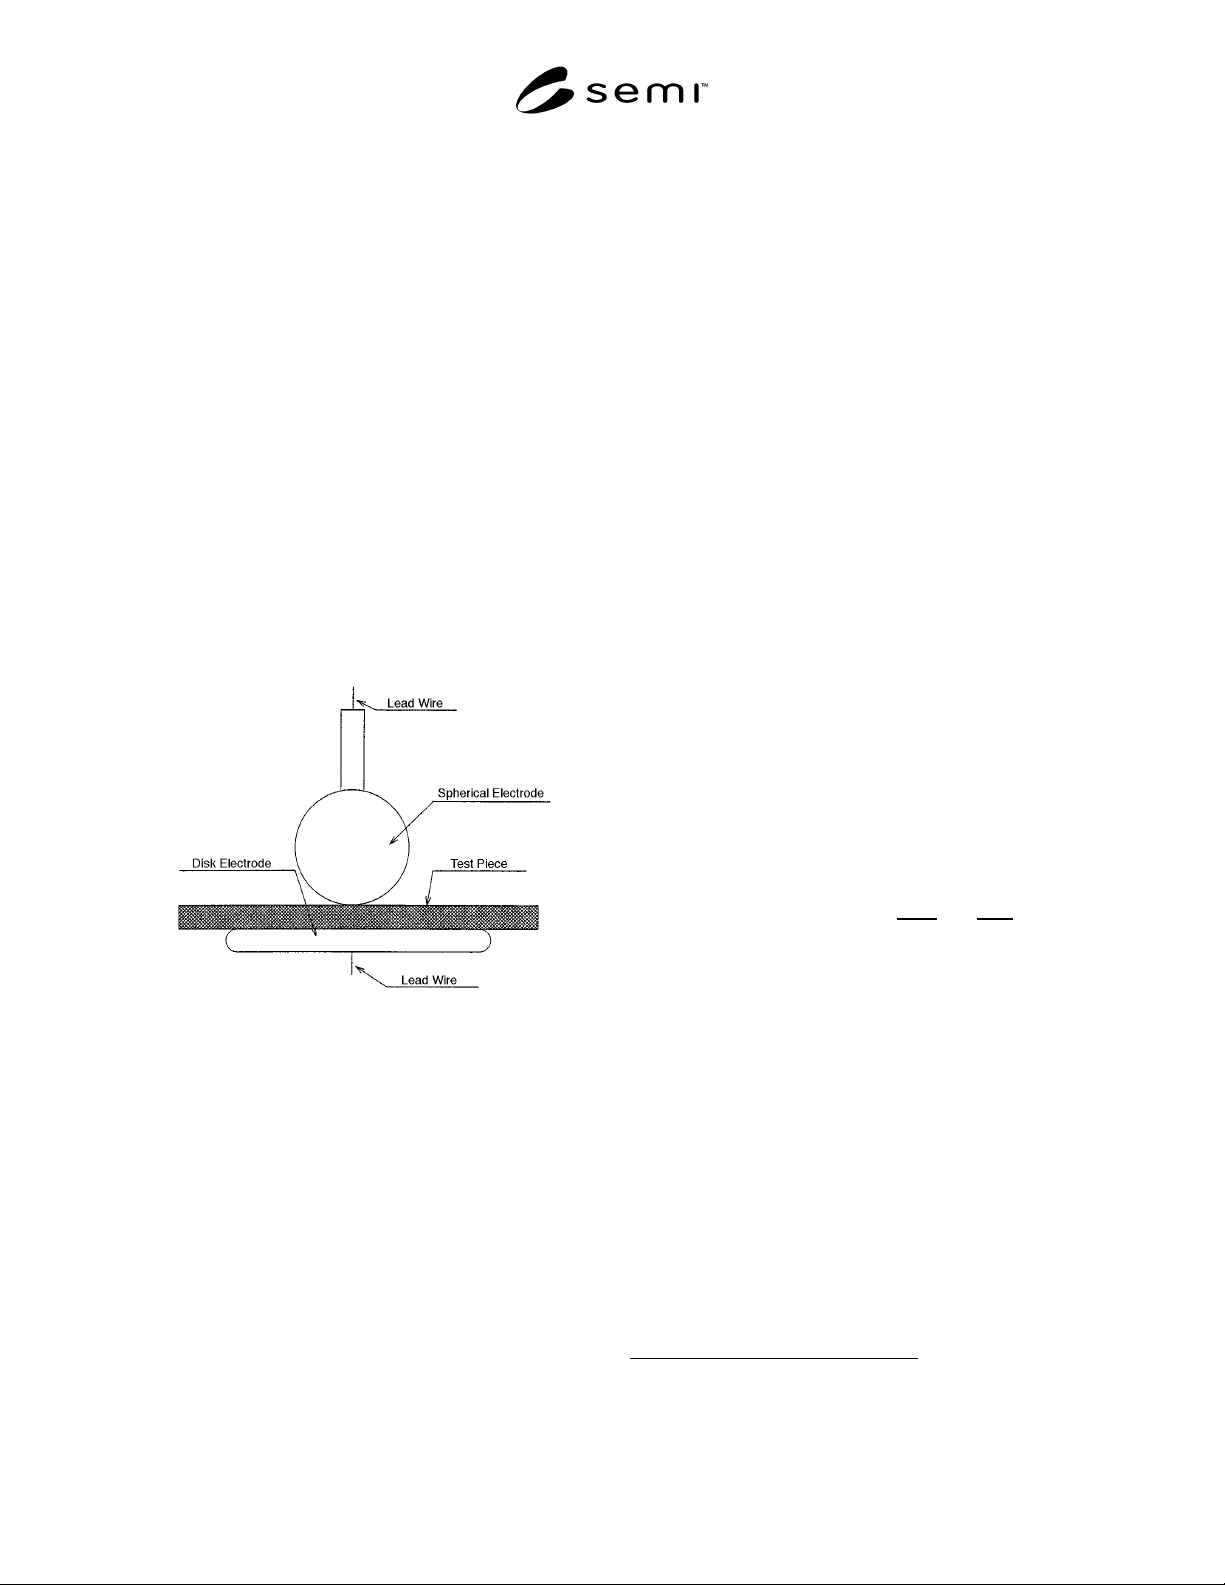
2.2 Electrodes — A brass spherical electrode with a
diameter of 12.5 mm and a brass electrode with a
diameter of 25 mm, which peripheral edges being
rounded off to a radius of 2.5 mm. (See Figure 1.)
2.3 Micrometer — Accuracy 0.001 mm
Figure 1
Electrodes for Measurement of Breakdown Strength
3 Sampling
3.1 The sampling is one sample per one lot. The
vendor must report the definition of lot, if customer
requires it.
4 Preparation of Specimens
4.1 Cut the specimens from the tape samples so that
the size of the specimens is larger than the diameter of
the disk electrode.
4.2 The specimens shall be stabilized in 23° ± 5°C and
50 ± 5% RH for 90 ± 2 hrs.
5 Test Conditions
5.1 Temperature — 23° ± 5°C
5.2 Relative Humidity — 50 ± 5% RH
6 Procedure
6.1 Place the specimens on the disk electrode and
place the spherical electrode on the top of the tape.
Ensure good contact between electrodes and tape.
6.2 Setup Specimen
6.2.1 Turn on the voltage supply and increase the
voltage with constant ramp, until breakdown occurs.
NOTE 1: Note the voltage at breakdown. In subsequent
specimens, arrange the voltage ramp so that the breakdown
occurs approximately within 10–20 seconds after the
beginning of voltage application.
6.3 Repeat the measurements for all the specimens.
6.4 Measure the thickness of the specimens using the
micrometer.
6.5 Calculations
6.5.1 Breakdown strength should be calculated by the
following equation:
Dielectric Strength
kv
mm
ℜ
Υ
ℜ
ℜ
=
V
B
D
t
where :
V
B
d
=
Breakdown voltage (kv)
t
=
tape thickness (mm)
7 Related Documents
7.1 ASTM Specification
1
ASTM D 257 — Standard Test Methods for D-C
Resistance or Conductance of Insulating Materials
1 American Society of Testing and Materials, 100 Barr Harbor Drive,
West Conshohoken, PA 19428-2959 (all cited standards may be
found in Volume 10.05 of the Annual Book of ASTM Standards)